In this tutorial, we will learn how to create a Python package, but before we dive in, what is the benefit of creating a Python package?
It’s helpful for others: Packaging your code and/or data into a Python package facilitates the distribution, sharing, and reproducibility of your work to others. In practice, very few people will want to use or build upon your work if it cannot be easily installed.
It’s helpful for yourself: Creating a Python package also has huge benefits for you and can greatly expedite your own personal workflow. These benefits include:
Reusability: A Python package allows you to quickly reuse your code from one project in another project without having to dig up old scripts and figure out how to install all the old dependencies. Instead, you can easily load in your package via import pkg_name and immediately start using the functions.
Ease of documentation and testing: Python packages have convenient built-in tools for documenting your code and writing tests. Your future self will greatly appreciate the time you took to document how to use your functions (e.g., that you created years ago). In addition, writing tests for your functions can help you to catch bugs and prevent yourself from introducing bugs if you make changes to that function.
Withstanding the test of time: Ultimately, packaged code is generally more robust and reliable than ad hoc scripts, which might break when you update Python or your packages. By packaging your code, you can ensure that it will continue to work in the future.
Python Package Development Outline
To create a Python package, we will proceed through the following steps:
To begin, let’s create a new GitHub repository for our package. Using GitHub is a great way to share your package with others and to keep track of changes to your package over time with version control.
Click on the green “New” button in the top left corner.
Choose a name for your package/repository (e.g., mypypackage).
Choose whether you want your package to be public or private. (This can be changed later.)
Under “Add .gitignore”, choose the “Python” template.
Click on the green “Create repository” button.
Clone the repository to your local machine via one of the following ways:
Using the command line: Copy the URL of your repository and type git clone <URL> in your terminal.
Using GitHub Desktop: Click on the green “Code” button and then click on “Open with GitHub Desktop”.
Using GitKraken: Open GitKraken, click on “Clone a repo”, and paste the URL of your repository.
2 Initialize Package Structure
In general, Python packages must be organized according to a specific structure. Luckily, the cookiecutter Python package has a convenient template that we can use to set up the basic package structure. If you have not already installed cookiecutter on your system, you can do so by running the following code in your terminal:
pip install cookiecutter
To next populate your newly-created GitHub repository with the basic Python package structure:
Navigate to yourmypypackagedirectory in your terminal:
cd path/to/mypypackage
Create the scaffold of your Python package using the cookiecutter command in your terminal:
And follow the prompts to fill in the package metadata, e.g.,
author_name: Your name
package_name: mypypackage
python_version: 3.11
open_source_license: 1 - MIT
include_github_actions: 2 - ci (to be discussed later)
This will create the basic package structure in the mypypackage/mypypackage/ directory. However, typically, we don’t want this nested package structure, so we will move the contents of the inner mypypackage directory to the outer mypypackage directory to avoid having a nested package structure.
Move the contents of the innermypypackagedirectory to the outer mypypackagedirectory to avoid having a nested package structure.
In your mypypackage/ directory, you can now see that several files and folders have been created in your package:
REAMDE.md: contains a brief overview of your package, how to install it, and how to use it. This file is the first thing that others will see when they visit your GitHub repository.
pyproject.toml: a file that contains metadata about your package.
LICENSE: a license file (if specified in the cookiecutter prompts).
src/mypypackage/: a directory that will contain the Python functions in your package.
docs/: a directory that will contain documentation for your package website.
tests/: a directory that will contain your unit tests.
And other files that are nice-to-haves:
CONTRIBUTING.md: a file that outlines how others can contribute to your package.
CONDUCT.md: a file that outlines the code of conduct for your package.
CHANGELOG.md: a file that outlines the changes made to your package over time.
This concludes the initial setup of your Python package and would be a good time to commit your changes to your GitHub repository.
3 Add and Document Functions
At this point, our package, while operational, is useless since we have not yet added any functions to our package.
To add functions to your package, you simply need to create a new Python script in the src/mypypackage/ directory of your package and add your function(s) there.
As an example of this, we are going to add a function that creates a pair plot between multiple variables. This function is similar to the pairplot() function in the seaborn Python package. However, unlike the seaborn function, our function shows correlations between quantiative variables in the upper triangle of the plot, boxplots instead of scatter plots for categorical variables, and a frequency heatmap for pairs of categorical variables.
Go to Canvas and download the plot.py file from the “Files” section under “Package Code”.
Move the plot.py file to the src/mypypackage/ directory of your package.
The plot_pairs() function in the plot.py file has also been documented using a docstring, following the numpydoc style. Generally, you should document the following for each function:
A short description of what the function does.
The function’s arguments (under Paramaters).
The function’s return value (under Returns).
Examples of how to use the function (under Examples).
Example of function documentation using numpydoc style
Once you’ve written the function docstring, you can view the documentation for the function in the Python console by running the following code:
Show Code
# must activate the virtual environment that contains your package first# in terminal, navigate to the mypypackage/ directory and run: poetry run python# after importing the function, you can view the documentation for the functionfrom mypypackage.plot import plot_pairshelp(plot_pairs)
4 Manage Dependencies
After adding our desired functions, we may need to add/update the dependencies for our package. In other words, our functions typically depend on other packages (or use functions from other packages). When developing a package, it is necessary to specify these dependencies so that these package dependencies are automatically installed when someone installs our package. After all, without these package dependencies, our functions will not work.
To add dependencies to your package, we will use poetry, a Python package manager that is commonly used for managing Python packages and dependencies. If you have not already installed poetry on your system, you can do so by running the following code in your terminal:
pip install poetry
Then using poetry to add the dependencies to your package, you can run the following code in your terminal:
cd path/to/mypypackagepoetry add matplotlib seaborn
This will add matplotlib and seaborn as dependencies to your package (see the [tool.poetry.dependencies] section in the updated pyproject.toml file).
This concludes all of the “required” steps for creating a Python package. Still, there are some further best practices and simple steps that we can take to spruce up our package.
5 Write Tests
Regardless of whether you are creating a Python package or not, it is generally a good idea to write tests for your functions. While it may seem tedious and time-consuming at first, writing tests now can save you time in the long run by ensuring that your functions continue to work as expected as you make changes to your package. In fact, as we write new functions, we often call the function in the console to check that it works as expected (e.g,. the result itself is as expected or the structure/shape makes sense). These manual checks can be easily turned into tests in your testing suite. The beauty of creating such a testing suite is that you can automatically run all your tests with a single command.
In Python, the pytest framework is one of the go-to testing frameworks for writing and running tests. To add pytest to your package, you can run the following code in your terminal:
poetry add --group dev pytest
This will add pytest as a development dependency to your package (see the [tool.poetry.group.dev.dependencies] section in the updated pyproject.toml file). Note that we added pytest as a development dependency (i.e., --group dev) since we only need pytest for testing our package and not for using our package.
For an example of a test file, check out the test_plot.py file on Canvas under the “Package Code” folder and move it to the tests/ directory of your package. This file contains a test for the plot_pairs() function that we added earlier.
To run all the tests in your testing suite, you can run the following code in your terminal:
# may also need to run `poetry install` before the line of code belowpoetry run pytest tests/
6 Test-Drive our Python package
As you are developing your package, you may want to load your package into the current Python environment and use your functions. This can be done by running the following in your terminal:
poetry install
This creates a virtual environment and lock file that contains your package and its dependencies. Note also that this command will install your package in “editable” mode, meaning that it installs a link to your package’s code on your computer (rather than installing it as a independent piece of software). As a result, this means that any edits made to the package’s source code are immediately available the next time it is imported, without having to run poetry install again.
After running poetry install once, you can run python using poetry’s virtual environment by running the following in your terminal:
poetry run python
This opens a Python console (using the package’s virtual environment) where you can import your package and use your functions as you would with any other Python package, e.g.,
from mypypackage.plot import plot_pairsplot_pairs(...)
7 Create a Package Website
Creating a website for your package can be a great way to showcase your package and to provide additional information and resources for users. This certainly is not a requirement for creating a Python package, but because it is incredibly simple to make using the sphinx Python package, we will make one here.
To install sphinx for your package, you can run the following code in your terminal:
poetry add --group dev sphinx
We also need a few extensions to sphinx to make our website look nice and to automatically generate documentation from our Python code. To install these extensions, you can run the following code in your terminal:
poetry add --group dev myst-nb sphinx-autoapi sphinx-rtd-theme
Then, to build the website locally, you can run the following code in your terminal:
poetry run make html --directory docs/
This will create/update the website files in the docs/ directory of your package. To view the website, you can open the docs/_build/html/index.html file in your browser.
However, this website is not so useful if it is not hosted online. To host your package website online, we will take advantage of GitHub Pages, a free service that allows you to host static websites directly from a GitHub repository. In fact, every GitHub repository can have its own GitHub Pages website.
As part of the next section, we will set up a website for our package using GitHub Pages to host it publicly and GitHub Actions to automatically update the website every time we push new changes to our repository.
8 Add GitHub Actions
Some of the tasks when building a package (e.g., running the tests, building documentation and the package website) are very monotonous and can be automated. GitHub Actions is a continuous integration (CI) service that can be used to automate these tasks every time we push new changes to our GitHub repository. This can be a great way to ensure that your (possibly public-facing) package is always in a working state.
Recall that in the cookiecutter setup, we responded 2 - ci to the include_github_actions prompt. This created a .github/ directory in our package that contains a workflows/ directory with a ci.yaml file. This workflow file specifies the tasks (i.e., installation, testing, testing coverage, and building documentation) that we want to run every time we push new changes to our repository.
However, there’s one additional step we need to take to ensure that this GitHub Action runs successfully. Specifically, to run the pytest --cov and codecov task in the ci.yaml file, you will need to add some additional development dependency to your package by running the following code in your terminal:
poetry add --group dev pytest-cov codecov
To put this GitHub Action into action, we need to push the workflow files to GitHub. Then to see the results of this automated workflow, you can go to the “Actions” tab of your GitHub repository and click on the most recent workflow run. If this workflow runs without any errors, you will see a green dot next to the workflow run. This means that the installation, testing, testing coverage, and building documentation tasks ran successfully.
Lastly, if we would like to automate the deployment of the package website using GitHub Actions, we can take the following additional steps:
Add the following code to the end of the ci.yaml file:
This will move and push all of the built documentation files to the gh-pages branch of your repository.
To successfully run the task in (A) with GitHub Actions, we also need to allow GitHub Actions permission to read and write to our repository: Go to your GitHub repository, click on “Settings” > “Actions” > “General” > Set “Workflow permissions” to “Read and write permissions”, and save.
Tell GitHub Pages where to look for your website (i.e., index.html) by going to your GitHub repository, clicking on “Settings” and then “Pages” (on the left), and setting:
Source: “Deploy from a branch”
Branch: “gh-pages”
Directory: “/ (root)”
After saving these settings, your package website should be live at https://<username>.github.io/<repository_name>. For easy access, you can also add a link to your package website in your GitHub repository’s homepage by clicking on the gear icon to the right of the “About” section and toggling on the “Use your GitHub Pages website”.
Voila! We have a fully-fledged Python package and a website to show for it. And by the way, we never have to worry about updating the website again; it will automatically update every time we push new changes to our repository.
9 Installing your Package
Now that we have a fully-fledged Python package, if you or others want to install your package directly from GitHub, you can do so by running the following code in your terminal:
This will install the latest version of your package from GitHub, and assuming your repository is public, others can also install your package using this code.
You also have the option to install your package from your local directory by running the following code in your terminal:
pip install path/to/mypypackage
Congratulations! You have successfully created an open-source Python package and have made it available to the world.
Summary
Summarizing the main steps in creating a Python package:
Set up a GitHub repository to host your package.
Initialize the basic Python package structure using a cookiecutter template:
Add and document functions to your package by creating Python scripts in the src/<pkg_name> directory and documenting your functions using the numpydoc style
Manage and specify package dependencies using poetry add ....
Write tests for your functions using the pytest framework.
How to install and use your package: As you are actively developing your Python package, you can “test-drive” your package using poetry install. When the package is in a more stable state and you would like to properly build and install the package, you can install the package from your local directory using pip install path/to/mypypackage or from GitHub using pip install mypypackage@git+https://github.com/[username]/mypypackage. This GitHub version is also the version that others would install if they wanted to use your package. After installing, you can import your package as usual using import mypypackage and use your functions as you would with functions from other Python packages.
---title: "Developing a Python Package"author: "Prof. Tiffany Tang"date: todayformat: html: theme: sandstone lightbox: true # theme: yeti embed-resources: falsetoc: truenumber-sections: truejupyter: python3execute: warning: false message: false eval: false---# Why Create a Python Package? {.unnumbered}<center><video controls width="600"> <source src="videos/00-python_package_intro.mp4" type="video/mp4"></video></center>In this tutorial, we will learn how to create a Python package, but before we dive in, what is the benefit of creating a Python package?1. **It's helpful for others**: Packaging your code and/or data into a Python package facilitates the distribution, sharing, and reproducibility of your work *to others*. In practice, very few people will want to use or build upon your work if it cannot be easily installed.2. **It's helpful for yourself**: Creating a Python package also has huge benefits for *you* and can greatly expedite your own personal workflow. These benefits include: - **Reusability**: A Python package allows you to quickly reuse your code from one project in another project without having to dig up old scripts and figure out how to install all the old dependencies. Instead, you can easily load in your package via `import pkg_name` and immediately start using the functions. - **Ease of documentation and testing**: Python packages have convenient built-in tools for documenting your code and writing tests. Your future self will greatly appreciate the time you took to document how to use your functions (e.g., that you created years ago). In addition, writing tests for your functions can help you to catch bugs and prevent yourself from introducing bugs if you make changes to that function. - **Withstanding the test of time**: Ultimately, packaged code is generally more robust and reliable than ad hoc scripts, which might break when you update Python or your packages. By packaging your code, you can ensure that it will continue to work in the future.# Python Package Development Outline {.unnumbered}To create a Python package, we will proceed through the following steps:**Core (required) steps**:1. Set up a GitHub repository to host your package.2. Initialize the basic Python package structure.3. Add and document functions in your package.4. Manage and specify package dependencies.**Other package development tools**:5. Writing tests for your functions.6. Test-driving your package.7. Creating a package website.8. Adding GitHub Actions for automation.9. Installing your package.The resulting R package from this tutorial can be found at [https://github.com/tiffanymtang/mypypackage](https://github.com/tiffanymtang/mypypackage).# Set up GitHub<center><video controls width="600"> <source src="videos/01-python_package_github.mp4" type="video/mp4"></video></center>To begin, let's create a new GitHub repository for our package. Using GitHub is a great way to share your package with others and to keep track of changes to your package over time with version control.A. Go to [GitHub](https://github.com/) and log in.B. Click on the green "New" button in the top left corner.C. Choose a name for your package/repository (e.g., `mypypackage`).D. Choose whether you want your package to be public or private. (This can be changed later.)E. Under "Add .gitignore", choose the "Python" template.F. Click on the green "Create repository" button.G. Clone the repository to your local machine via one of the following ways: i. Using the command line: Copy the URL of your repository and type `git clone <URL>` in your terminal. ii. Using GitHub Desktop: Click on the green "Code" button and then click on "Open with GitHub Desktop". iii. Using GitKraken: Open GitKraken, click on "Clone a repo", and paste the URL of your repository.# Initialize Package Structure<center><video controls width="600"> <source src="videos/02-python_package_setup.mp4" type="video/mp4"></video></center>In general, Python packages must be organized according to a specific structure. Luckily, the [`cookiecutter`](https://cookiecutter.readthedocs.io/en/stable/) Python package has a convenient template that we can use to set up the basic package structure. If you have not already installed `cookiecutter` on your system, you can do so by running the following code in your terminal:```bashpip install cookiecutter```To next populate your newly-created GitHub repository with the basic Python package structure:A. **Navigate to your** `mypypackage` **directory** in your terminal: ```bash cd path/to/mypypackage ```B. **Create the scaffold** of your Python package using the `cookiecutter` command in your terminal: ```bash cookiecutter https://github.com/py-pkgs/py-pkgs-cookiecutter.git ``` And follow the prompts to fill in the package metadata, e.g., - `author_name`: Your name - `package_name`: mypypackage - `python_version`: 3.11 - `open_source_license`: 1 - MIT - `include_github_actions`: 2 - ci (to be discussed later) This will create the basic package structure in the `mypypackage/mypypackage/` directory. However, typically, we don't want this *nested* package structure, so we will move the contents of the inner `mypypackage` directory to the outer `mypypackage` directory to avoid having a nested package structure.C. **Move the contents of the inner** `mypypackage` **directory** to the outer `mypypackage` **directory** to avoid having a nested package structure. ```bash mv mypypackage/* . mv mypypackage/.* . rm -r mypypackage ```In your `mypypackage/` directory, you can now see that several files and folders have been created in your package: - `REAMDE.md`: contains a brief overview of your package, how to install it, and how to use it. This file is the first thing that others will see when they visit your GitHub repository. - `pyproject.toml`: a file that contains metadata about your package. - `LICENSE`: a license file (if specified in the `cookiecutter` prompts). - `src/mypypackage/`: a directory that will contain the Python functions in your package. - `docs/`: a directory that will contain documentation for your package website. - `tests/`: a directory that will contain your unit tests.And other files that are nice-to-haves: - `CONTRIBUTING.md`: a file that outlines how others can contribute to your package. - `CONDUCT.md`: a file that outlines the code of conduct for your package. - `CHANGELOG.md`: a file that outlines the changes made to your package over time.This concludes the initial setup of your Python package and would be a good time to commit your changes to your GitHub repository.# Add and Document Functions<center><video controls width="600"> <source src="videos/03-python_package_adding_functions.mp4" type="video/mp4"></video></center>At this point, our package, while operational, is useless since we have not yet added any functions to our package.To add functions to your package, you simply need to create a new Python script in the `src/mypypackage/` directory of your package and add your function(s) there.As an example of this, we are going to add a function that creates a pair plot between multiple variables. This function is similar to the `pairplot()` function in the `seaborn` Python package.However, unlike the `seaborn` function, our function shows correlations between quantiative variables in the upper triangle of the plot, boxplots instead of scatter plots for categorical variables, and a frequency heatmap for pairs of categorical variables.A. Go to Canvas and download the `plot.py` file from the "Files" section under "Package Code".B. Move the `plot.py` file to the `src/mypypackage/` directory of your package.The `plot_pairs()` function in the `plot.py` file has also been documented using a docstring, following the [numpydoc](https://numpydoc.readthedocs.io/en/latest/format.html#docstring-standard) style. Generally, you should document the following for each function:- A short description of what the function does.- The function's arguments (under `Paramaters`).- The function's return value (under `Returns`).- Examples of how to use the function (under `Examples`).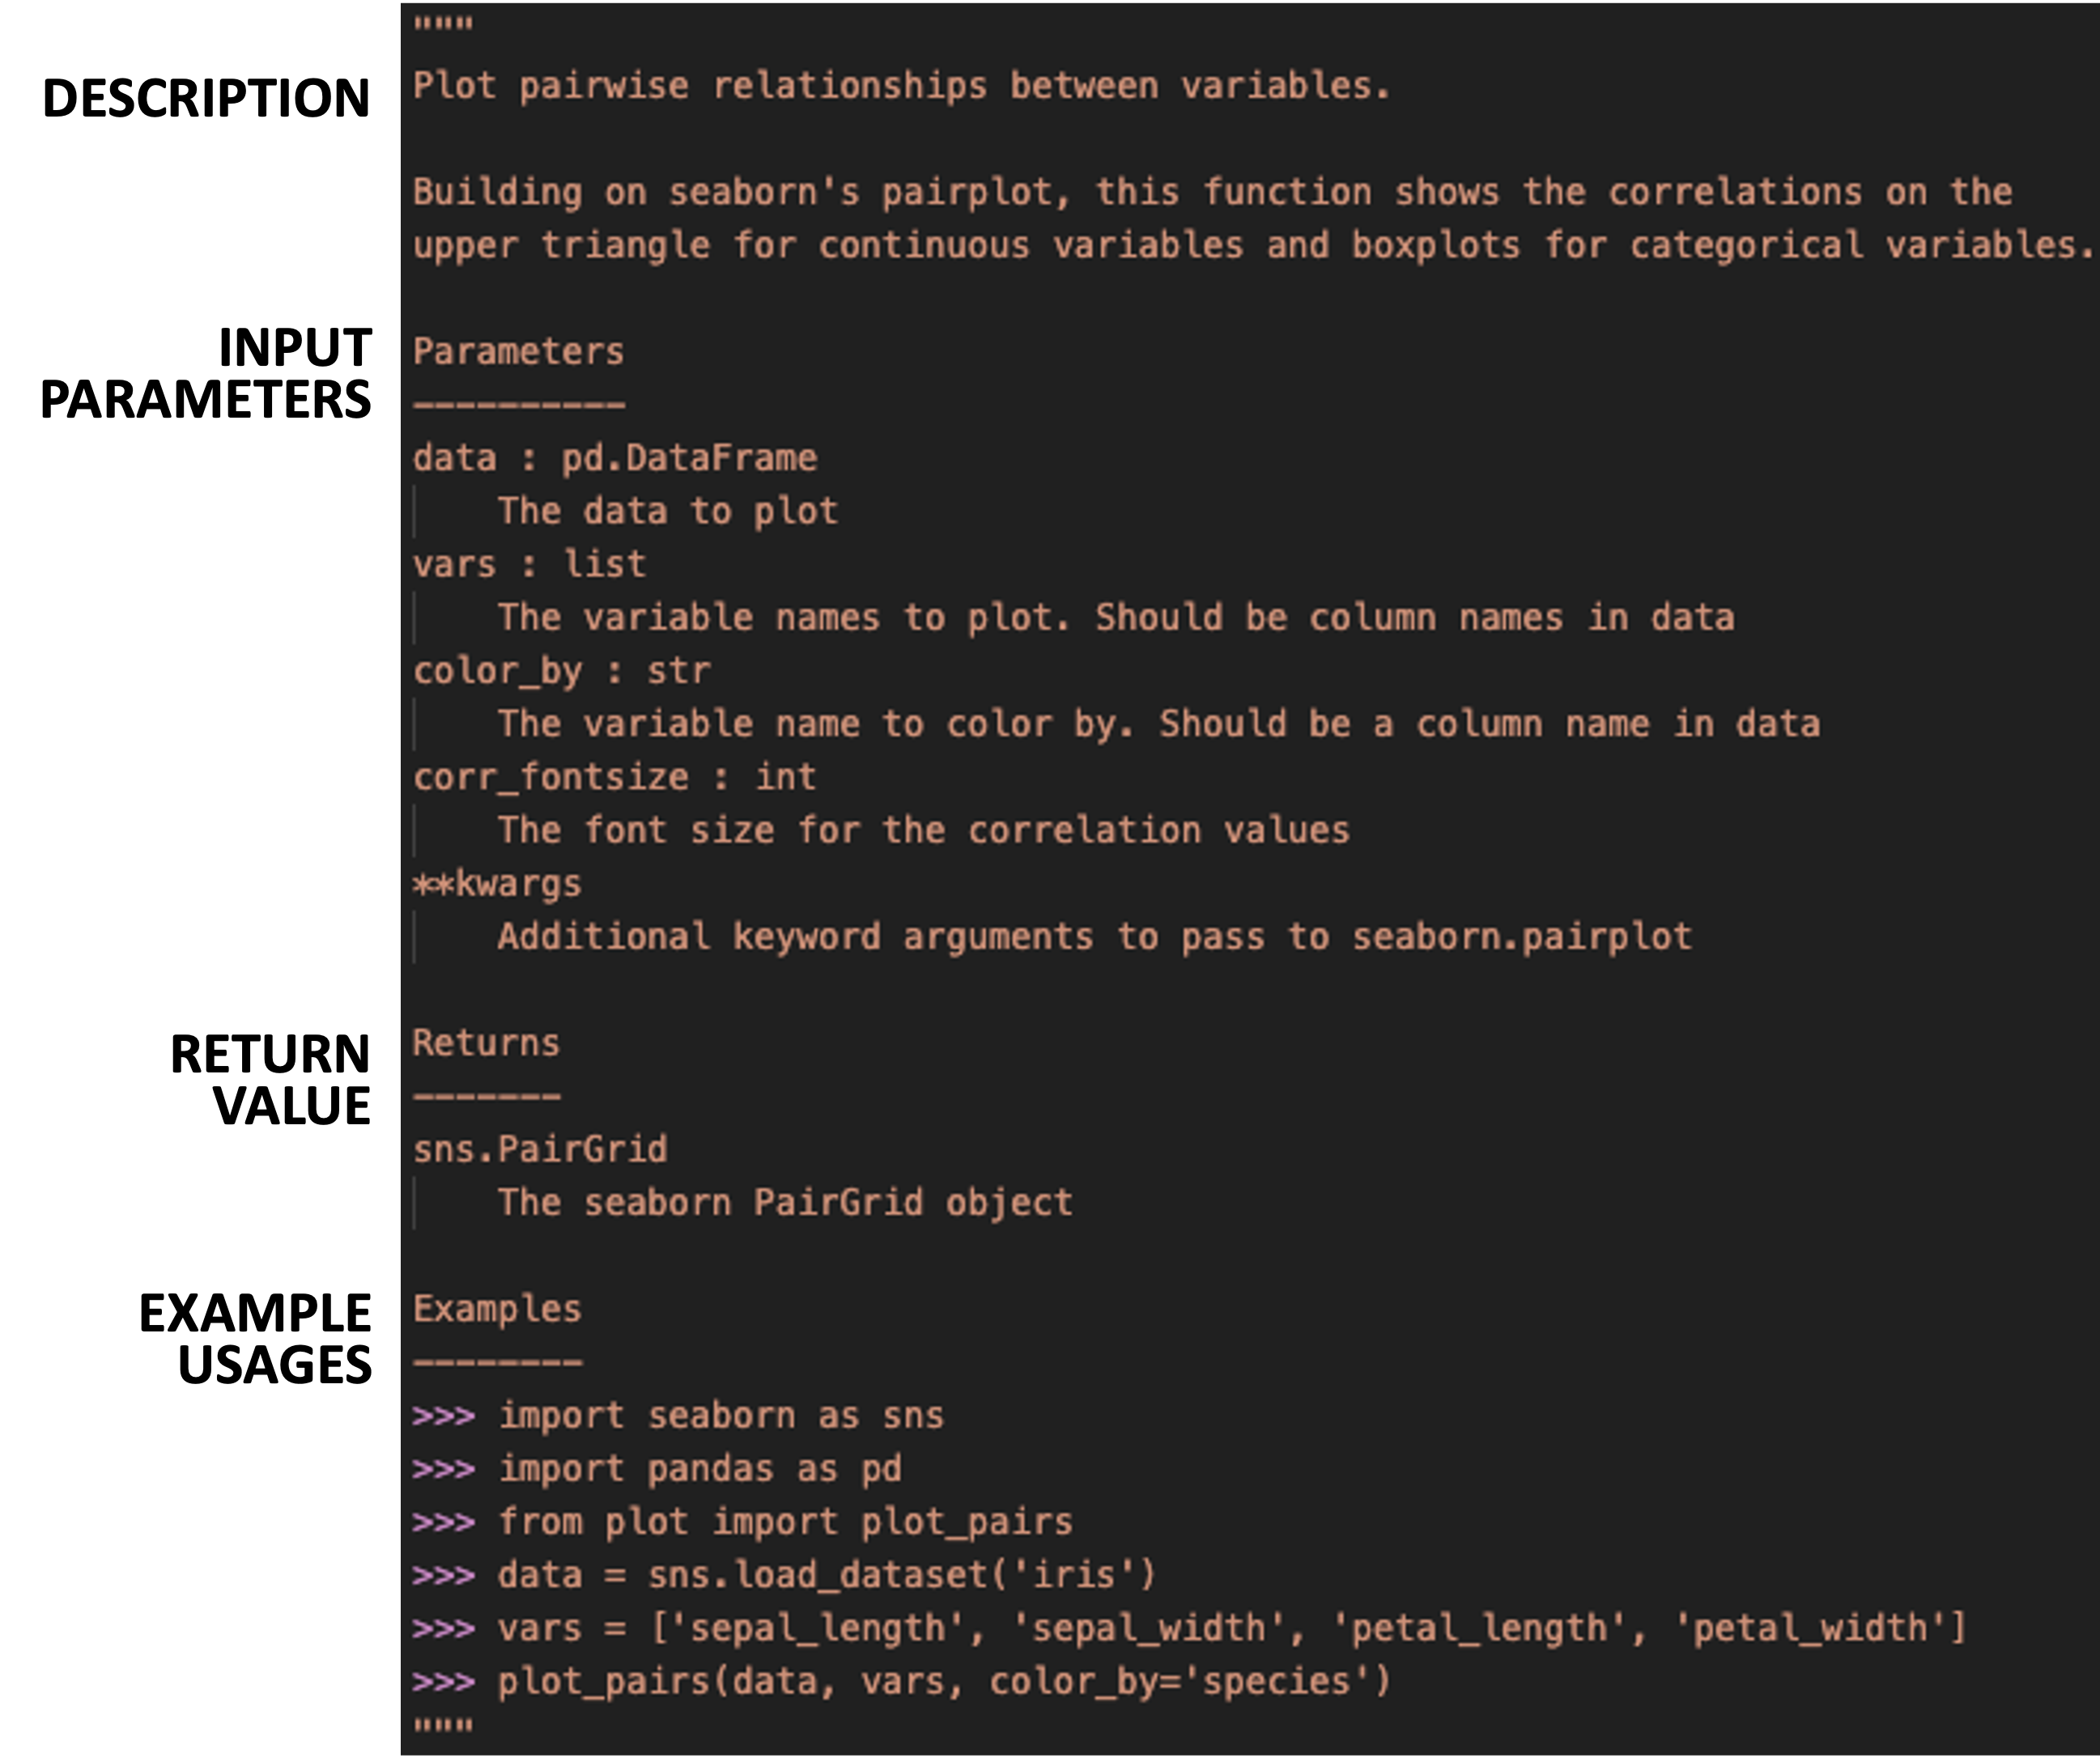Once you've written the function docstring, you can view the documentation for the function in the Python console by running the following code:```{python}# must activate the virtual environment that contains your package first# in terminal, navigate to the mypypackage/ directory and run: poetry run python# after importing the function, you can view the documentation for the functionfrom mypypackage.plot import plot_pairshelp(plot_pairs)```# Manage Dependencies<center><video controls width="600"> <source src="videos/04-python_package_dependencies.mp4" type="video/mp4"></video></center>After adding our desired functions, we may need to add/update the dependencies for our package. In other words, our functions typically *depend* on other packages (or use functions from other packages). When developing a package, it is necessary to specify these dependencies so that these package dependencies are automatically installed when someone installs our package. After all, without these package dependencies, our functions will not work.To add dependencies to your package, we will use [`poetry`](https://python-poetry.org/), a Python package manager that is commonly used for managing Python packages and dependencies. If you have not already installed `poetry` on your system, you can do so by running the following code in your terminal:```bashpip install poetry```Then using `poetry` to add the dependencies to your package, you can run the following code in your terminal:```bashcd path/to/mypypackagepoetry add matplotlib seaborn```This will add `matplotlib` and `seaborn` as dependencies to your package (see the `[tool.poetry.dependencies]` section in the updated `pyproject.toml` file).This concludes all of the "required" steps for creating a Python package. Still, there are some further best practices and simple steps that we can take to spruce up our package.# Write Tests<center><video controls width="600"> <source src="videos/05-python_package_testing.mp4" type="video/mp4"></video></center>Regardless of whether you are creating a Python package or not, it is generally a good idea to write tests for your functions. While it may seem tedious and time-consuming at first, writing tests now can save you time in the long run by ensuring that your functions continue to work as expected as you make changes to your package. In fact, as we write new functions, we often call the function in the console to check that it works as expected (e.g,. the result itself is as expected or the structure/shape makes sense). These manual checks can be easily turned into tests in your testing suite. The beauty of creating such a testing suite is that you can automatically run all your tests with a single command.In Python, the [`pytest`](https://docs.pytest.org/en/stable/) framework is one of the go-to testing frameworks for writing and running tests. To add `pytest` to your package, you can run the following code in your terminal:```bashpoetry add --group dev pytest```This will add `pytest` as a development dependency to your package (see the `[tool.poetry.group.dev.dependencies]` section in the updated `pyproject.toml` file). Note that we added `pytest` as a development dependency (i.e., `--group dev`) since we only need `pytest` for testing our package and not for using our package.For an example of a test file, check out the `test_plot.py` file on Canvas under the "Package Code" folder and move it to the `tests/` directory of your package. This file contains a test for the `plot_pairs()` function that we added earlier. To run all the tests in your testing suite, you can run the following code in your terminal:```bash# may also need to run `poetry install` before the line of code belowpoetry run pytest tests/```# Test-Drive our Python package<center><video controls width="600"> <source src="videos/06-python_package_testdrive.mp4" type="video/mp4"></video></center>As you are developing your package, you may want to load your package into the current Python environment and use your functions. This can be done by running the following in your terminal:```bashpoetry install```This creates a virtual environment and lock file that contains your package and its dependencies.Note also that this command will install your package in "editable" mode, meaning that it installs a link to your package’s code on your computer (rather than installing it as a independent piece of software). As a result, this means that any edits made to the package’s source code are immediately available the next time it is imported, without having to run poetry install again.After running `poetry install` once, you can run python using poetry's virtual environment by running the following in your terminal:```bashpoetry run python```This opens a Python console (using the package's virtual environment) where you can import your package and use your functions as you would with any other Python package, e.g.,```pythonfrom mypypackage.plot import plot_pairsplot_pairs(...)```# Create a Package Website<center><video controls width="600"> <source src="videos/07-python_package_website.mp4" type="video/mp4"></video></center>Creating a website for your package can be a great way to showcase your package and to provide additional information and resources for users. This certainly is not a requirement for creating a Python package, but because it is incredibly simple to make using the [`sphinx`](https://www.sphinx-doc.org/en/master/) Python package, we will make one here.To install `sphinx` for your package, you can run the following code in your terminal:```bashpoetry add --group dev sphinx```We also need a few extensions to `sphinx` to make our website look nice and to automatically generate documentation from our Python code. To install these extensions, you can run the following code in your terminal:```bashpoetry add --group dev myst-nb sphinx-autoapi sphinx-rtd-theme```Then, to build the website locally, you can run the following code in your terminal:```bashpoetry run make html --directory docs/```This will create/update the website files in the `docs/` directory of your package. To view the website, you can open the `docs/_build/html/index.html` file in your browser.However, this website is not so useful if it is not hosted online. To host your package website online, we will take advantage of GitHub Pages, a free service that allows you to host static websites directly from a GitHub repository. In fact, every GitHub repository can have its own GitHub Pages website.As part of the next section, we will set up a website for our package using GitHub Pages to host it publicly and GitHub Actions to automatically update the website every time we push new changes to our repository.# Add GitHub Actions<center><video controls width="600"> <source src="videos/08-python_package_gh_actions.mp4" type="video/mp4"></video></center>Some of the tasks when building a package (e.g., running the tests, building documentation and the package website) are very monotonous and can be automated. [GitHub Actions](https://github.com/features/actions) is a continuous integration (CI) service that can be used to automate these tasks every time we push new changes to our GitHub repository. This can be a great way to ensure that your (possibly public-facing) package is always in a working state.Recall that in the `cookiecutter` setup, we responded `2 - ci` to the `include_github_actions` prompt. This created a `.github/` directory in our package that contains a `workflows/` directory with a `ci.yaml` file.This workflow file specifies the tasks (i.e., installation, testing, testing coverage, and building documentation) that we want to run every time we push new changes to our repository.However, there's one additional step we need to take to ensure that this GitHub Action runs successfully.Specifically, to run the `pytest --cov` and `codecov` task in the `ci.yaml` file, you will need to add some additional development dependency to your package by running the following code in your terminal:```bashpoetry add --group dev pytest-cov codecov```To put this GitHub Action into action, we need to push the workflow files to GitHub. Then to see the results of this automated workflow, you can go to the "Actions" tab of your GitHub repository and click on the most recent workflow run. If this workflow runs without any errors, you will see a green dot next to the workflow run. This means that the installation, testing, testing coverage, and building documentation tasks ran successfully.Lastly, if we would like to automate the deployment of the package website using GitHub Actions, we can take the following additional steps:A. Add the following code to the end of the `ci.yaml` file: ```yaml - name: Deploy uses: peaceiris/actions-gh-pages@v4 with: personal_token: ${{ secrets.GITHUB_TOKEN }} publish_dir: ./docs/_build/html ``` This will move and push all of the built documentation files to the `gh-pages` branch of your repository.B. To successfully run the task in (A) with GitHub Actions, we also need to allow GitHub Actions permission to read and write to our repository: Go to your GitHub repository, click on "Settings" > "Actions" > "General" > Set "Workflow permissions" to "Read and write permissions", and save.C. Tell GitHub Pages where to look for your website (i.e., `index.html`) by going to your GitHub repository, clicking on "Settings" and then "Pages" (on the left), and setting: - Source: "Deploy from a branch" - Branch: "gh-pages" - Directory: "/ (root)"D. After saving these settings, your package website should be live at `https://<username>.github.io/<repository_name>`. For easy access, you can also add a link to your package website in your GitHub repository's homepage by clicking on the gear icon to the right of the "About" section and toggling on the "Use your GitHub Pages website".Voila! We have a fully-fledged Python package and a website to show for it. And by the way, we never have to worry about updating the website again; it will automatically update every time we push new changes to our repository.# Installing your Package<center><video controls width="600"> <source src="videos/09-python_package_install.mp4" type="video/mp4"></video></center>Now that we have a fully-fledged Python package, if you or others want to install your package directly from GitHub, you can do so by running the following code in your terminal:```bashpip install mypypackage@git+https://github.com/[username]/mypypackage```This will install the latest version of your package from GitHub, and assuming your repository is public, others can also install your package using this code.You also have the option to install your package from your local directory by running the following code in your terminal:```bashpip install path/to/mypypackage```Congratulations! You have successfully created an open-source Python package and have made it available to the world.# Summary {.unnumbered}Summarizing the main steps in creating a Python package:A. **Set up a GitHub repository** to host your package.B. **Initialize the basic Python package structure** using a [`cookiecutter`](https://cookiecutter.readthedocs.io/en/stable/) template: - `cookiecutter https://github.com/py-pkgs/py-pkgs-cookiecutter.git`C. **Add and document functions** to your package by creating Python scripts in the `src/<pkg_name>` directory and documenting your functions using the [numpydoc](https://numpydoc.readthedocs.io/en/latest/format.html#docstring-standard) styleD. **Manage and specify package dependencies** using `poetry add ...`.E. **Write tests** for your functions using the [`pytest`](https://docs.pytest.org/en/stable/) framework.G. **Create a package website** (optional) using [`sphinx`](https://www.sphinx-doc.org/en/master/).**How to install and use your package**: As you are actively developing your Python package, you can "test-drive" your package using `poetry install`. When the package is in a more stable state and you would like to properly build and install the package, you can install the package from your local directory using `pip install path/to/mypypackage` or from GitHub using `pip install mypypackage@git+https://github.com/[username]/mypypackage`. This GitHub version is also the version that others would install if they wanted to use your package. After installing, you can import your package as usual using `import mypypackage` and use your functions as you would with functions from other Python packages.The resulting Python package from this tutorial can be found at [https://github.com/tiffanymtang/mypypackage](https://github.com/tiffanymtang/mypypackage).# Additional Resources {.unnumbered}- [Python Packaging Textbook](https://py-pkgs.org/03-how-to-package-a-python) by Tomas Beuzen and Tiffany Timbers- [Python Packaging User Guide](https://packaging.python.org/en/latest/)- [Poetry cheatsheet](https://github.com/kyegomez/poetry-cheatsheet) by Kye Gomez
