Show Code
install.packages("usethis")
install.packages("devtools")In this tutorial, we will learn how to create an R package, but before we dive in, what is the benefit of creating an R package?
It’s helpful for others: Packaging your code and/or data into an R package facilitates the distribution, sharing, and reproducibility of your work to others. In practice, very few people will want to use or build upon your work if it cannot be easily installed.
It’s helpful for yourself: Creating an R package also has huge benefits for you and can greatly expedite your own personal workflow. These benefits include:
library(pkg_name) and immediately start using the functions.To create an R package, we will proceed through the following steps:
Core (required) steps:
Other package development tools:
The resulting R package from this tutorial can be found at https://github.com/tiffanymtang/myrpackage.
To begin, let’s create a new GitHub repository for our package. Using GitHub is a great way to share your package with others and to keep track of changes to your package over time with version control.
Go to GitHub and log in.
Click on the green “New” button in the top left corner.
Choose a name for your package/repository (e.g., myrpackage).
Choose whether you want your package to be public or private. (This can be changed later.)
Under “Add .gitignore”, choose the “R” template.
Click on the green “Create repository” button.
Clone the repository to your local machine via one of the following ways:
git clone <URL> in your terminal.In general, R packages must be organized according to a specific structure. Luckily, the usethis and devtools R packages make it very easy to set up the basic package structure and to develop R packages. If you have not already installed these packages on your system, you can do so by running the following code:
install.packages("usethis")
install.packages("devtools")To next populate your newly-created GitHub repository with the basic R package structure:
Open RStudio.
Create the scaffold of your R package by running the following code in the R console:
usethis::create_package("path/to/myrpackage/")This will create the basic package structure in the specified directory. It should have also created and opened a new RStudio project for your package. You can close the old Rstudio window and work solely in the new RStudio project, which should say “myrpackage” in the top right corner.
In this “myrpackage” project, you can see that several files and folders have been created in your myrpackage/ directory:
DESCRIPTION: Contains metadata about your package.NAMESPACE: Specifies which functions are exported from your package (not to be edited manually)..Rbuildignore: Specifies files to ignore when building the package.R/: Where you will store all your R functions in this package.Let’s update some of the metadata for our package in the DESCRIPTION file:
DESCRIPTION file in RStudio and update the package metadata. In particular, fill out the Title, Authors, and Description fields with appropriate information.Let’s also do a little more housekeeping:
Create a readme by running the following code in the R console:
usethis::use_readme_md()
# or alternatively, if you prefer to write your README in R Markdown:
# usethis::use_readme_rmd()
The README.md should provide a brief overview of your package, how to install it, and how to use it. This file is the first thing that others will see when they visit your GitHub repository (or package website).
Add a license to your package by running the following code in the R console:
usethis::use_mit_license()This concludes the initial setup of your R package and would be a good time to commit your changes to your GitHub repository.
At this point, our package, while operational, is useless since we have not yet added any functions to our package.
To add functions to your package, you simply need to create a new R script in the R/ directory of your package and add your function(s) there. Then, to make your function available to users of your package, you will also need to export your function by adding the tag #' @export above the function definition.
As an example of this, we are going to add functions that enable us to (re-)use our own custom ggplot2 color palettes.
Go to Canvas and download the ggplot-color-themes.R file from the “Files” section under “Package Code”.
Move the ggplot-color-themes.R file to the R/ directory of your package. All functions that have been tagged with #' @export will be exported with your package (i.e., these are the functions that will be available to users of your package).
The functions in the ggplot-color-themes.R file have also been documented using the roxygen2 package. This package allows you to write documentation for your functions directly above the function definition in the R script. Generally, you should document the following for each function:
@description).@param).@returns).@examples).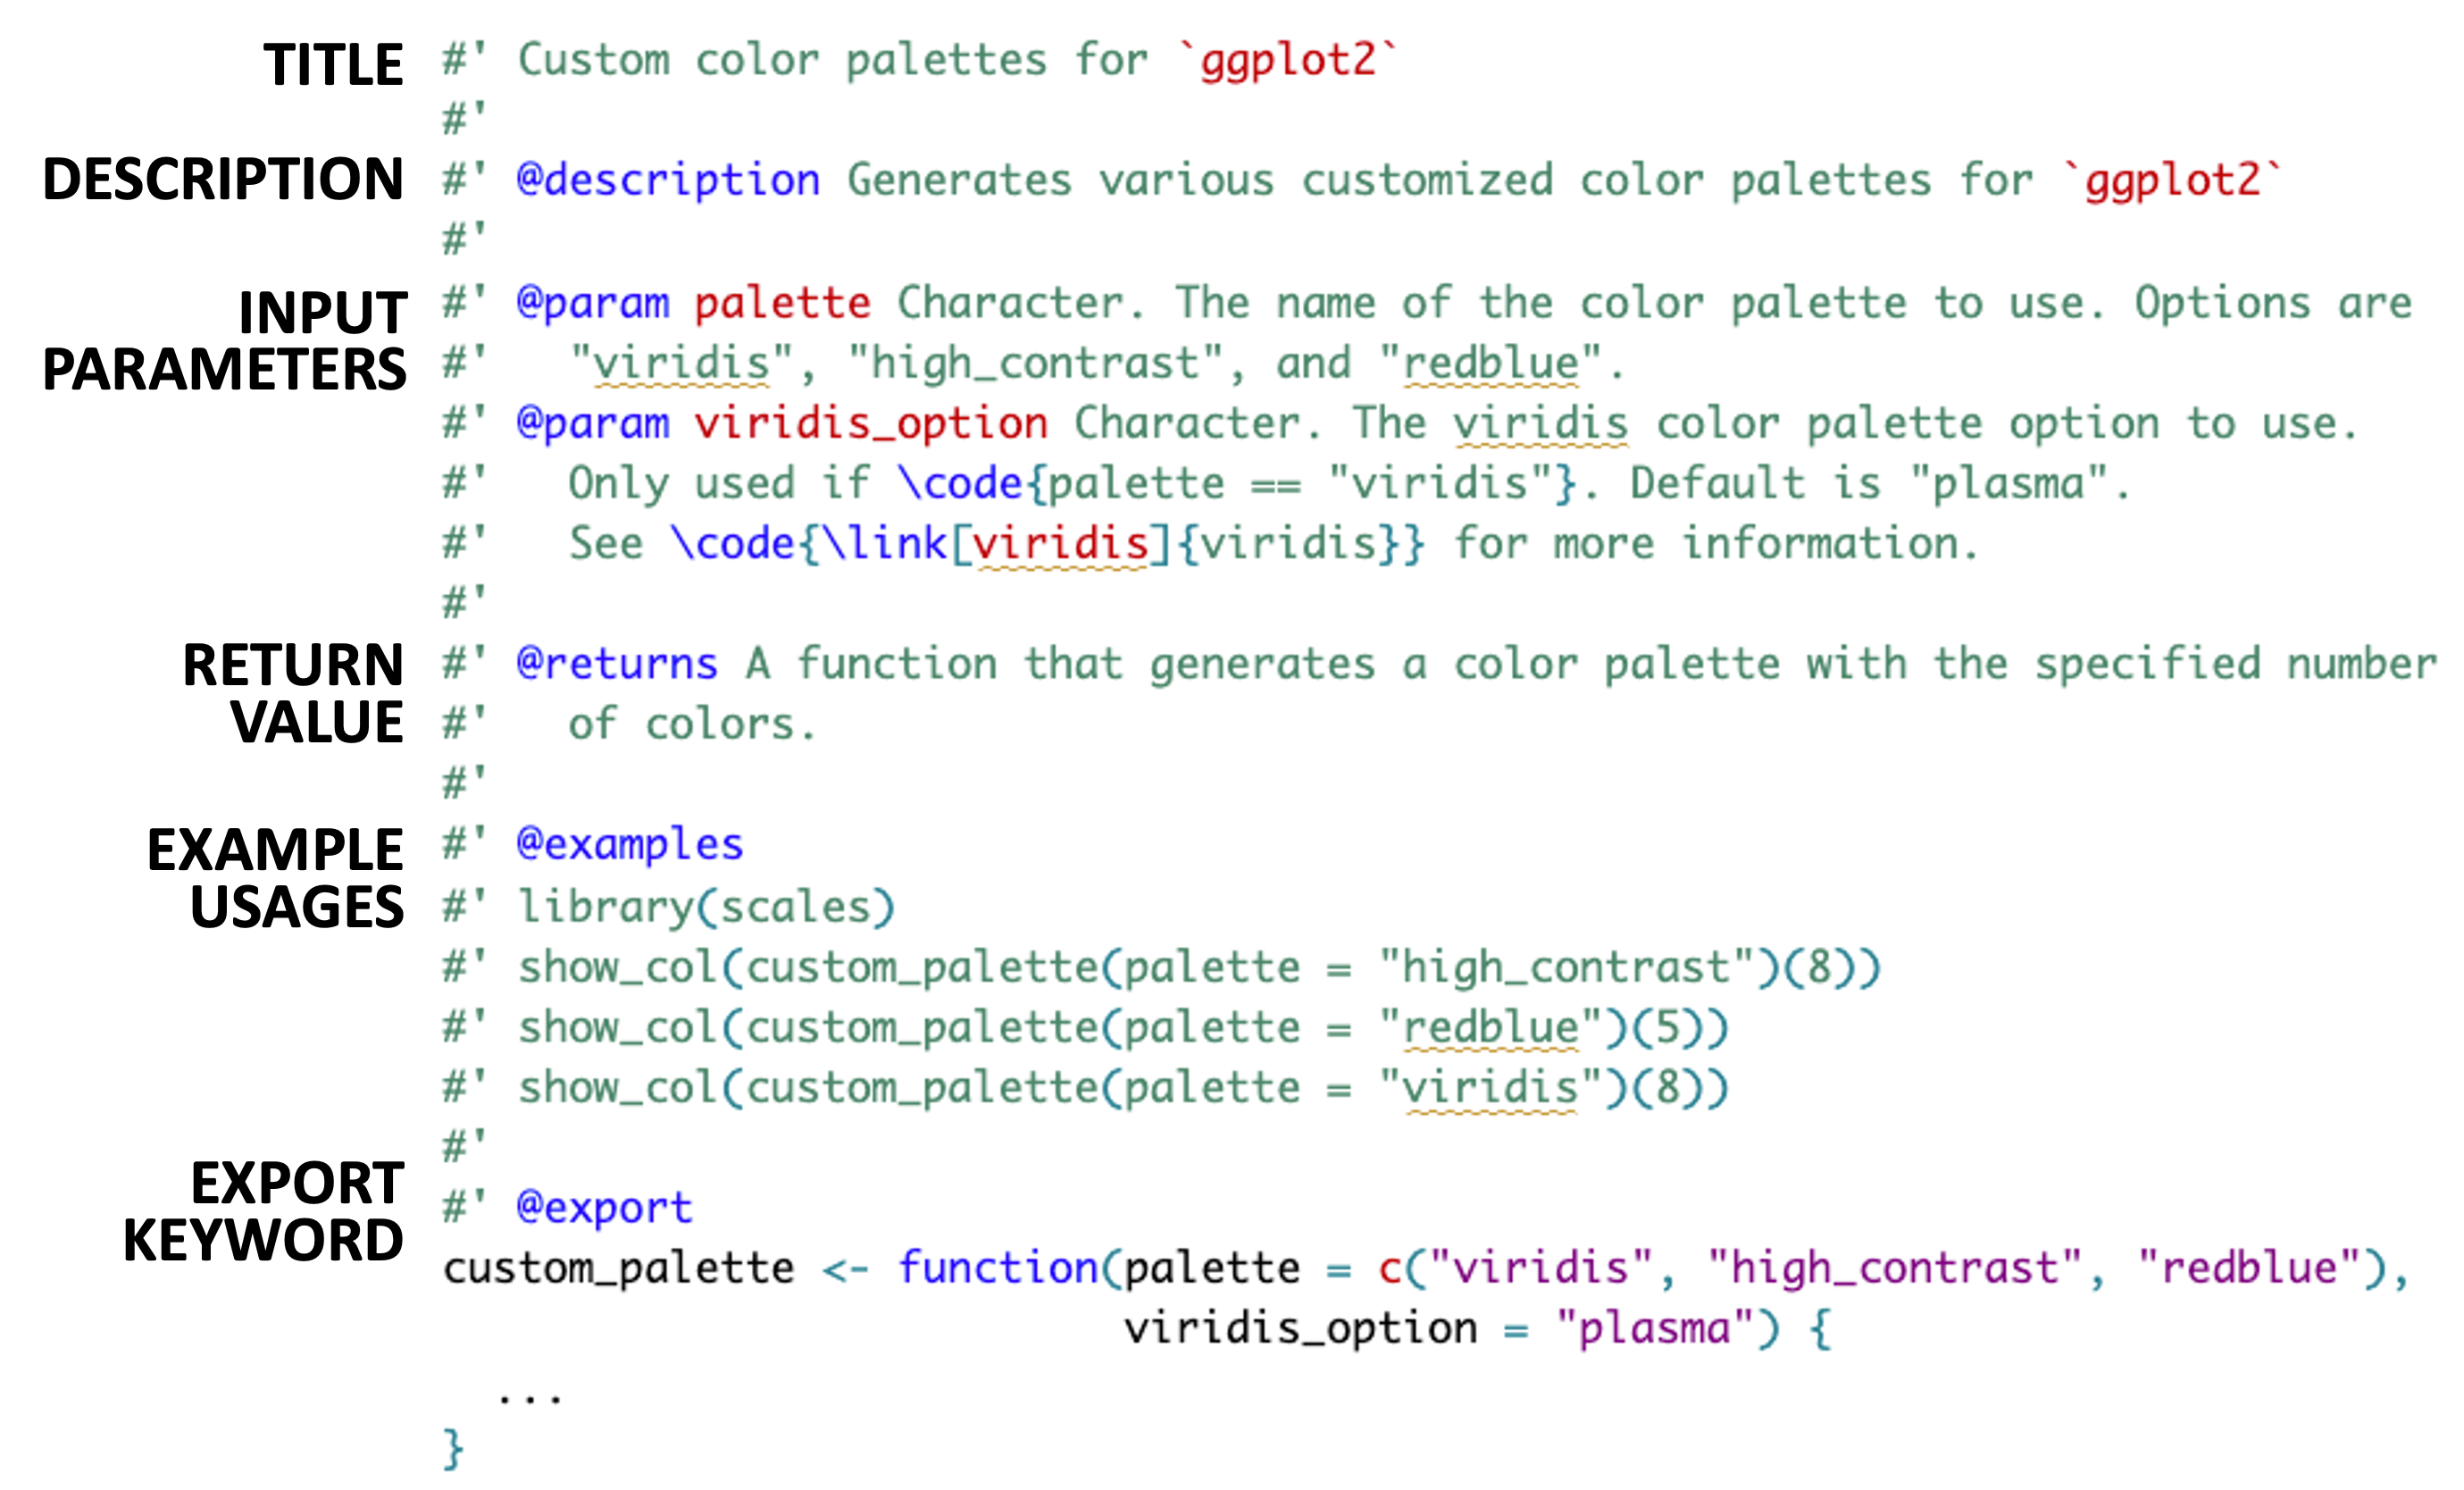
To generate the help pages and official documentation for your functions, run the following code in the R console:
devtools::document()If you open your NAMESPACE file, you should see that the exported functions from your R/ directory are now listed and are part of your package’s namespace. Additionally, this should have created a man/ directory in your package that now contains the documentation (.Rd files) for your functions.
After updating your package/function documentation, you can then search for your functions in the RStudio help pane or use the ? operator to access the documentation for your functions:
# may need to load in your package first (uncomment below)
# devtools::load_all()
? custom_paletteAfter adding our desired functions, we may need to add/update the dependencies for our package. In other words, our functions typically depend on other packages (or use functions from other packages). When developing a package, it is necessary to specify these dependencies so that these package dependencies are automatically installed when someone installs our package. After all, without these package dependencies, our functions will not work.
To add dependencies to your package, you can run the following code in the R console:
usethis::use_package("ggplot2")This will add ggplot2 as a dependency to your package (see the updated DESCRIPTION file).
Tip: If you are unsure of what dependencies your package needs, you can run the devtools::check() function. Among many other things, this will check for missing dependencies and suggest adding them to your DESCRIPTION file.
For our package, we also need to add the viridis, viridisLite, dplyr, and scales packages as dependencies.
usethis::use_package("viridis")
usethis::use_package("viridisLite")
usethis::use_package("dplyr")
usethis::use_package("scales", type = "suggests")
Note that since scales is only used in the documentation examples, we have added it as a “suggested” dependency (as opposed to a required dependency). This means that the scales package will not be automatically installed when someone installs our package unless the user explicitly chooses to install it.
This concludes all of the “required” steps for creating an R package. Still, there are some further best practices and simple steps that we can take to spruce up our package.
Regardless of whether you are creating an R package or not, it is generally a good idea to write tests for your functions. While it may seem tedious and time-consuming at first, writing tests now can save you time in the long run by ensuring that your functions continue to work as expected as you make changes to your package. In fact, as we write new functions, we often call the function in the console to check that it works as expected (e.g,. the result itself is as expected or the structure/shape makes sense). These manual checks can be easily turned into tests in your testing suite. The beauty of creating such a testing suite is that you can automatically run all your tests with a single command.
In R, the testthat package is the go-to package for writing tests.
To initialize a testthat testing suite for your package, we first need to run the following code in the R console:
usethis::use_testthat()This will create a tests/ directory in your package where you can write tests for your functions. You only need to do this once for your package.
To add tests for our functions in the ggplot-color-themes.R script, you can run the following code in the R console:
usethis::use_test("ggplot-color-themes")The general rule of thumb is to create a separate test file for each function file, and within each test file, create a separate test_that() block for each function.
There are many different things that can be assessed in a test, including but not limited to whether the function returns the expected output, whether the structure of the output is expected, and whether the function throws an error or warning when it should. Some common functions used in tests include expect_equal(), expect_true(), expect_false(), expect_error(), expect_warning(), and expect_length(). For more information on writing tests, see the testthat documentation.
For an example of a test for the custom_palette() function, download the test-ggplot-color-themes.R file under “Package Code” from Canvas and move it to the tests/testthat/ directory of your package.
To run all the tests in your testing suite, you can run the following code in the R console:
devtools::test()As you are developing your package, you may want to load your package into the current R environment and use your functions. This can be done in one of two ways:
Using devtools::load_all(): This function loads your package into the R environment without installing it. This is recommended when you are actively developing your package since it allows you to quickly re-load in your package after making a change and seeing the effects immediately.
devtools::load_all()devtools::load_all(), you can use your package’s functions as if you had called library(myrpackage).Using devtools::install(): This function goes through the proper and full build of your package and installs it on your system. Since this takes longer, it is generally not recommended during active development. Rather, this should be used when the package is in a stable state or if you want to see how your package will behave when installed by others.
devtools::install()devtools::install(), you can load in your package using library(myrpackage) and use your functions as you would any other function in R.library(myrpackage) will load in the installed version of your package, so if you make changes to your package without re-installing it, those changes will not be reflected in the version of myrpackage that is loaded in via library(myrpackage).Summary of the two methods:
| Method | Description | When to Use |
|---|---|---|
devtools::load_all() |
Loads your package into the R environment without installing it. | During active development. |
devtools::install() |
Installs your package on your system. | When the package is in a stable state. |
As you are developing your package, it’s often a good idea to run
devtools::check()every so often to check whether or not there are any issues with your package build.
This will run a series of fairly comprehensive checks on your package, including:
Note: devtools::check() includes running devtools::document() and devtools::test() as part of the check process. Thus, if you run devtools::check(), you do not have to run devtools::document() or devtools::test() separately.
If there are any issues with your package, the devtools::check() function will provide feedback on how to fix them. If there are no issues, this would be a good time to commit your changes to your GitHub repository.
Some of the tasks when building a package (e.g., updating documentation, running the tests, running devtools::check()) are very monotonous and can be automated. GitHub Actions is a continuous integration (CI) service that can be used to automate these tasks every time we push new changes to our GitHub repository. This can be a great way to ensure that your (possibly public-facing) package is always in a working state.
When building R packages, one of the most common GitHub Actions to add is the check-standard action, which runs devtools::check() on your package every time you push new changes to your repository. To add this particular GitHub Action to your package, you can run the following code in the R console:
usethis::use_github_action("check-standard")This will create a .github/ directory in your package that contains a workflows/ directory with a R-CMD-check.yaml file. In essence, the yaml file instructs GitHub to run the check-standard action on various operating systems (Mac, Windows, and Ubuntu) every time you push new changes to the main branch of your repository.
To put this GitHub Action into action, we need to push the workflow files to GitHub. Then to see the results of the check-standard action, you can go to the “Actions” tab of your GitHub repository and click on the most recent workflow run. If this check-standard workflow runs without any errors, you will see a green dot next to the workflow run. This means that devtools::check() ran successfully, and your package can be successfully built and installed on either Mac, Windows, or Ubuntu systems.
Creating a website for your package can be a great way to showcase your package and to provide additional information and resources for users. This certainly is not a requirement for creating an R package, but because it is incredibly simple to make using the pkgdown R package, we will make one here.
To initialize pkgdown for your package, you can run the following code in the R console:
usethis::use_pkgdown()Then, to build the website locally, you can run the following code in the R console:
# install.packages("pkgdown")
pkgdown::build_site()
This will create a docs/ directory in your package that contains the website files. To view the website, you can open the docs/index.html file in your browser.
However, this website is not so useful if it is not hosted online. To host your package website online, we will take advantage of GitHub Pages, a free service that allows you to host static websites directly from a GitHub repository. In fact, every GitHub repository can have its own GitHub Pages website.
We will set up a website for our package using GitHub Pages to host it publicly and GitHub Actions to automatically update the website every time we push new changes to our repository.
Set up the pkgdown GitHub Action by running the following code in the R console:
usethis::use_github_action("pkgdown")As in our previous GitHub Action, this will create a new workflow file in the .github/workflows/ directory of your package. This workflow will rebuild your package website using pkgdown every time you push new changes to your repository.
Push this new workflow file to your GitHub repository. After you do this and after the workflow finishes running, you will notice that a new gh-pages branch has been created in your repository. The workflow that we added actually builds the website and pushes the built website files to this gh-pages branch (so as to not clutter the main branch with website files).
Tell GitHub Pages where to look for your website (i.e., index.html) by going to your GitHub repository, clicking on “Settings” and then “Pages” (on the left), and setting:
After saving these settings, your package website should be live at https://<username>.github.io/<repository_name>. For easy access, you can also add a link to your package website in your GitHub repository’s homepage by clicking on the gear icon to the right of the “About” section and toggling on the “Use your GitHub Pages website”.
Voila! We have a fully-fledged R package and a website to show for it. And by the way, we never have to worry about updating the website again; it will automatically update every time we push new changes to our repository.
Now that we have a fully-fledged R package, if you or others want to install your package from GitHub, you can do so by running the following code in the R console:
devtools::install_github("<github_username>/myrpackage")This will install the latest version of your package from GitHub, and assuming your repository is public, others can also install your package using this code.
Congratulations! You have successfully created an open-source R package and have made it available to the world.
Summarizing the main steps in creating an R package:
Set up a GitHub repository to host your package.
Initialize the basic R package structure using a series of helper functions from the usethis package:
usethis::create_package("/path/to/myrpackage")
usethis::use_readme_md()
usethis::use_mit_license()
Add and document functions to your package by creating R scripts in the R/ directory and documenting your functions using roxygen2.
Manage and specify package dependencies using usethis::use_package().
Write tests for your functions using usethis::use_test() and the testthat package.
Check your package for issues using devtools::check(). This can be automated using GitHub Actions with usethis::use_github_action("check-standard").
Create a package website using usethis::use_pkgdown(). This can be automated using GitHub Actions with usethis::use_github_action("pkgdown") and GitHub Pages.
How to install and use your package: As you are actively developing your R package, you can “test-drive” your package using devtools::load_all(). When the package is in a more stable state and you would like to properly build and install the package, you can install the package from your local source (i.e., your local myrpackage/ folder) via devtools::install(). Alternatively, you can install the package version that is available on GitHub using devtools::install_github("<github_username>/myrpackage"). This GitHub version is also the version that others would install if they wanted to use your package. After installing, you can load in your package using library(myrpackage) and use your functions as you would with functions from other R packages.
The resulting R package from this tutorial can be found at https://github.com/tiffanymtang/myrpackage.