Reproducible Workflows
Overview of Reproducible Workflows
In this walkthrough, we will discuss three important components to ensuring reproducible data science workflows:
- Organizing your project files in a clear and consistent manner
- Creating reproducible environments to manage package dependencies
- Using
renv(for R users) andconda(for Python users)
- Using
- Using reproducible reporting tools such as quarto to combine combine code, results, and narrative text
A Suggested Project Structure
A clear and consistent project structure is essential to keeping organized and facilitating reproducible data science workflows. While there is no one-size-fits-all solution for organizing your project files, the following structure is a suggested starting point and one that we will be using throughout this course.
├── data         # store all raw and processed data
├── notebooks    # store all notebooks (.qmd, .Rmd, .ipynb, ...)
├── other        # miscellaneous documents
├── R            # store R functions (ONLY functions)
├── python       # store python functions (ONLY functions)
├── scripts      # store R/python scripts (i.e., non-functions)
├── results      # store all results
├── renv         # do not edit; created automatically by renv (R only)
.Rprofile        # do not edit; created automatically by renv (R only)
renv.lock        # do not edit; created automatically by renv (R only)
environment.yml  # yml file to reproduce conda environment (python only)
conda-lock.yml   # lock file to reproduce conda environment (python only)
Reproducible Environments
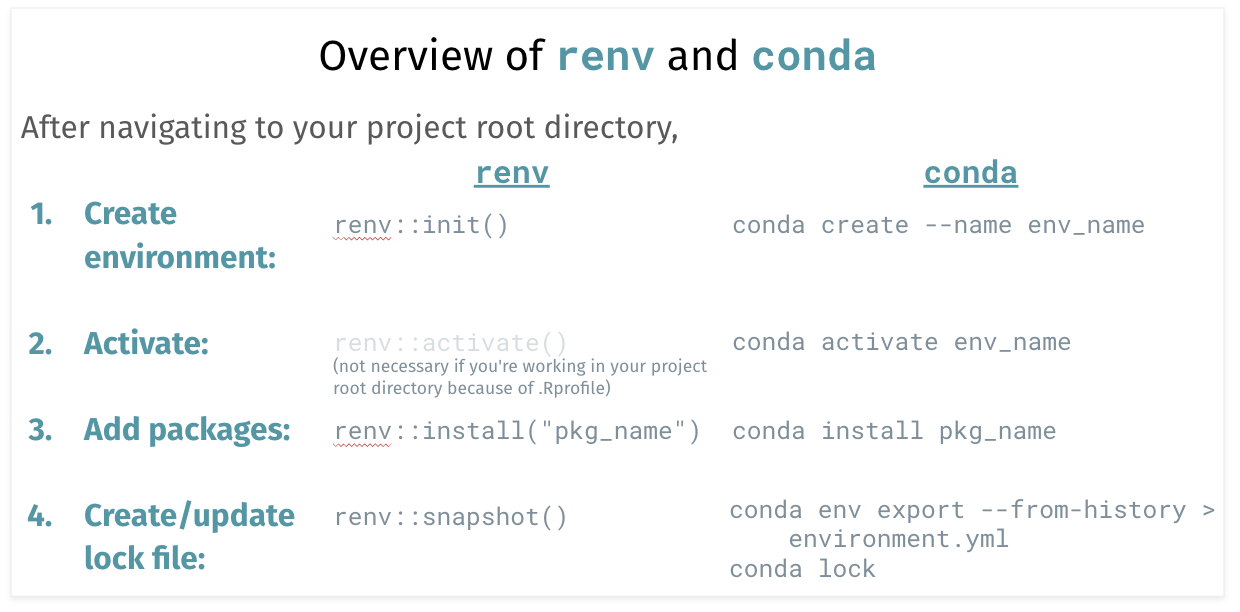
Next, to manage package dependencies and ensure that your code can be run on different computers with the same package versions, we will create reproducible environments using renv (for R users) and conda (for Python users).
Before proceeding, please ensure that you have pulled the latest version of the dsip-s26 repository to your computer.
For this walkthrough, we will be using the files provided in the dsip-s26/course_materials/cancer_mortality directory of the dsip-s26 repository. To follow along, please make a copy of the dsip-s26/course_materials/cancer_mortality directory and place it in your dsip/ directory.
How to Create a Reproducible Environment
We detail each of these steps below.
Install renv (only need to run once): If you haven’t already, install the
renvR package by running the following command in your R console:install.packages("renv")Navigate to your project root directory:
- If you are using Positron, open your
dsip/cancer_mortality/(ordsip/lab1) directory. - If you are using RStudio, create a new R project in your
dsip/cancer_mortality/(ordsip/lab1) directory. To do this, click on File > New Project > Existing Directory > navigate to yourdsip/cancer_mortality/(ordsip/lab1) directory. This will create a*.Rprojfile in your project root directory.
- If you are using Positron, open your
Initialize renv: In the R console, run the following command to initialize an
renvfor your project:renv::init()Since we already have R code in our project (see
notebooks/data_cleaning_R.qmd),renvwill do its best to automatically detect and install the packages that are being used in your project. If you want to start with a clean slate (i.e., no packages installed), you can runrenv::init(bare = TRUE)instead.renv FilesWhen you initialize
renv, this will create several new files/directories:renv.lock,.Rprofile(a hidden file), andrenv/in your current working directory. Therenv/directory contains symbolic links to all of the packages needed/used in your project. [Rather than installing a new copy of the package for everyrenvthat you might create,renvuses symbolic links that point to your main R package library to save on storage]. Therenv.lockfile (also called the “lockfile”) contains all of the necessary package information to exactly reproduce your R environment on a different computer. Finally, the.Rprofilefile contains code that is automatically run every time you open R from this working directory; in this case, it contains code to automatically activate yourrenvwhen you open your project from this directory.Adding packages: As you work on your lab, you will need to install new packages. To install/use these packages in your
renv, you can do so withrenv::install(package_name). For example, to render a quarto document, we will need to install thermarkdownpackage, which can be done by running the following command in your R console:renv::install("rmarkdown")Snapshot your environment: After you have installed the necessary packages for your lab, you need to “snapshot” your environment, that is, to record the latest package information in your
renv.locklockfile. To do this, run the following command in your R console:renv::snapshot()To see which packages are being used in your project but not yet installed or snapshotted in the lock file, you can run the following command in your R console:
renv::status().Check your lockfile: You can open the
renv.lockfile in a text editor to see the package information that has been recorded for your project. This file contains all of the necessary information to exactly reproduce your R environment on a different computer.
If you are on a Windows computer and getting a conda command not found error, you must use the Anaconda Prompt (not the regular Command Prompt or PowerShell) to run the conda commands below. You can find the Anaconda Prompt by searching for it in the Start Menu.
If you want to integrate conda with PowerShell, you can try following the instructions here.
Install conda-lock (only need to run once): If you haven’t already, install the
conda-lockpackage by running the following command in your terminal:conda install --name=base conda-lockNavigate to your project root directory: in your terminal, change your working directory to
dsip/cancer_mortality/(ordsip/lab1), e.g.,cd path/to/dsip/cancer_mortalityInitialize a new conda environment: To create a new conda environment, run the following command in your terminal. You can replace
dsip_cancerwith the name of your choice for the environment, and you can specify a specific version of Python if desired (e.g.,python=3.12.2):conda create --name dsip_canceror with a specific version of Python:
conda create --name dsip_cancer python=3.12.2Activate the conda environment: To activate the conda environment, run the following command in your terminal:
conda activate dsip_cancerconda init ErrorIf you run into an error when trying to activate the conda environment, you may need to run the following command to initialize conda in your shell:
conda init(or orconda init zshif you are using zsh).Adding packages: You can add and install new packages in your conda environment using the
conda installcommand. For example, the starter python code indsip/notebooks/data_cleaning_python.qmduses thepandaspackage. We will also need to install thejupyterlabpackage to render quarto notebooks in python. To install these packages, you can run the following command in your terminal:conda install pandas jupyterlabTo see which packages are installed in your conda environment, you can run the following command in your terminal:
conda list.Export environment: After you have installed the necessary packages for your lab, you should export your conda environment to a YAML file. This YAML file contains a list of the packages that were installed in your conda environment. To do this, run the following command in your terminal:
conda env export --from-history > environment.ymlNote: the
--from-historyflag will only list/export the packages that you have explicitly installed in your environment (i.e., it will not include packages that were installed as dependencies of other packages). Be sure to include the--from-historyflag when exporting your environment to ensure that you have a minimal environment file. If you exclude the--from-historyflag, you will get a full list of all packages in your environment, including dependencies which may be specific to your operating system and will not be portable to other operating systems.Create and check conda lock file: While the above
environment.ymlfile is great for sharing your environment with others, it does not provide instructions to exactly reproduce your environment across different operating system platforms. To enable exact reproducibility of our conda environment, we need to create a lock file (as we did withrenv). To create a lock file for your conda environment, you can run the following command in your terminal:conda lock
If you used pip to install some packages in your conda environment, you can include these pip-installed dependencies in your conda lock file by following the steps below:
First, add these pip-installed packages to your
environment.ymlfile. The easiest way to do this is to first runconda env export. This will output something like... dependencies: - conda_installed_packages - pip: - pip_installed_package_1 - pip_installed_package_2Copy and paste the
pip:section into your existingenvironment.ymlfile (which was created byconda env export --from-history > environment.yml). Be sure to follow the same formatting and indentation as what was outputted byconda env export.Next, create the conda lock file as usual by running
conda lock.
How to Restore Environment from Lock File
Given an appropriate lock file, you can easily reproduce your exact R or Python environment on a different computer by following the instructions below.
Clone your
dsiprepository, and installrenvviainstall.packages("renv")in your R console if you haven’t already.Navigate to your project root directory:
- If you are using Positron, open your
dsip/lab1/directory. - If you are using RStudio, open your
*.Rprojproject file in yourdsip/lab1/directory.
- If you are using Positron, open your
Restore your environment: To restore your R environment to the exact state that it was in when you last worked on it, you can run the following command in your R console:
renv::restore()
Clone your
dsiprepository, and installconda-lockviaconda install --name=base conda-lockin your terminal if you haven’t already.Navigate to your project root directory: Open your terminal and navigate to your
dsip/lab1/directory, e.g.,cd path/to/dsip/lab1Restore your environment: To restore your Python environment using the conda-lock file, you can run the following command in your terminal:
conda-lock install --name dsip_lab1
Reproducible Reporting with Quarto
As discussed in a different tutorial, quarto is a powerful tool for creating reproducible reports that combine code, results, and narrative text. Using quarto in conjunction with reproducible environments will ensure that your reports can be easily reproduced on different computers with the same package versions.
Note: If you are using quarto in Positron or VS Code, I would highly recommend installing the quarto extension for your IDE to make working with quarto documents much easier. To open the Extensions view, you can click on the square icon on the left side or press Ctrl+Shift+X (Cmd+Shift+X on Mac). Then, search for “Quarto” and click on the install button. (This step only needs to be done once.)
Now to render a quarto document within a reproducible environment:
Make sure that
rmarkdownis installed in yourrenv. If not, you can install it viarenv::install("rmarkdown")in your R console. (Remember to snapshot your environment again viarenv::snapshot()after installing new packages.)In your terminal, navigate to your project root directory (e.g.,
dsip/cancer_mortality/ordsip/lab1/).Render the quarto document using
quarto renderorquarto previewin your terminal, e.g.,quarto render "notebooks/data_cleaning_R.qmd"or
quarto preview "notebooks/data_cleaning_R.qmd"Quarto Preview ButtonI generally do not recommend using the “Preview” button in Positron to render quarto documents when working within
renvenvironments.Why? This “Preview” button is known to have issues with rendering quarto documents within
renvenvironments. In particular, if your.qmdfile is not in the same directory as yourrenv(e.g., if your.qmdfile is in a subdirectory such asnotebooks/like we have done here), the “Preview” button will render your quarto document using your global R environment rather than your project-specificrenvenvironment. If you are using the “Preview” button to quickly see your changes, this is ok as long as you are aware of this behavior. However, if you want to check whether or not your quarto document renders correctly within yourrenvenvironment, you should always use the terminal commands shown above to render/preview your quarto document.
Make sure that
rmarkdownis installed in yourrenv. If not, you can install it viarenv::install("rmarkdown")in your R console. (Remember to snapshot your environment again viarenv::snapshot()after installing new packages.)In RStudio, open your
*.Rprojproject file in yourdsip/cancer_mortality/(ordsip/lab1/) directory. If you successfully opened the project, you should see the name of the project (e.g.,cancer_mortalityorlab1) in the top right corner of your RStudio window.Open the quarto document and render it by clicking on the
"Render"button at the top of the quarto document.
Make sure that
jupyterlabis installed in yourcondaenvironment. If not, you can install it by activating your desired environment (conda activate <env_name>) and then runningconda install jupyterlabin your terminal. (Remember to export your environment again viaconda env export --from-history > environment.ymland update your lock file viaconda lockafter installing new packages.)VS Code UsersIf you are using VS Code, you may also need to install the
ipykernelpackage in your conda environment to render quarto documents. You can do this by runningconda install ipykernelin your terminal after activating your desired conda environment.In your terminal, navigate to your project root directory (e.g.,
dsip/cancer_mortality/ordsip/lab1/).Render the quarto document using
quarto renderorquarto previewin your terminal, e.g.,quarto render "notebooks/data_cleaning_python.qmd"or
quarto preview "notebooks/data_cleaning_python.qmd"Quarto Preview ButtonIf you are using Positron or VS Code with the quarto extension, you can also use the “Preview” button at the top of the quarto document to render the document. However, you MUST first tell Positron/VS Code which conda environment to use for the quarto document. To do this, open the Command Palette by pressing
Ctrl+Shift+P(Cmd+Shift+Pon Mac) and then search for “Python: Select Interpreter”. You can then choose your desired conda environment that you created for lab 1.If you do not see your conda environment in the list, you can manually “enter interpreter path” and enter the path to the conda environment (i.e., the path shown next to your desired environment when you run
conda env listin your terminal).
Checking Reproducibility
If you would like to check whether or not your project report is fully reproducible, you can try the following steps:
Delete the
renv/library/andrenv/staging/directories in your project root directory (e.g.,dsip/lab1/).For Positron and VS Code users, open your project root directory (e.g.,
dsip/lab1/) in your IDE. For RStudio users, open your*.Rprojproject file in your project root directory (e.g.,dsip/lab1/).Try restoring your environment by running the following command in your R console:
renv::restore()Render your quarto document by running the following command in your terminal, e.g.,
quarto render "notebooks/lab1.qmd"If the document renders successfully without any errors, then your project is fully reproducible!
In your terminal, navigate to your project root directory (e.g.,
dsip/lab1/).Create a new conda environment from your lock file by running the following command in your terminal:
conda-lock install --name <temp_env>Note: if the
conda-lockcommand is not found, make sure you are using thebaseconda environment (or whatever conda environment you installedconda-lockin) by runningconda activate base(orconda activate <env_name>).Render your quarto document using the new conda environment by running the following command in your terminal:
conda activate <temp_env>
quarto render "notebooks/lab1.qmd"
If the document renders successfully without any errors, then your project is fully reproducible!
Important Note: When checking reproducibility, make sure that your code does not rely on any absolute file paths (i.e., file paths that are specific to your computer). Instead, use relative file paths that are relative to your project root directory. Additionally, make sure that any external files (e.g., results files or other data files beyond the original data provided to you) that your code relies on have been made available on GitHub.
Troubleshooting
If you encounter are trying to render a quarto document and get an error that the
yamlpackage is not found, you may need to install thejupyterlabpackage in your conda environment. You can do this by activating your desired conda environment (conda activate <env_name>) and then runningconda install jupyterlabin your terminal. For VS Code users, you may also need to install theipykernelpackage in your conda environment by runningconda install ipykernelin your terminal after activating your desired conda environment.If
conda-lockcannot be installed in your base conda environment, this is likely because of version conflicts with other packages in your base environment. To get around this, you can create a temporary conda environment to installconda-lockand use it to create lock files for your other conda environments. To do this, run the following commands in your terminal:conda create --name temp_conda_lock python=3.12.2 conda activate temp_conda_lock conda install conda-lockYou can then use this temporary environment to create lock files for your other conda environments by navigating to the appropriate project root directory and running
conda-lock install --name <env_name>as usual.