Git and GitHub Tutorial
Overview of Git and GitHub
At a high-level, what are git and GitHub?
- git: a version control system that allows you to track changes in your code
- GitHub: a platform that allows you to host your git repositories online/remotely
There many possible starting points for creating/initializing a GitHub repository:
- Start with an existing remote repository from GitHub;
- Create a new remote repository on GitHub; or
- Start with an existing local repository on your computer.
In this walkthrough, we will be setting up two GitHub repositories:
dsip-s26: repository with course materials (lectures, code, etc.)- To set up this
dsip-s26repository, we will use option (A) above. - You won’t be interacting with this repository much besides pulling to receive course materials.
- To set up this
dsip: your repository for your own work (e.g., labs, final project)- To set up this
dsiprepository, we will use option (B) above. - This is the repository that you will be interacting with the most.
- To set up this
Instructions to set up the dsip-s26 repository
In your terminal:
- Navigate to the directory where you want to store the course materials, e.g.,
cd path/to/directory- Clone the
dsip-s26repository by running the following command:
git clone https://github.com/tiffanymtang/dsip-s26.gitNote: This will create a new directory called
dsip-s26in your current working directory. To see this, you can runls
- To update the course materials at any point during the semester, you should navigate into the
dsip-s26directory, e.g.,
cd dsip-s26and run
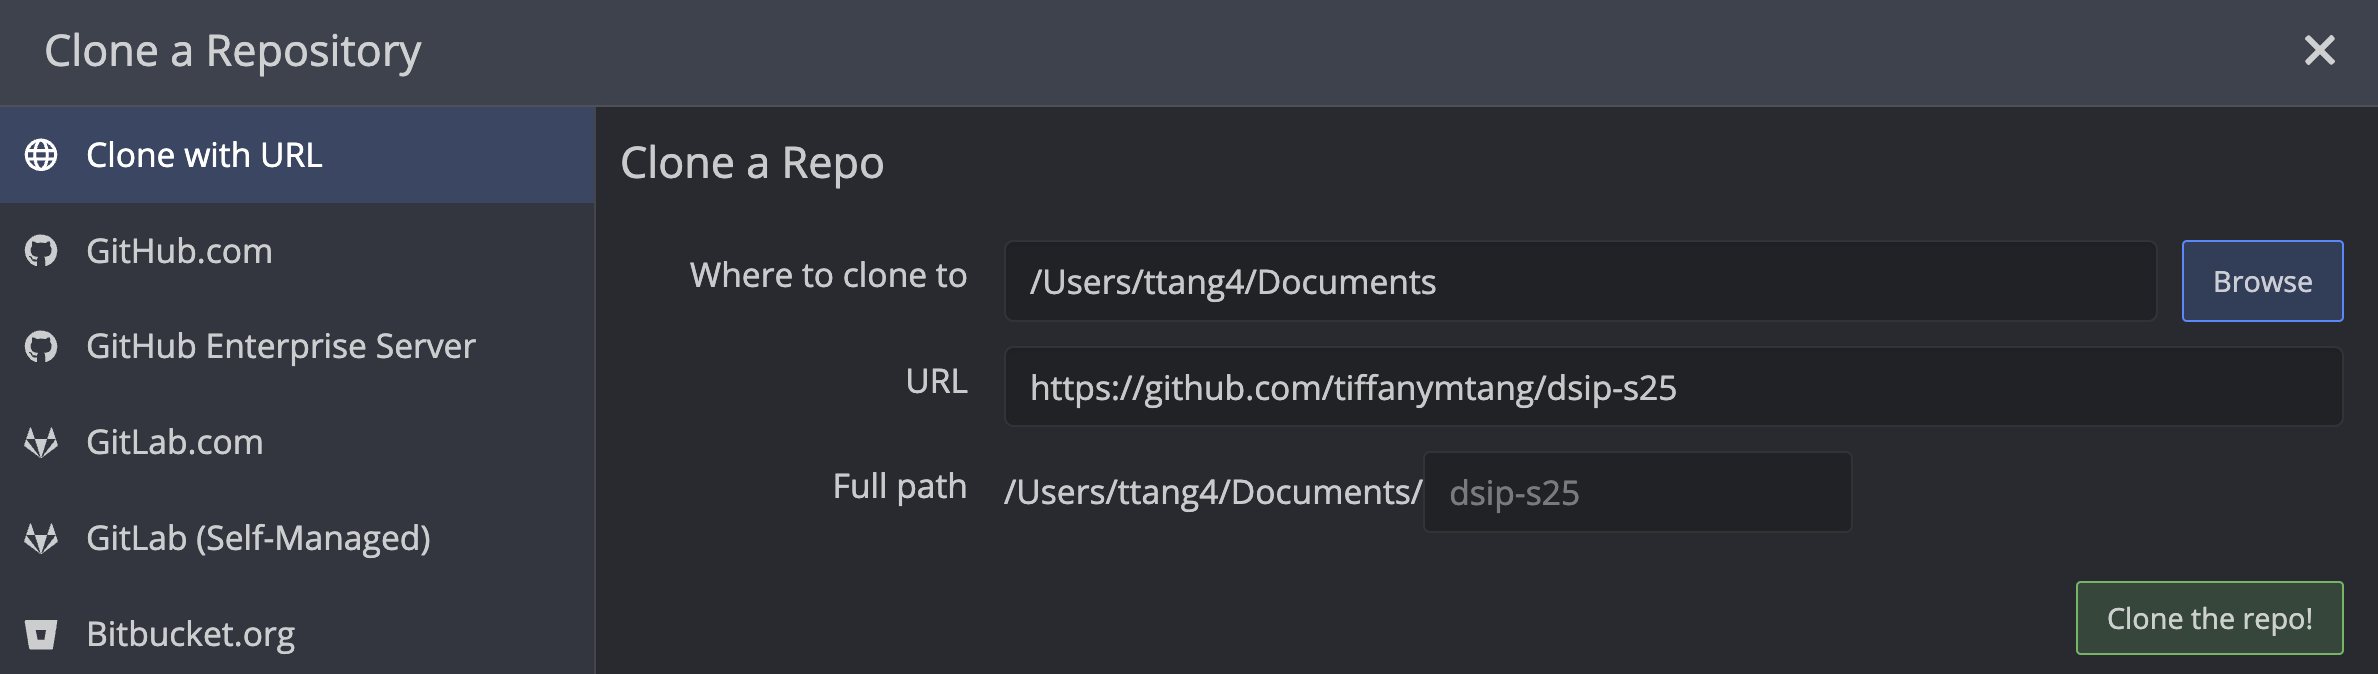
git pullOpen GitKraken and click on the “Clone a repo” button.
In the URL field, enter the following URL: https://github.com/tiffanymtang/dsip-s26. You can select where you want to store this repository on your computer by clicking on the “Browse” button next to “Where to clone to”. Once you are satisfied with the location, click on the “Clone the repo!” button.

If a pop-up appears asking you whether to open the
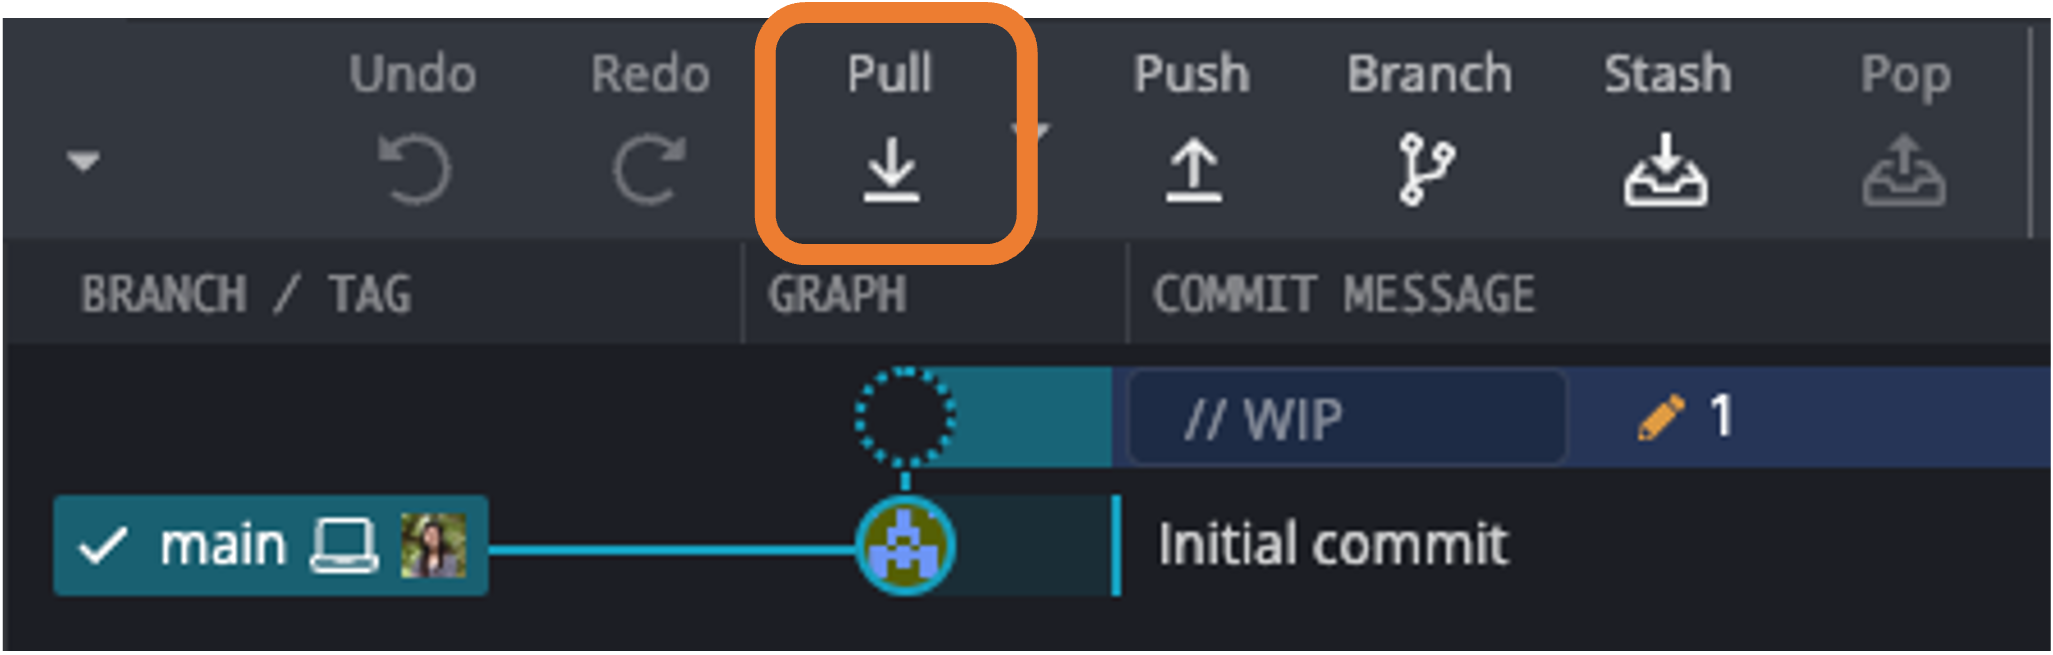
dsip-s26repository, go ahead and click on the “Open Now” button.To update the course materials at any point during the semester, click on the “Pull” button at the top of the application.

Instructions to set up your dsip repository
Next, we will create your personal dsip repository that you will be using to work on your labs. Unlike the dsip-s26 repository which was already an existing GitHub repository (and thus you only had to clone it locally), you will be creating your dsip repository from scratch on GitHub.
Go to: https://github.com/ and log in.
Click on the green “New” button (on the left) to create a new repository.
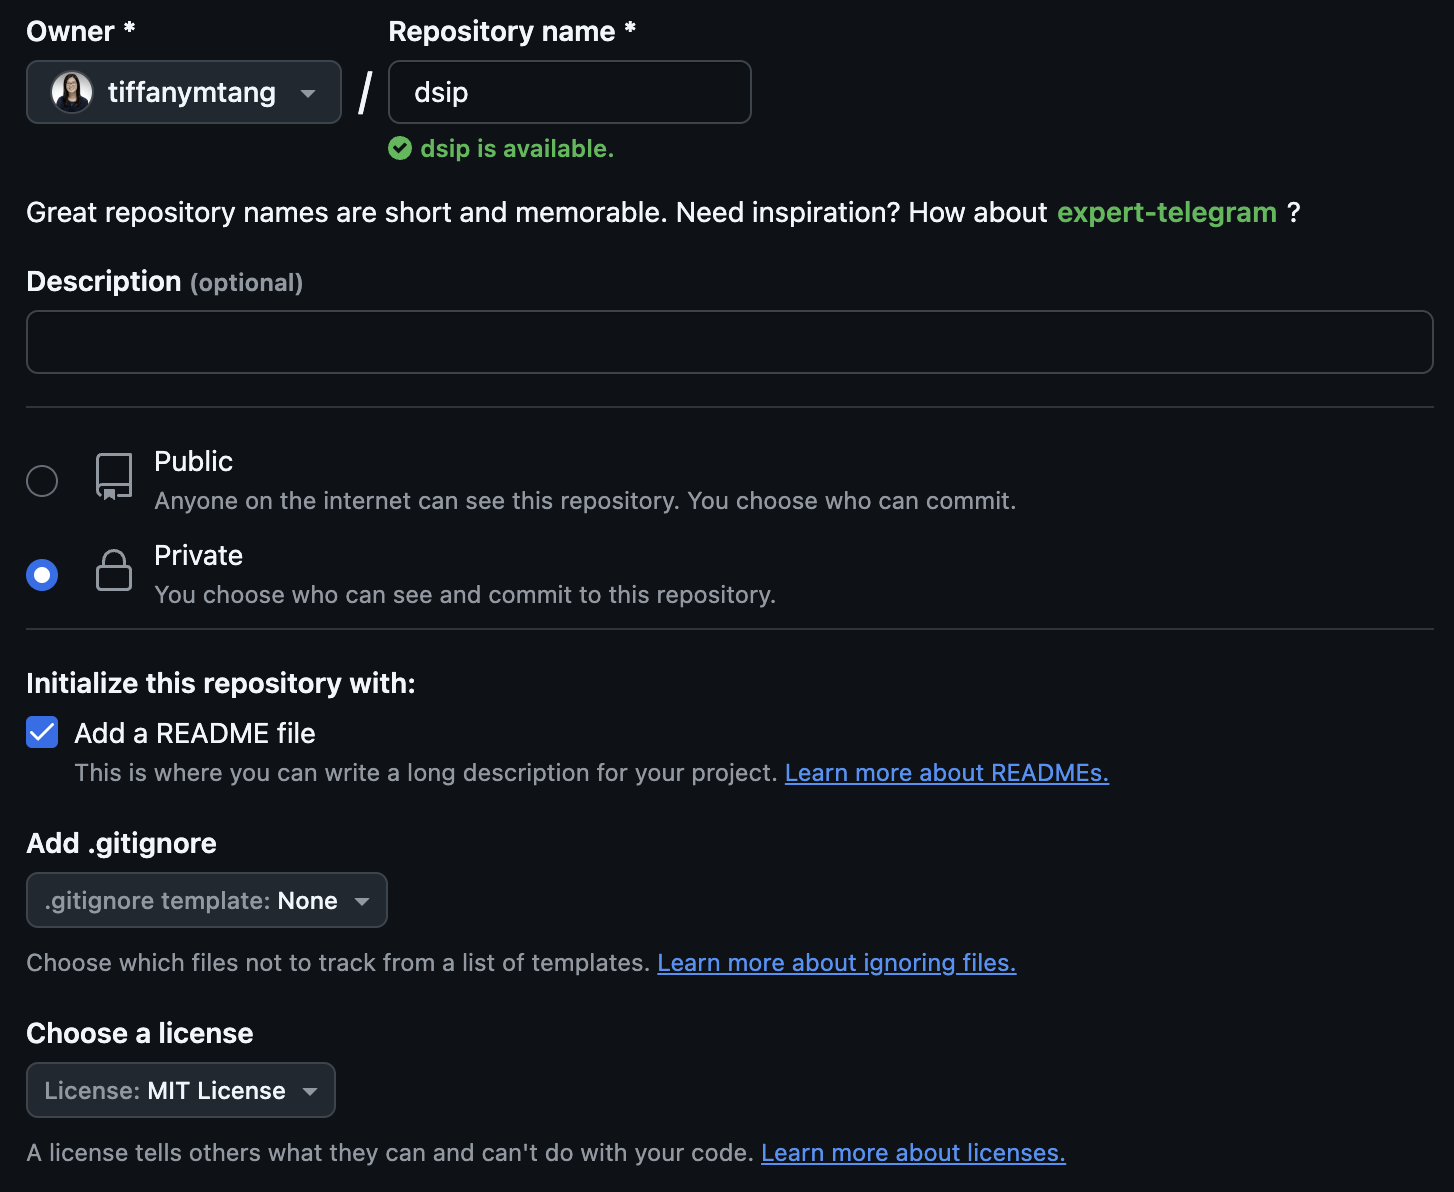
Fill in the following information:
- Owner: your GitHub username
- Repository name:
dsip - Public or Private: Please choose “Private” so that only you (and your added collaborators) can see your repository.
- Initialize this repository with: I would recommend checking the box for “Add a README file” so that you can easily clone the repository to your computer.
- Add .gitignore: For now, you can leave this as “None”.
- Add a license: I would recommend selecting “MIT License” from the dropdown menu, but this is optional.

Click on the green “Create repository” button.
Once you have created the repository, you will be taken to the repository’s main page. We next need to “clone” the (remote) repository to our local computers like we did with the
dsip-s26repository. So following the same steps from before:
In your terminal:
- Navigate to the directory where you want to store your
dsiprepository, e.g.,
cd path/to/directory- Clone the
dsiprepository by running the following command:
git clone https://github.com/{your_github_username}/dsip.gitNote: This will create a new directory called
dsipin your current working directory. To see this, you can runls
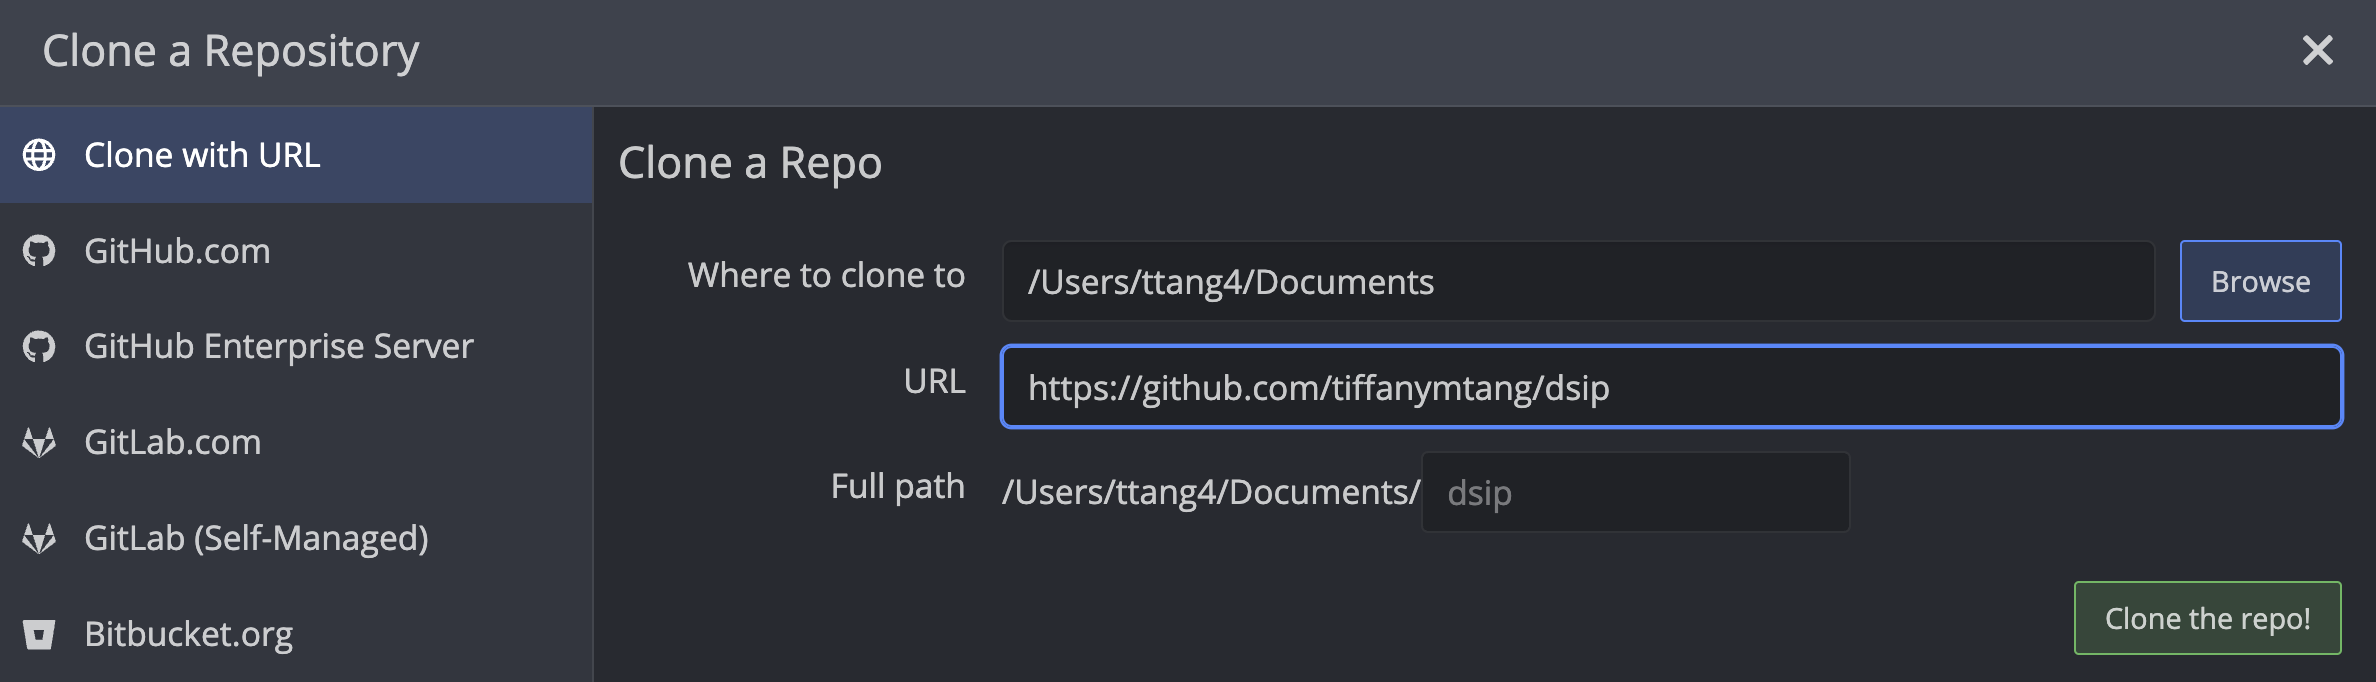
Open GitKraken and click on the “Clone a repo” button.
In the URL field, enter the following URL: https://github.com/{your_github_username}/dsip. You can select where you want to store this repository on your computer by clicking on the “Browse” button next to “Where to clone to”. Once you are satisfied with the location, click on the “Clone the repo!” button.

If a pop-up appears asking you whether to open the
dsiprepository, go ahead and click on the “Open Now” button.
So far, we’ve set up two different GitHub repositories. Next, using your dsip repository, we will go over how to interact/make changes to these repositories and to push these changes to GitHub.
A typical GitHub workflow
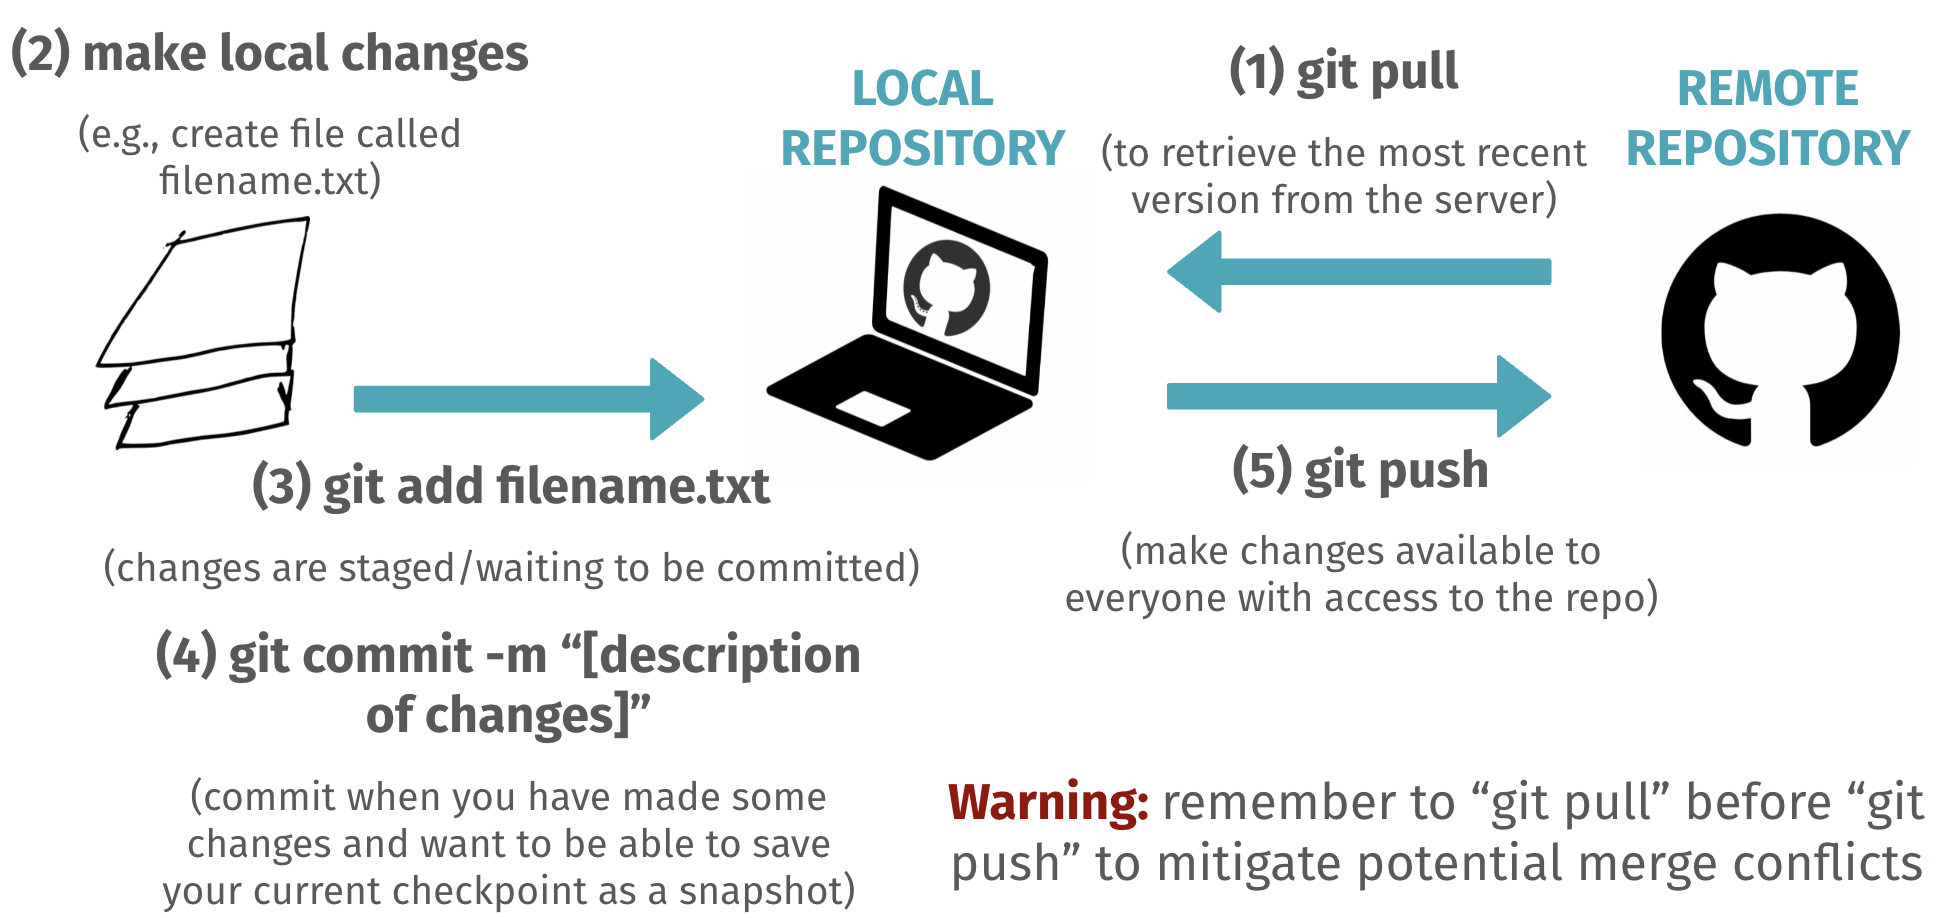
A typical GitHub workflow involves the following four commands:
- First,
git pullto download changes from the remote GitHub repository to your local computer - After making changes to your local repository,
git addfiles that you’d like to stage for your next commit - Next,
git committo store a “snapshot” of these added changes in your git version history - Finally,
git pushto upload these local changes to the remote GitHub repository
To see this workflow in action, let’s make a minor change to our dsip repository. In particular, let’s create a new text file called info.txt that contains the following two lines:
name = "Your Name"
github_name = "Your GitHub Username"Please place this info.txt file in your dsip folder (i.e., the file path should be dsip/info.txt).
Let’s now go through the four steps of the GitHub workflow. We will look at the equivalent commands using terminal, GitHub Desktop, and GitKraken side-by-side.
Terminal
- Navigate to the desired repository (i.e., your
dsiprepository):
cd path/to/dsipGitKraken
Navigate to the desired repository (i.e., your
dsiprepository):Open your
dsiprepository in GitKraken (e.g., using the “Browse for a repo” button).
- To pull:
git pullTo pull:
Click on the “Pull” button at the top of the application.
Recall: “pulling” is the process of downloading changes from the remote GitHub repository to your local computer.
- To add modified/new files to staging area:
git add info.txtYou may want to check the status of your git repository using
git statusto see which files have been modified and/or added to the staging area. It is common to rungit statusbefore and/or after each step of this workflow when first learning git.
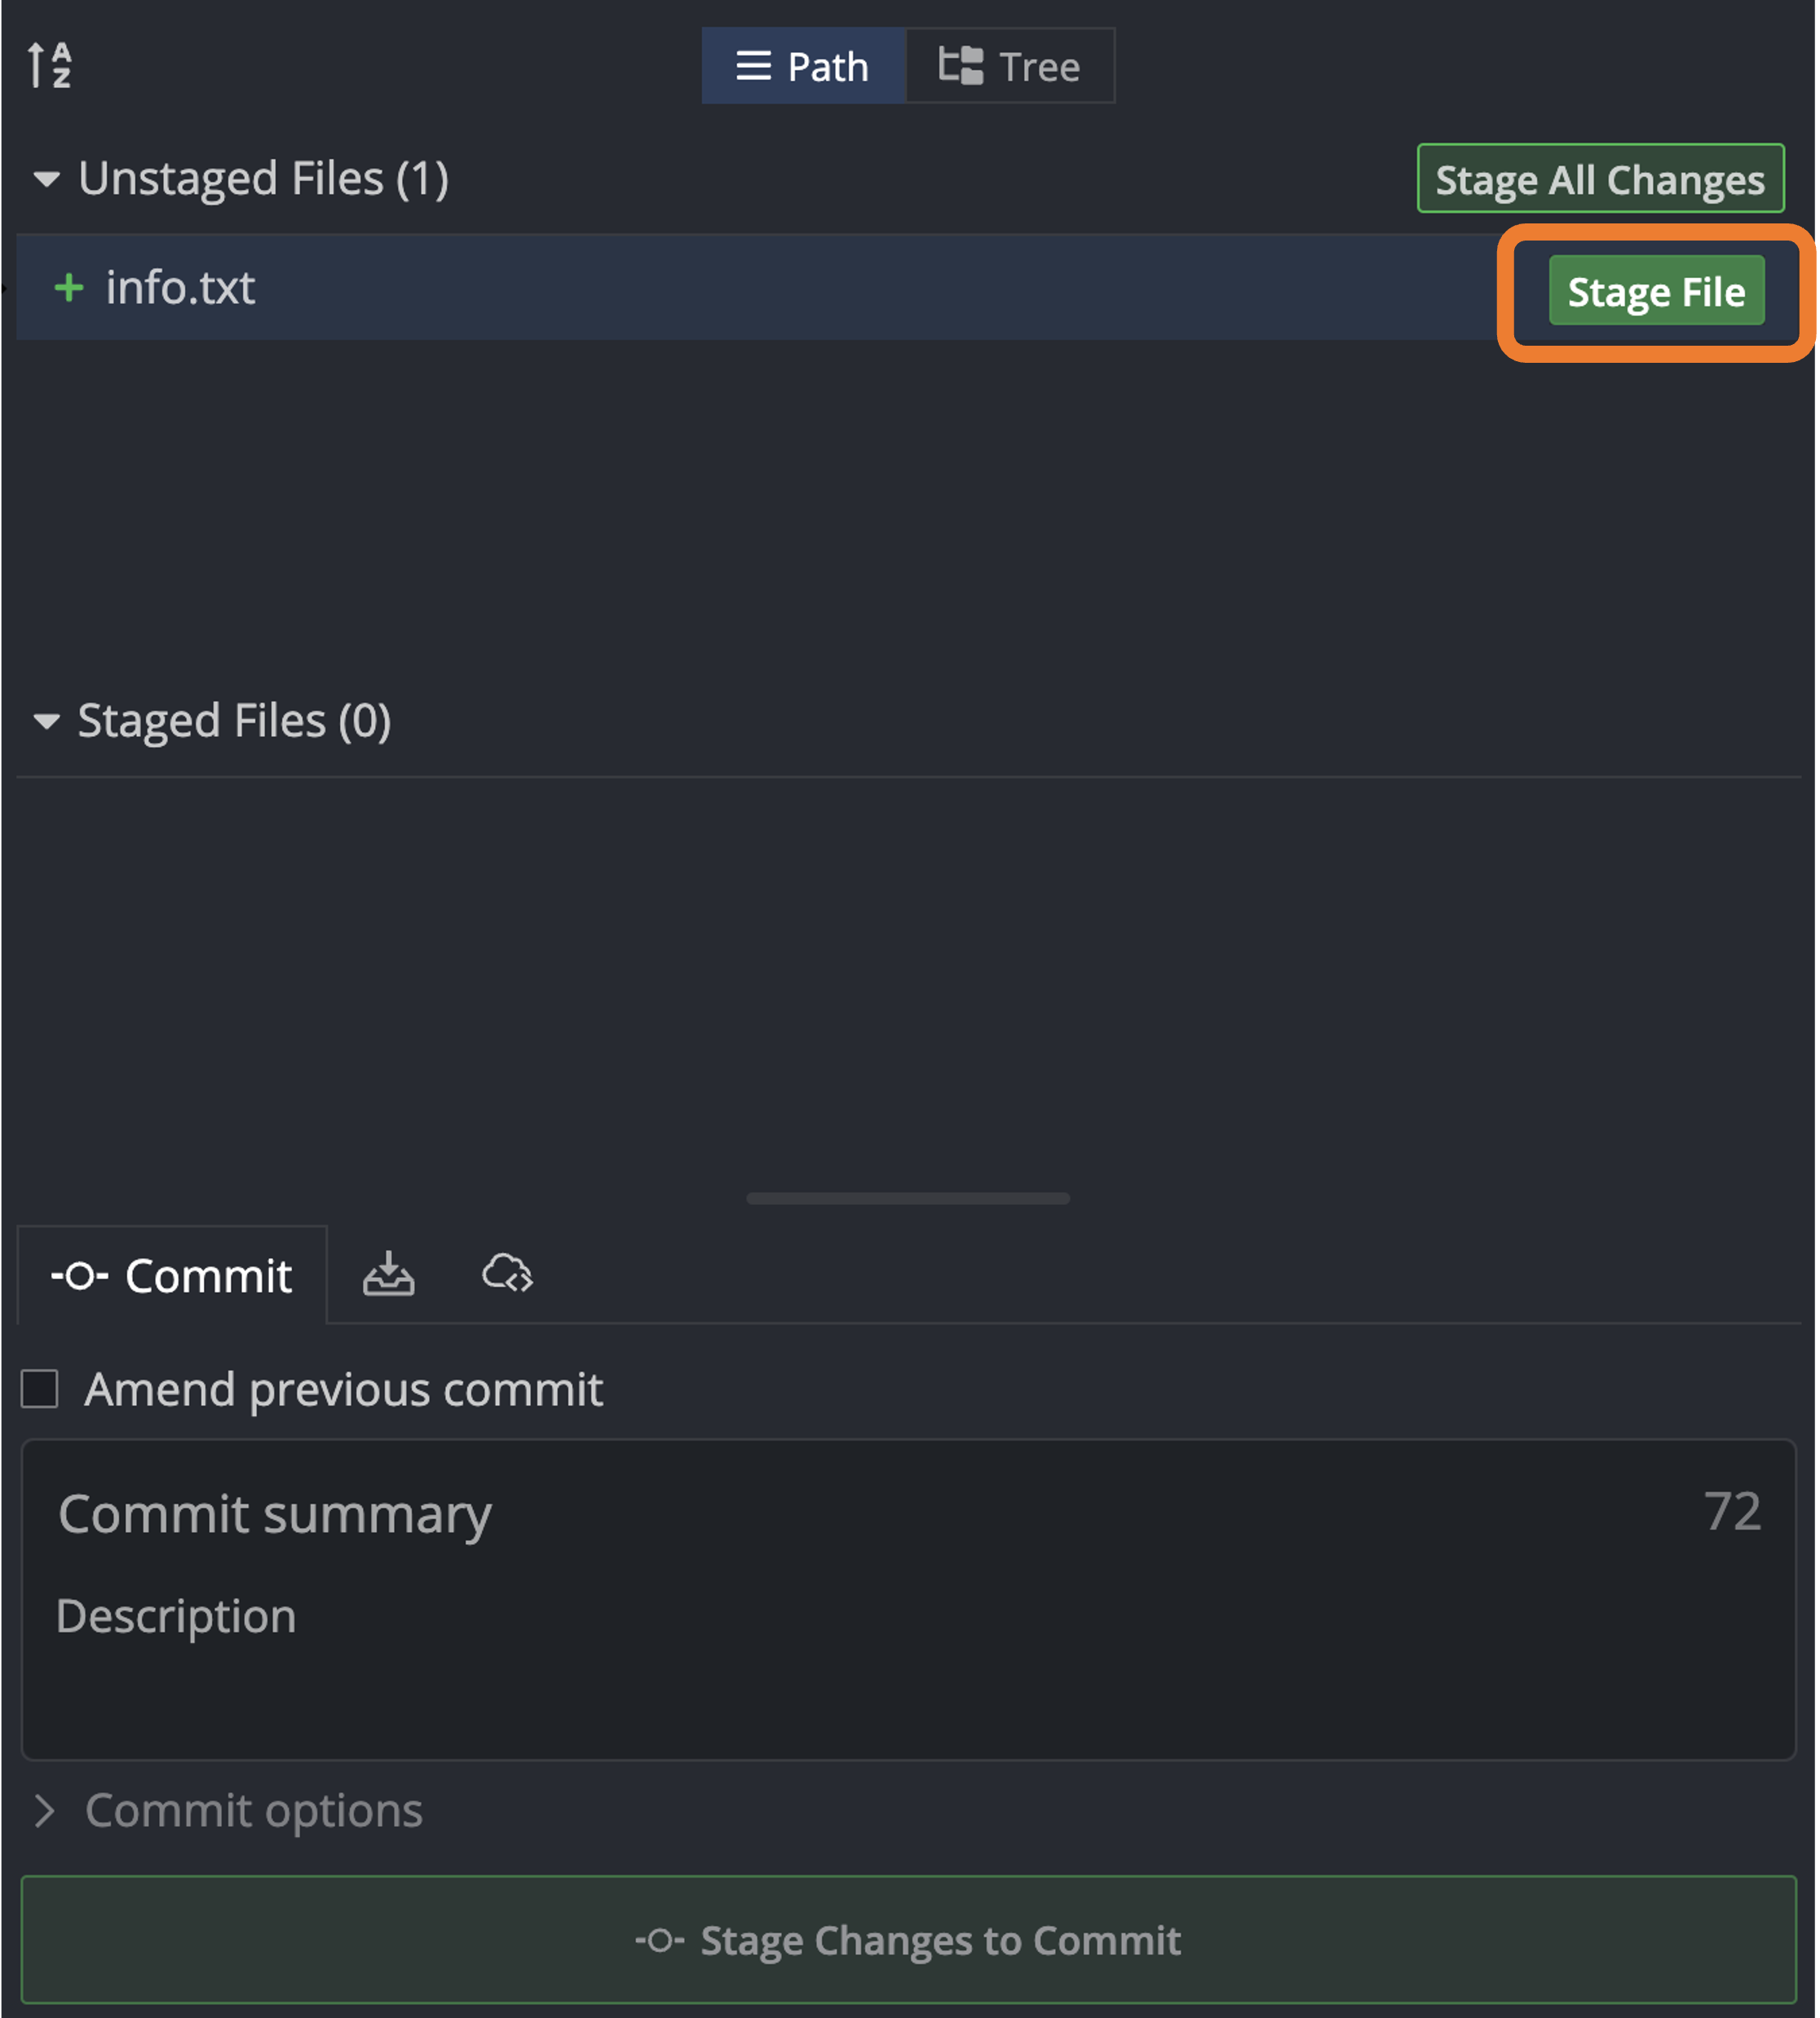
To add modified/new files to staging area:
Click on the “Stage File” button next to the file(s) that you want to add to the staging area.

Once you click on “Stage File”, this will move the file(s) from the “Unstaged Files” section to the “Staged Files” section.
- To commit staged files (with message/description):
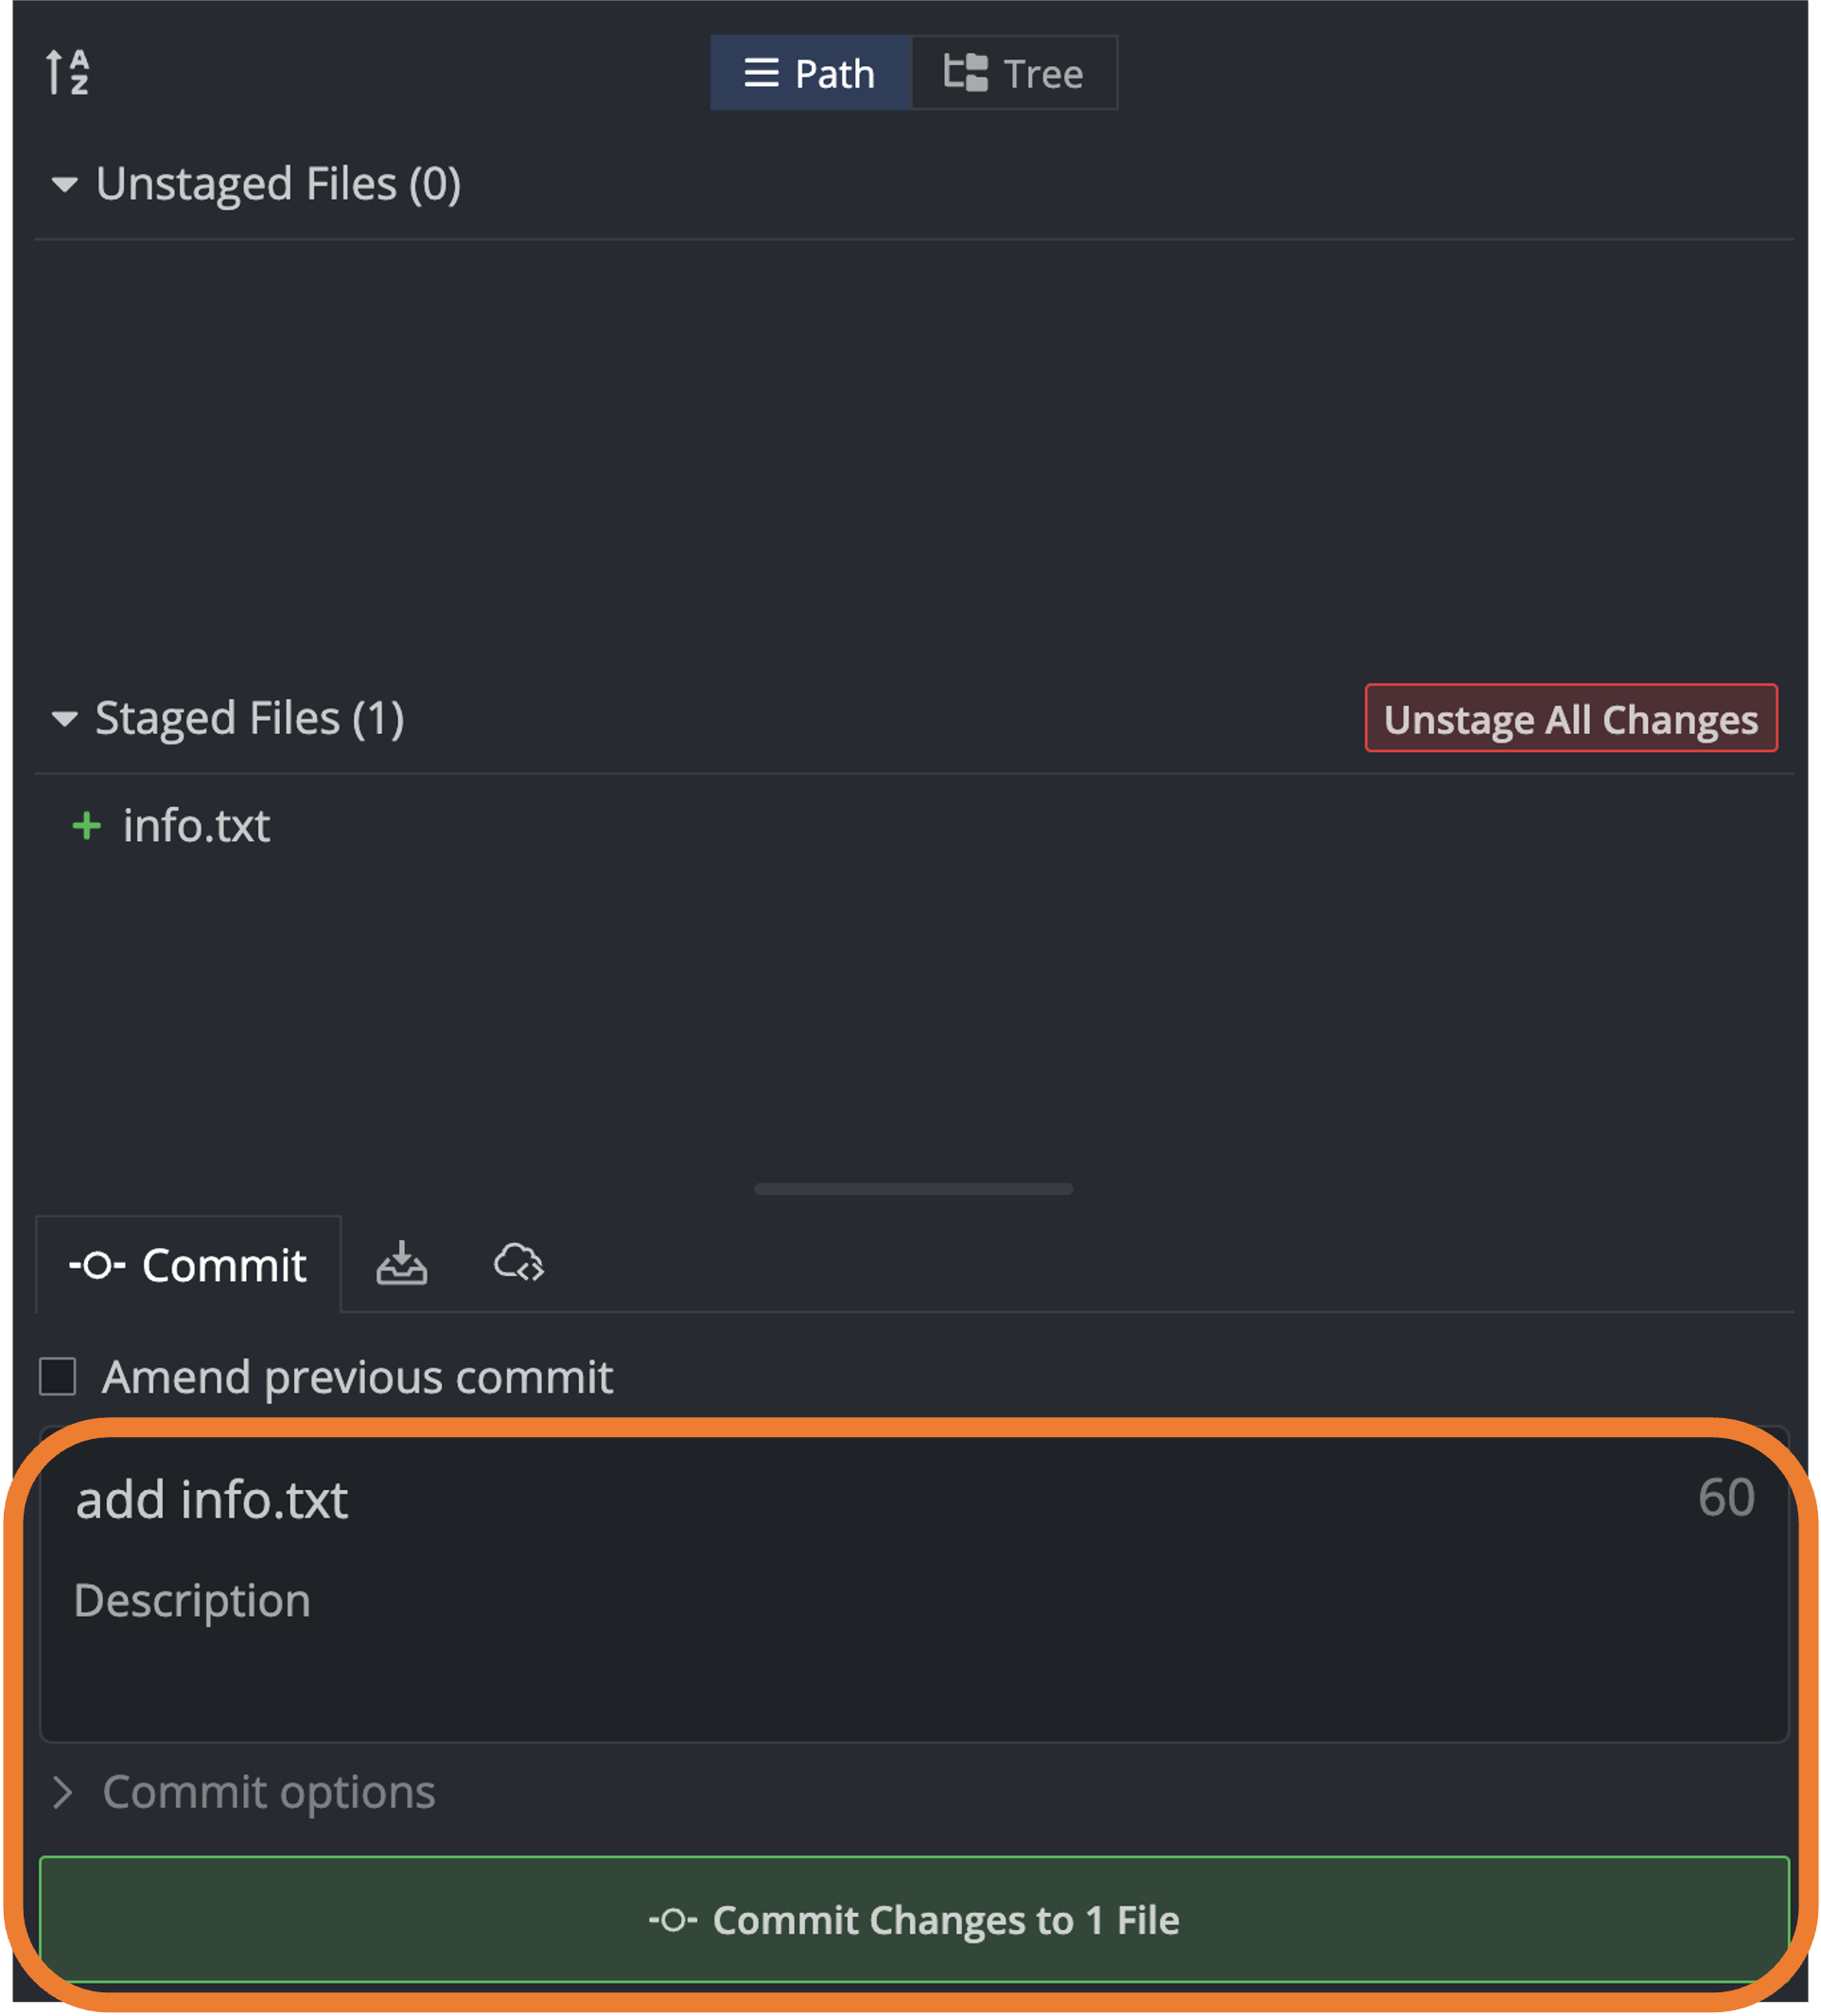
git commit -m "add info.txt"To commit staged files (with message/description):
Add a commit message to the “Commit summary” field. Once you are satisfied with the message, click on the “Commit changes” button.

Tip: It is good practice to keep your commits modular and focused (e.g., they should address one bug or add one feature to your code). This will make it easier to track version changes and to revert back to previous versions if needed. To help facilitate this, you should also try to write informative commit messages that describe the changes you made in the commit.
- To push:
git pushTo push:
Click on the “Push” button at the top of the application. After you click on “Push”, the head of the local repository (computer icon) and the head of the remote repository (your GitHub icon) should be aligned at the same commit.

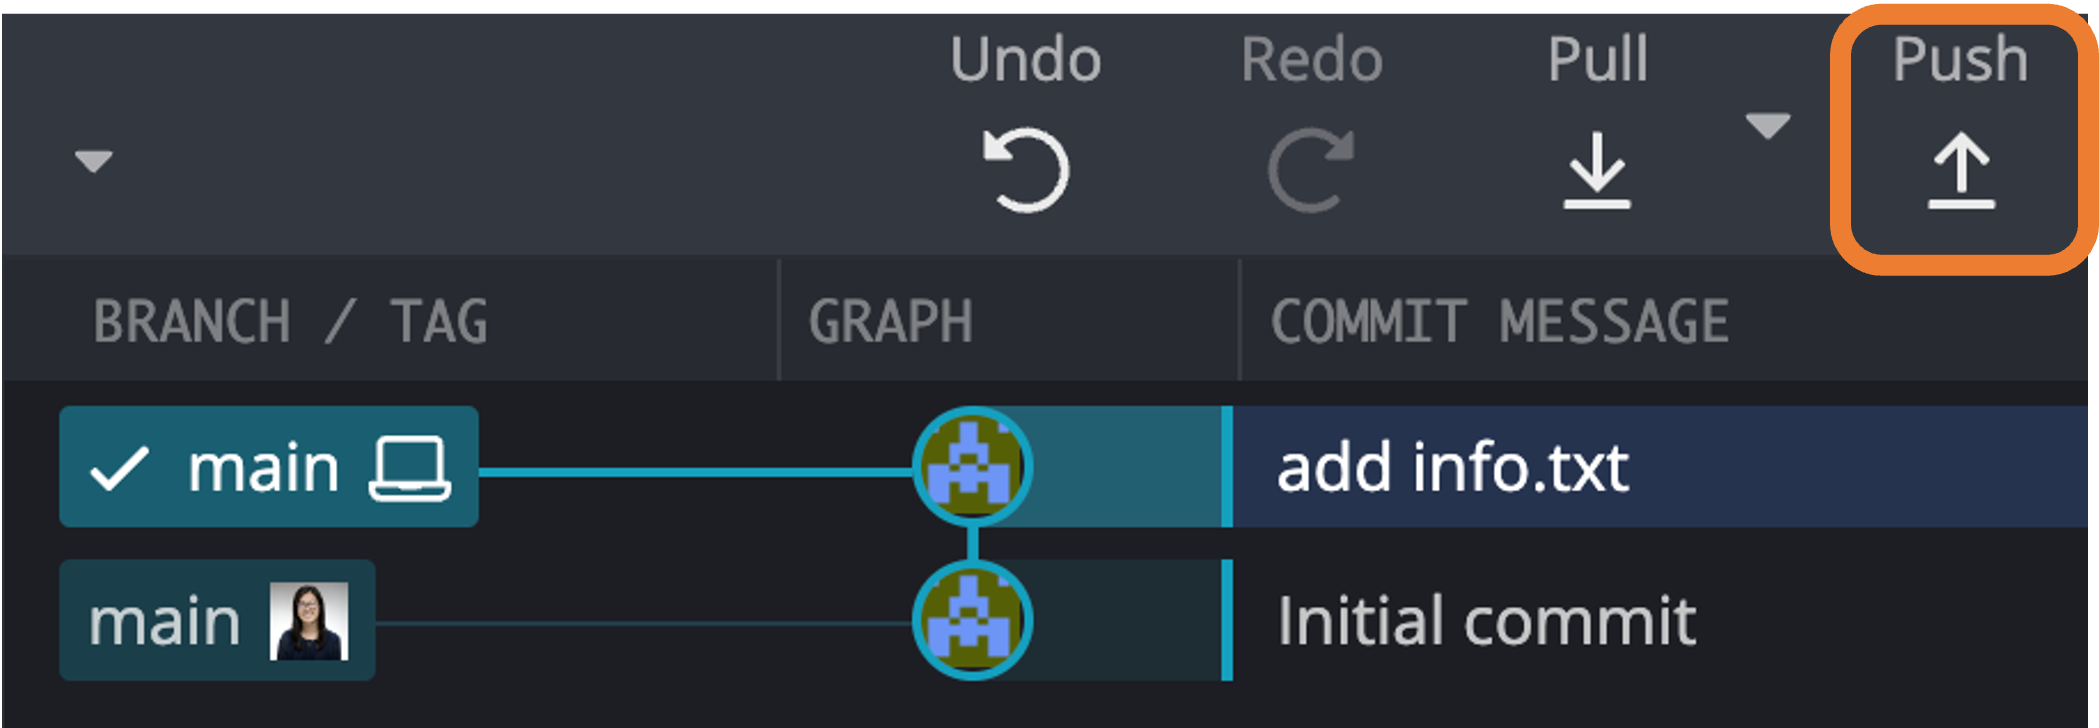
Recall: “pushing” is the process of uploading changes from your local computer to the remote GitHub repository. If you do not push your changes, they will not be reflected on GitHub and not accessible to collaborators.
Lastly, please add tiffanymtang and caiyufei8 as a collaborator in your dsip repository so that I and the grader can view your lab submissions. To do this, please:
- Go to your
dsiprepository on GitHub: https://github.com/{your_github_username}/dsip - Go to Settings (on the top) > Collaborators (on the left) > Add people (the green button) > Enter
tiffanymtang> Click on “Add tiffanymtang to this repository”. - Repeat the same process to add
caiyufei8as a collaborator.
GitHub Flow
While the above workflow is a good starting point for using git and GitHub, it is not the best way when collaborating with others on a project. If multiple people are working on the same code at the same time, the above workflow will lead to lots of annoying merge conflicts. Merge conflicts happen when two people simultaneously make changes to the same line of code in a file, so GitHub does not know which version of the code to keep.
- See this section for more details on how to resolve merge conflicts if they appear.
To reduce the potential for merge conflicts, it’s often best to use a branching strategy, where each person works on their own branch and then merges their changes back into the main branch when they are done. This way, you can work on your own code without worrying about interfering with others’ code, and the main branch always contains stable code that is ready to be deployed.
One of the most popular branching workflows is called GitHub Flow. GitHub Flow is not only a great way to collaborate with others, but also to keep your code organized and your changes well-documented. The basic idea is that you create an issue and a new branch for each feature or bug fix that you are working on, and then merge this branch back into the main branch using a pull request when you are done.
The main steps of GitHub Flow are:
- Create an issue on GitHub to track the feature or bug fix that you are working on.
- Create a new branch for each feature or bug fix that you are working on and link it to the issue.
- Make changes to your code and frequently commit them to your branch.
- Create a pull request on GitHub to merge your branch into the main branch.
- Review the pull request and resolve any merge conflicts.
- Merge the pull request into the main branch. This will automatically close the issue that you created in step 1.
- Delete the branch that you created for your feature or bug fix.
Step 1: Create an issue
Go to your repository’s GitHub.com page.
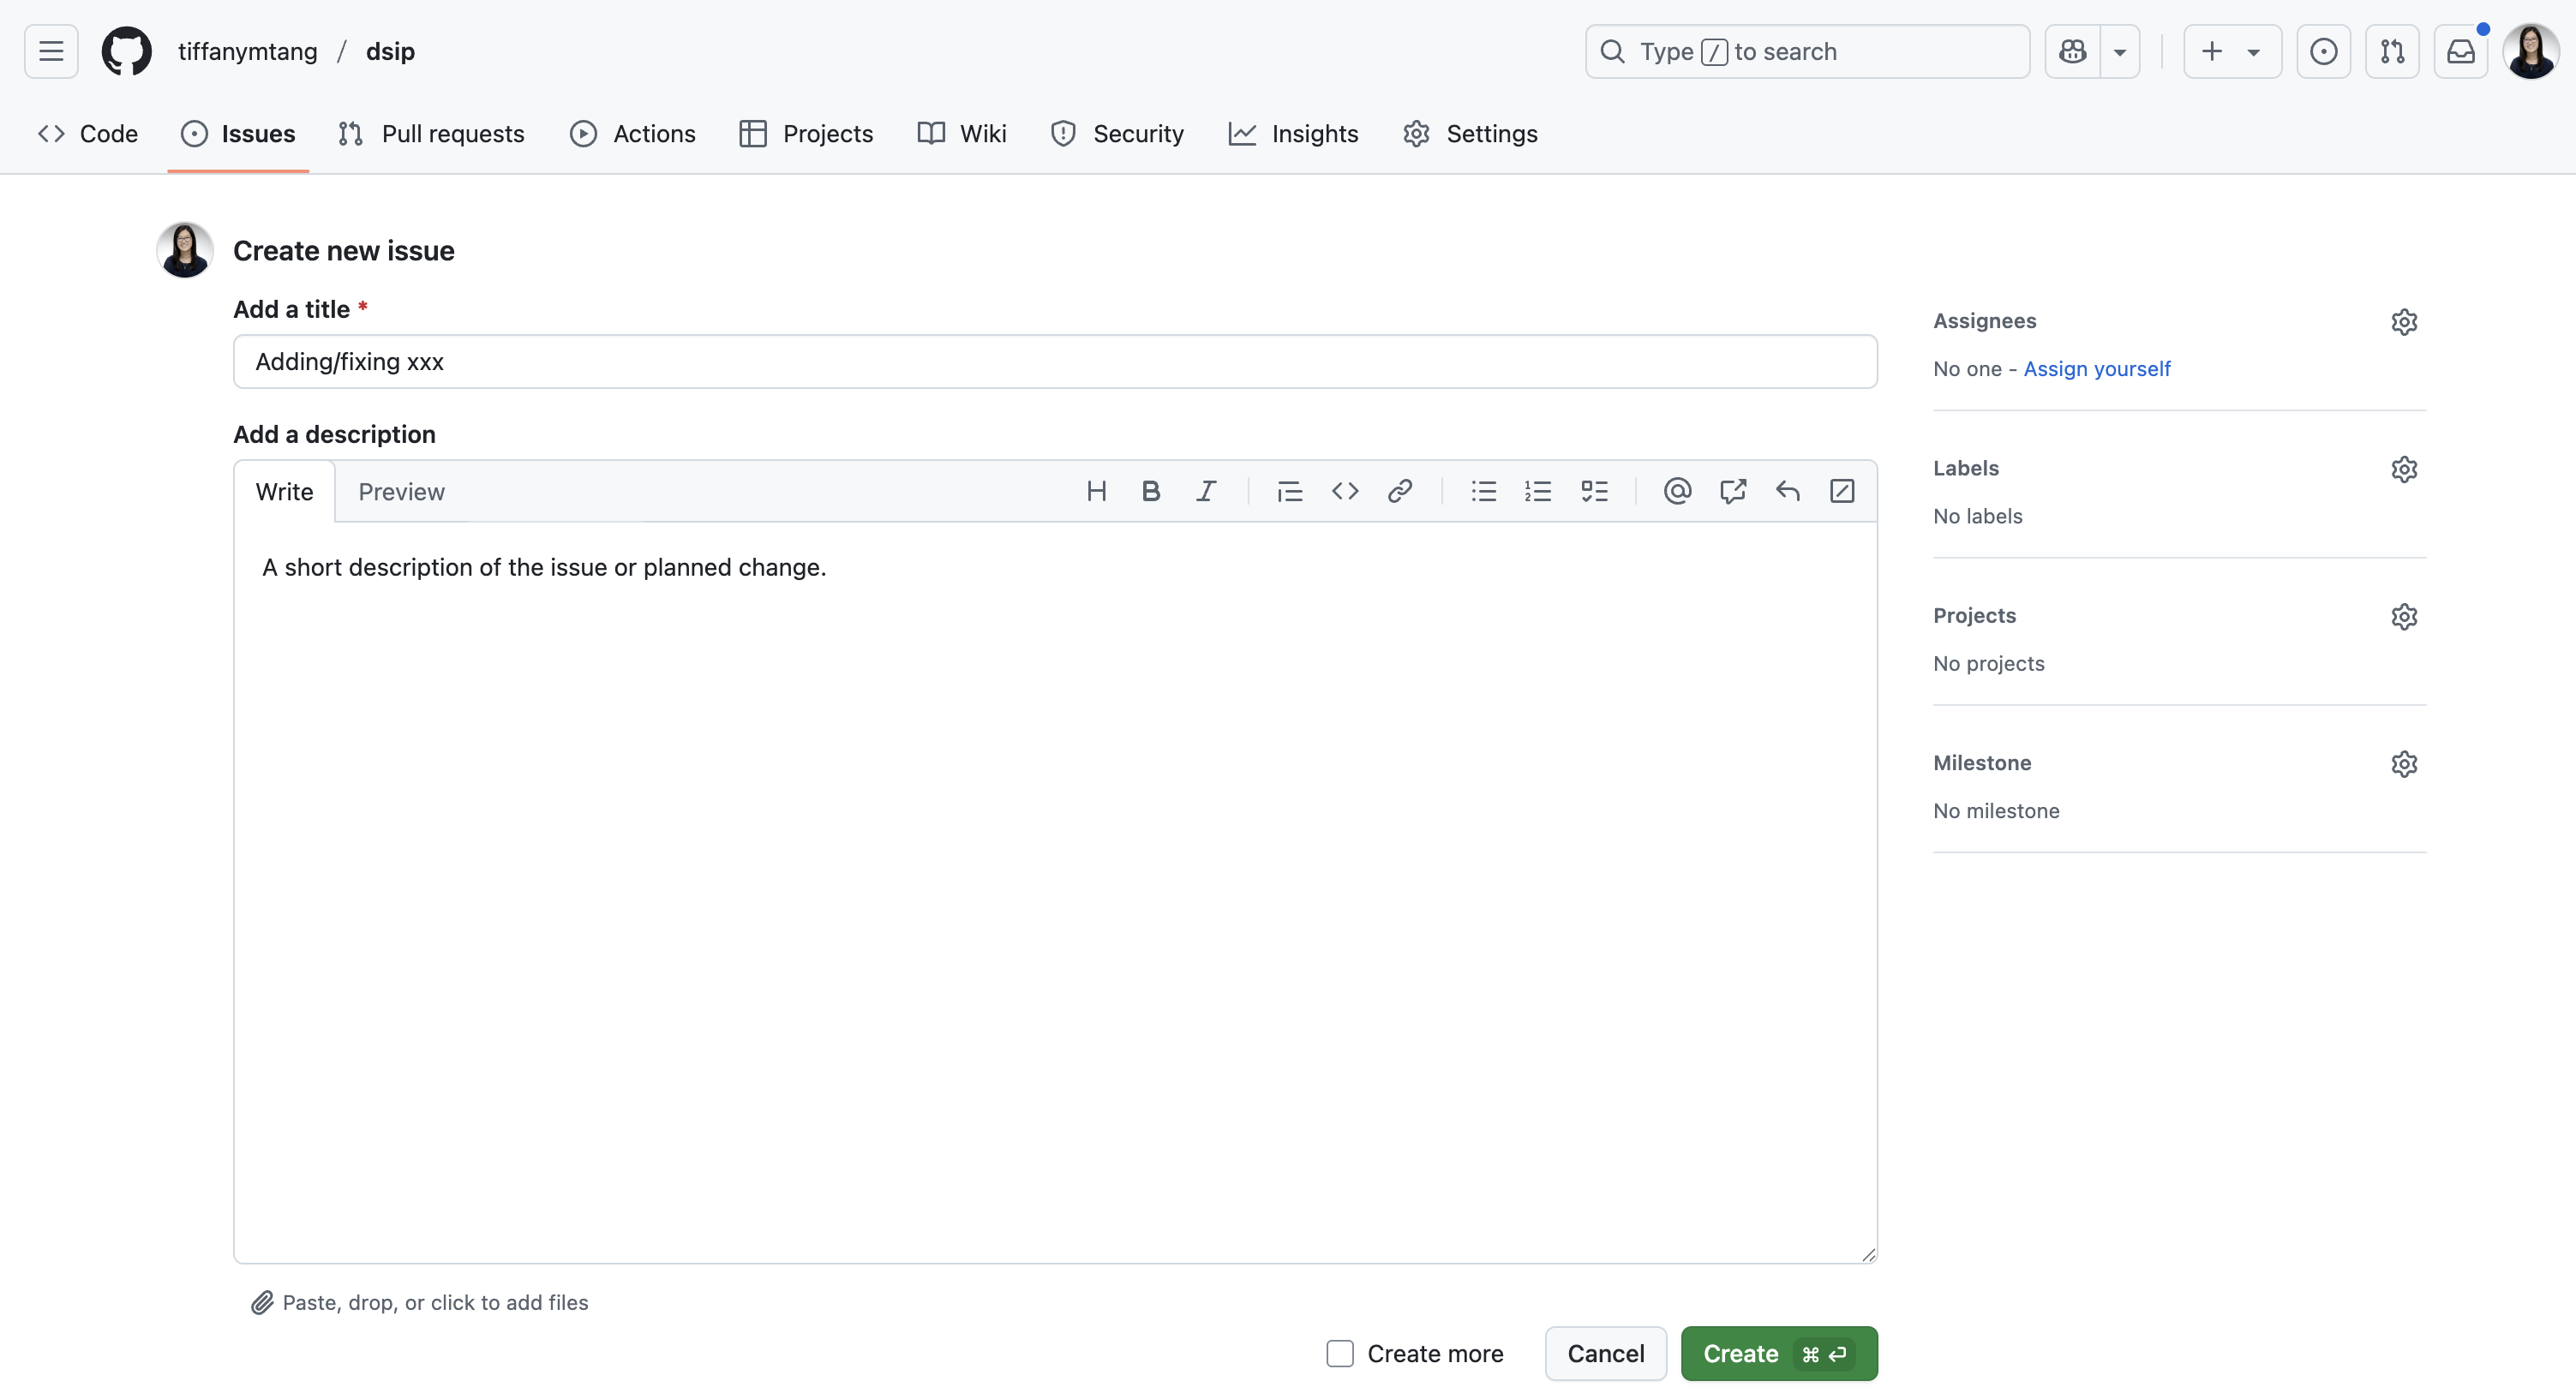
Click on the “Issues” tab and then on the green “New issue” button to create a new issue.

Fill in the title and description of the issue and click on the green “Submit new issue” button.
On the right panel, you can also assign the issue to yourself (or other collaborats) and/or add labels to the issue (e.g., “bug”, “enhancement”, etc.). This is a good way to keep track of what you are working on and to organize your work.


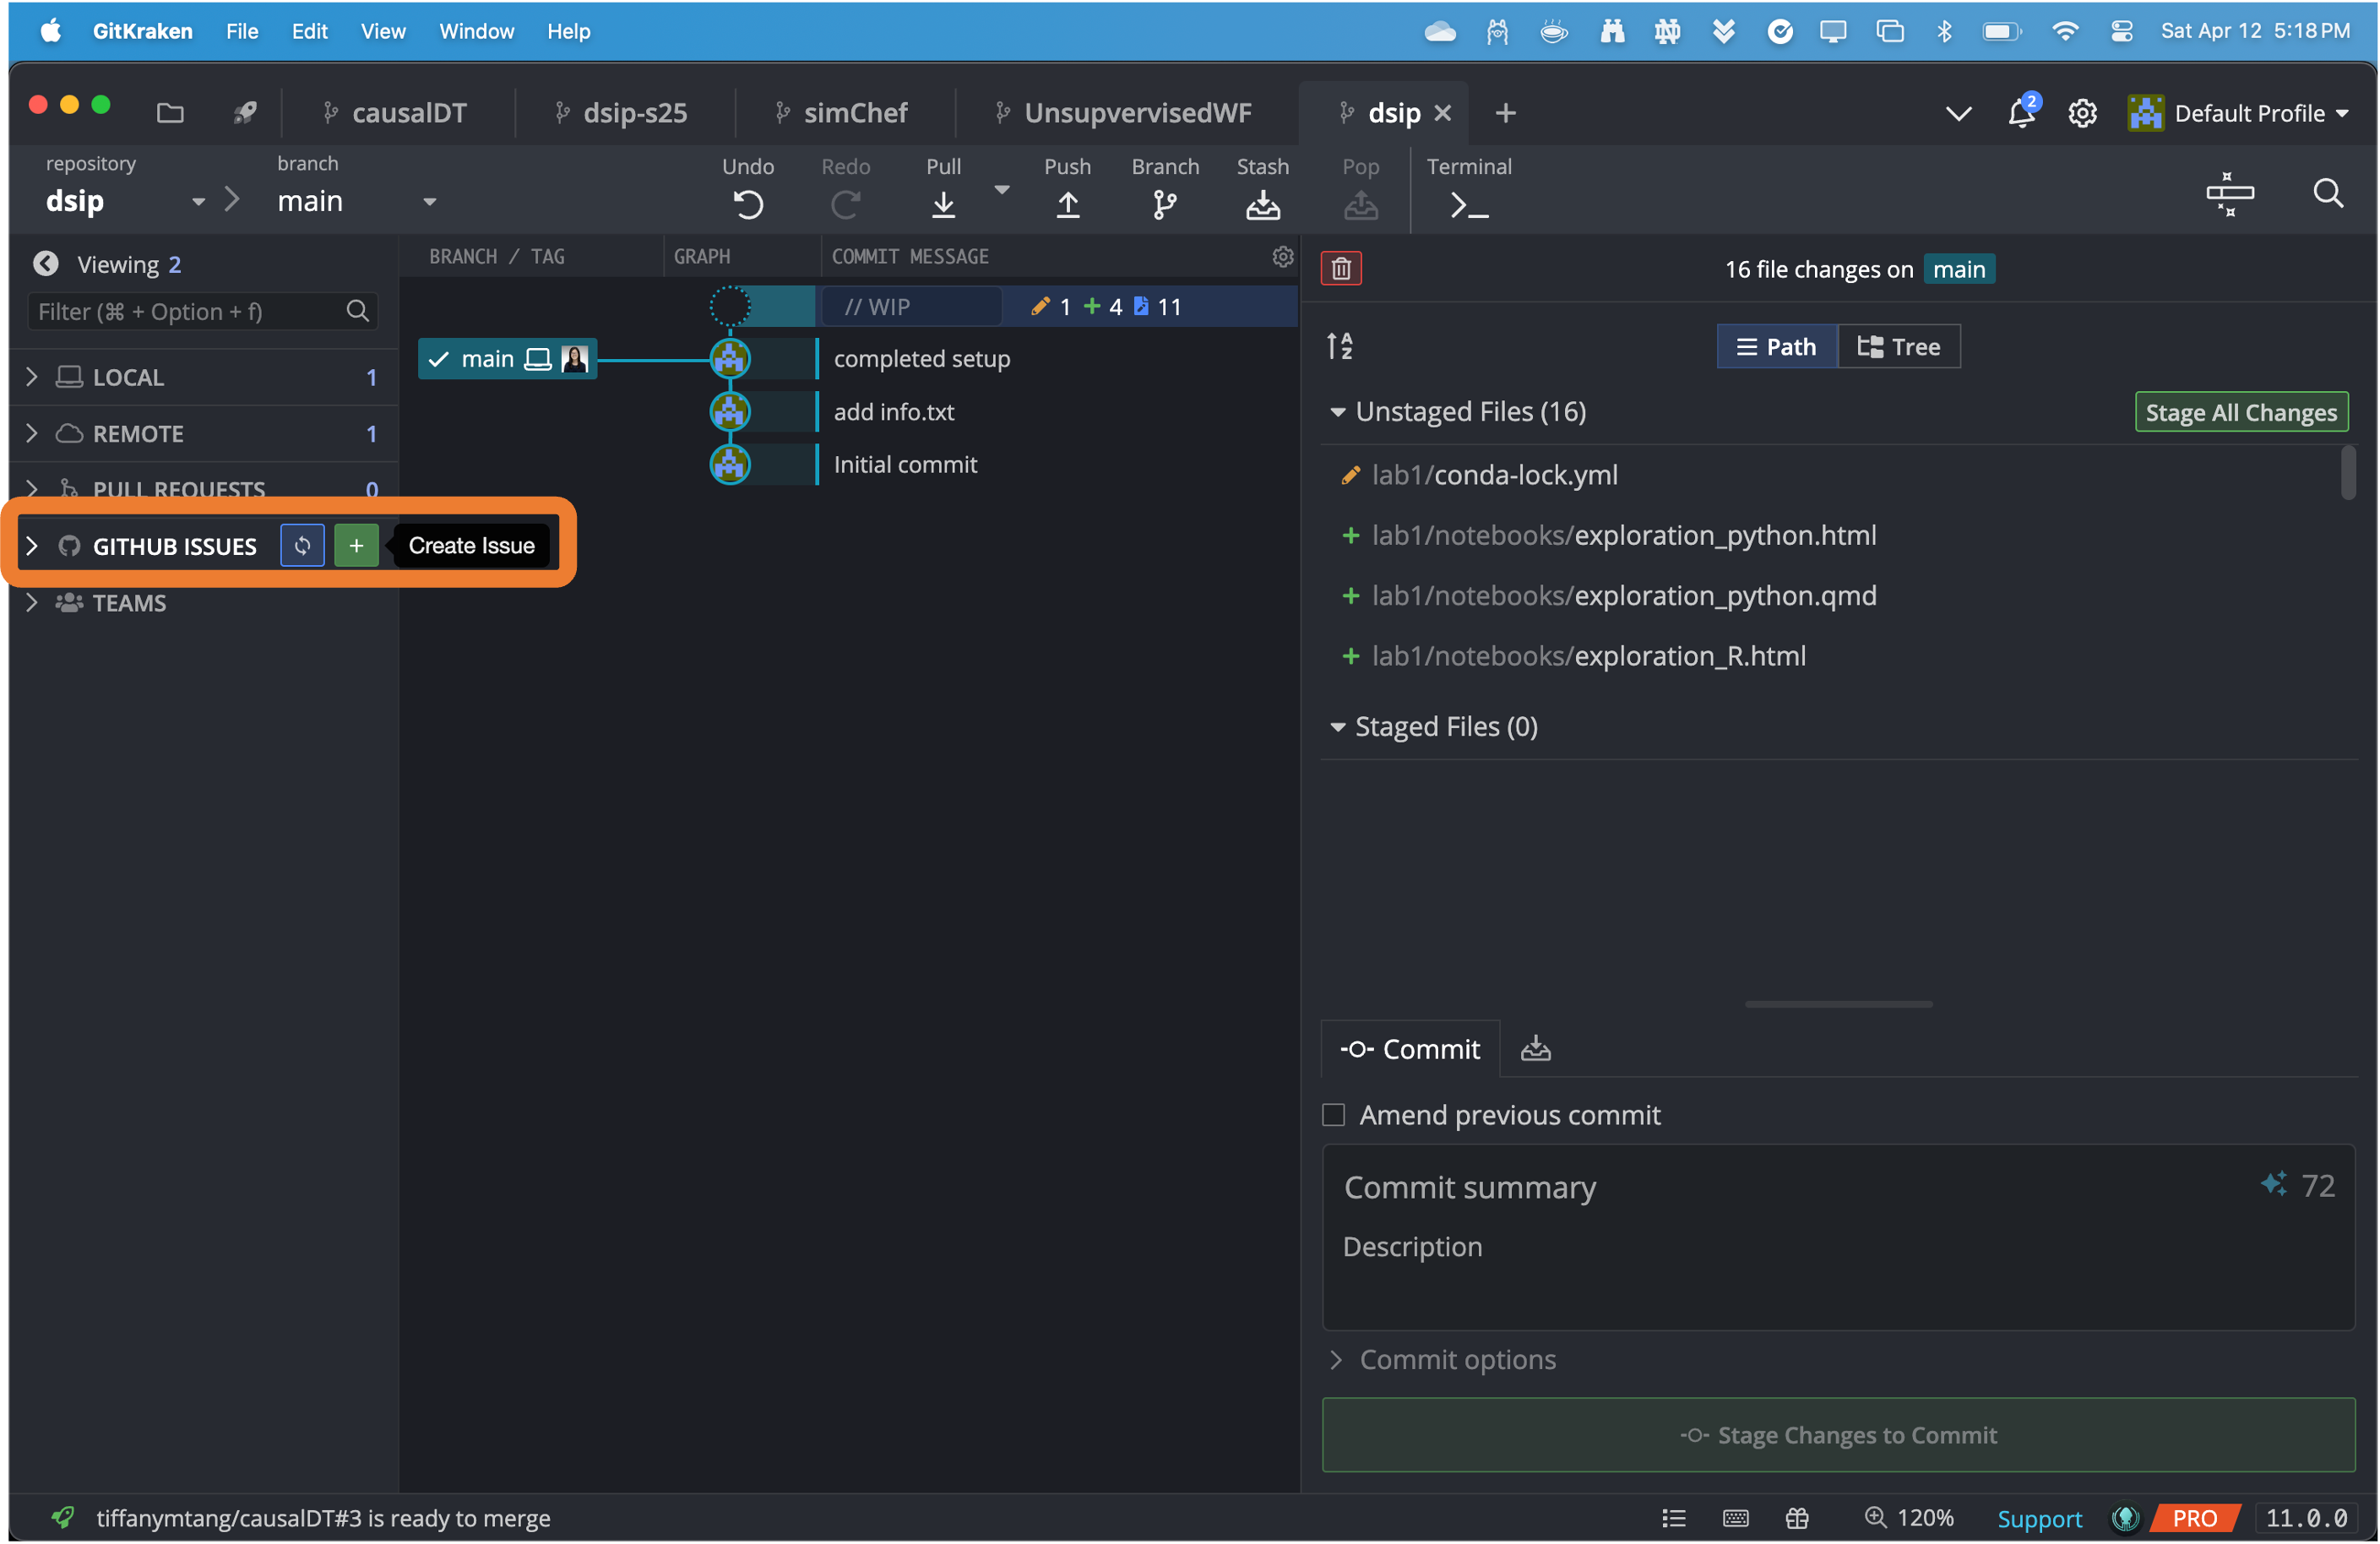
In GitKraken, hover over the “GitHub Issues” icon on the left sidebar and click on the “+” button to create a new issue.

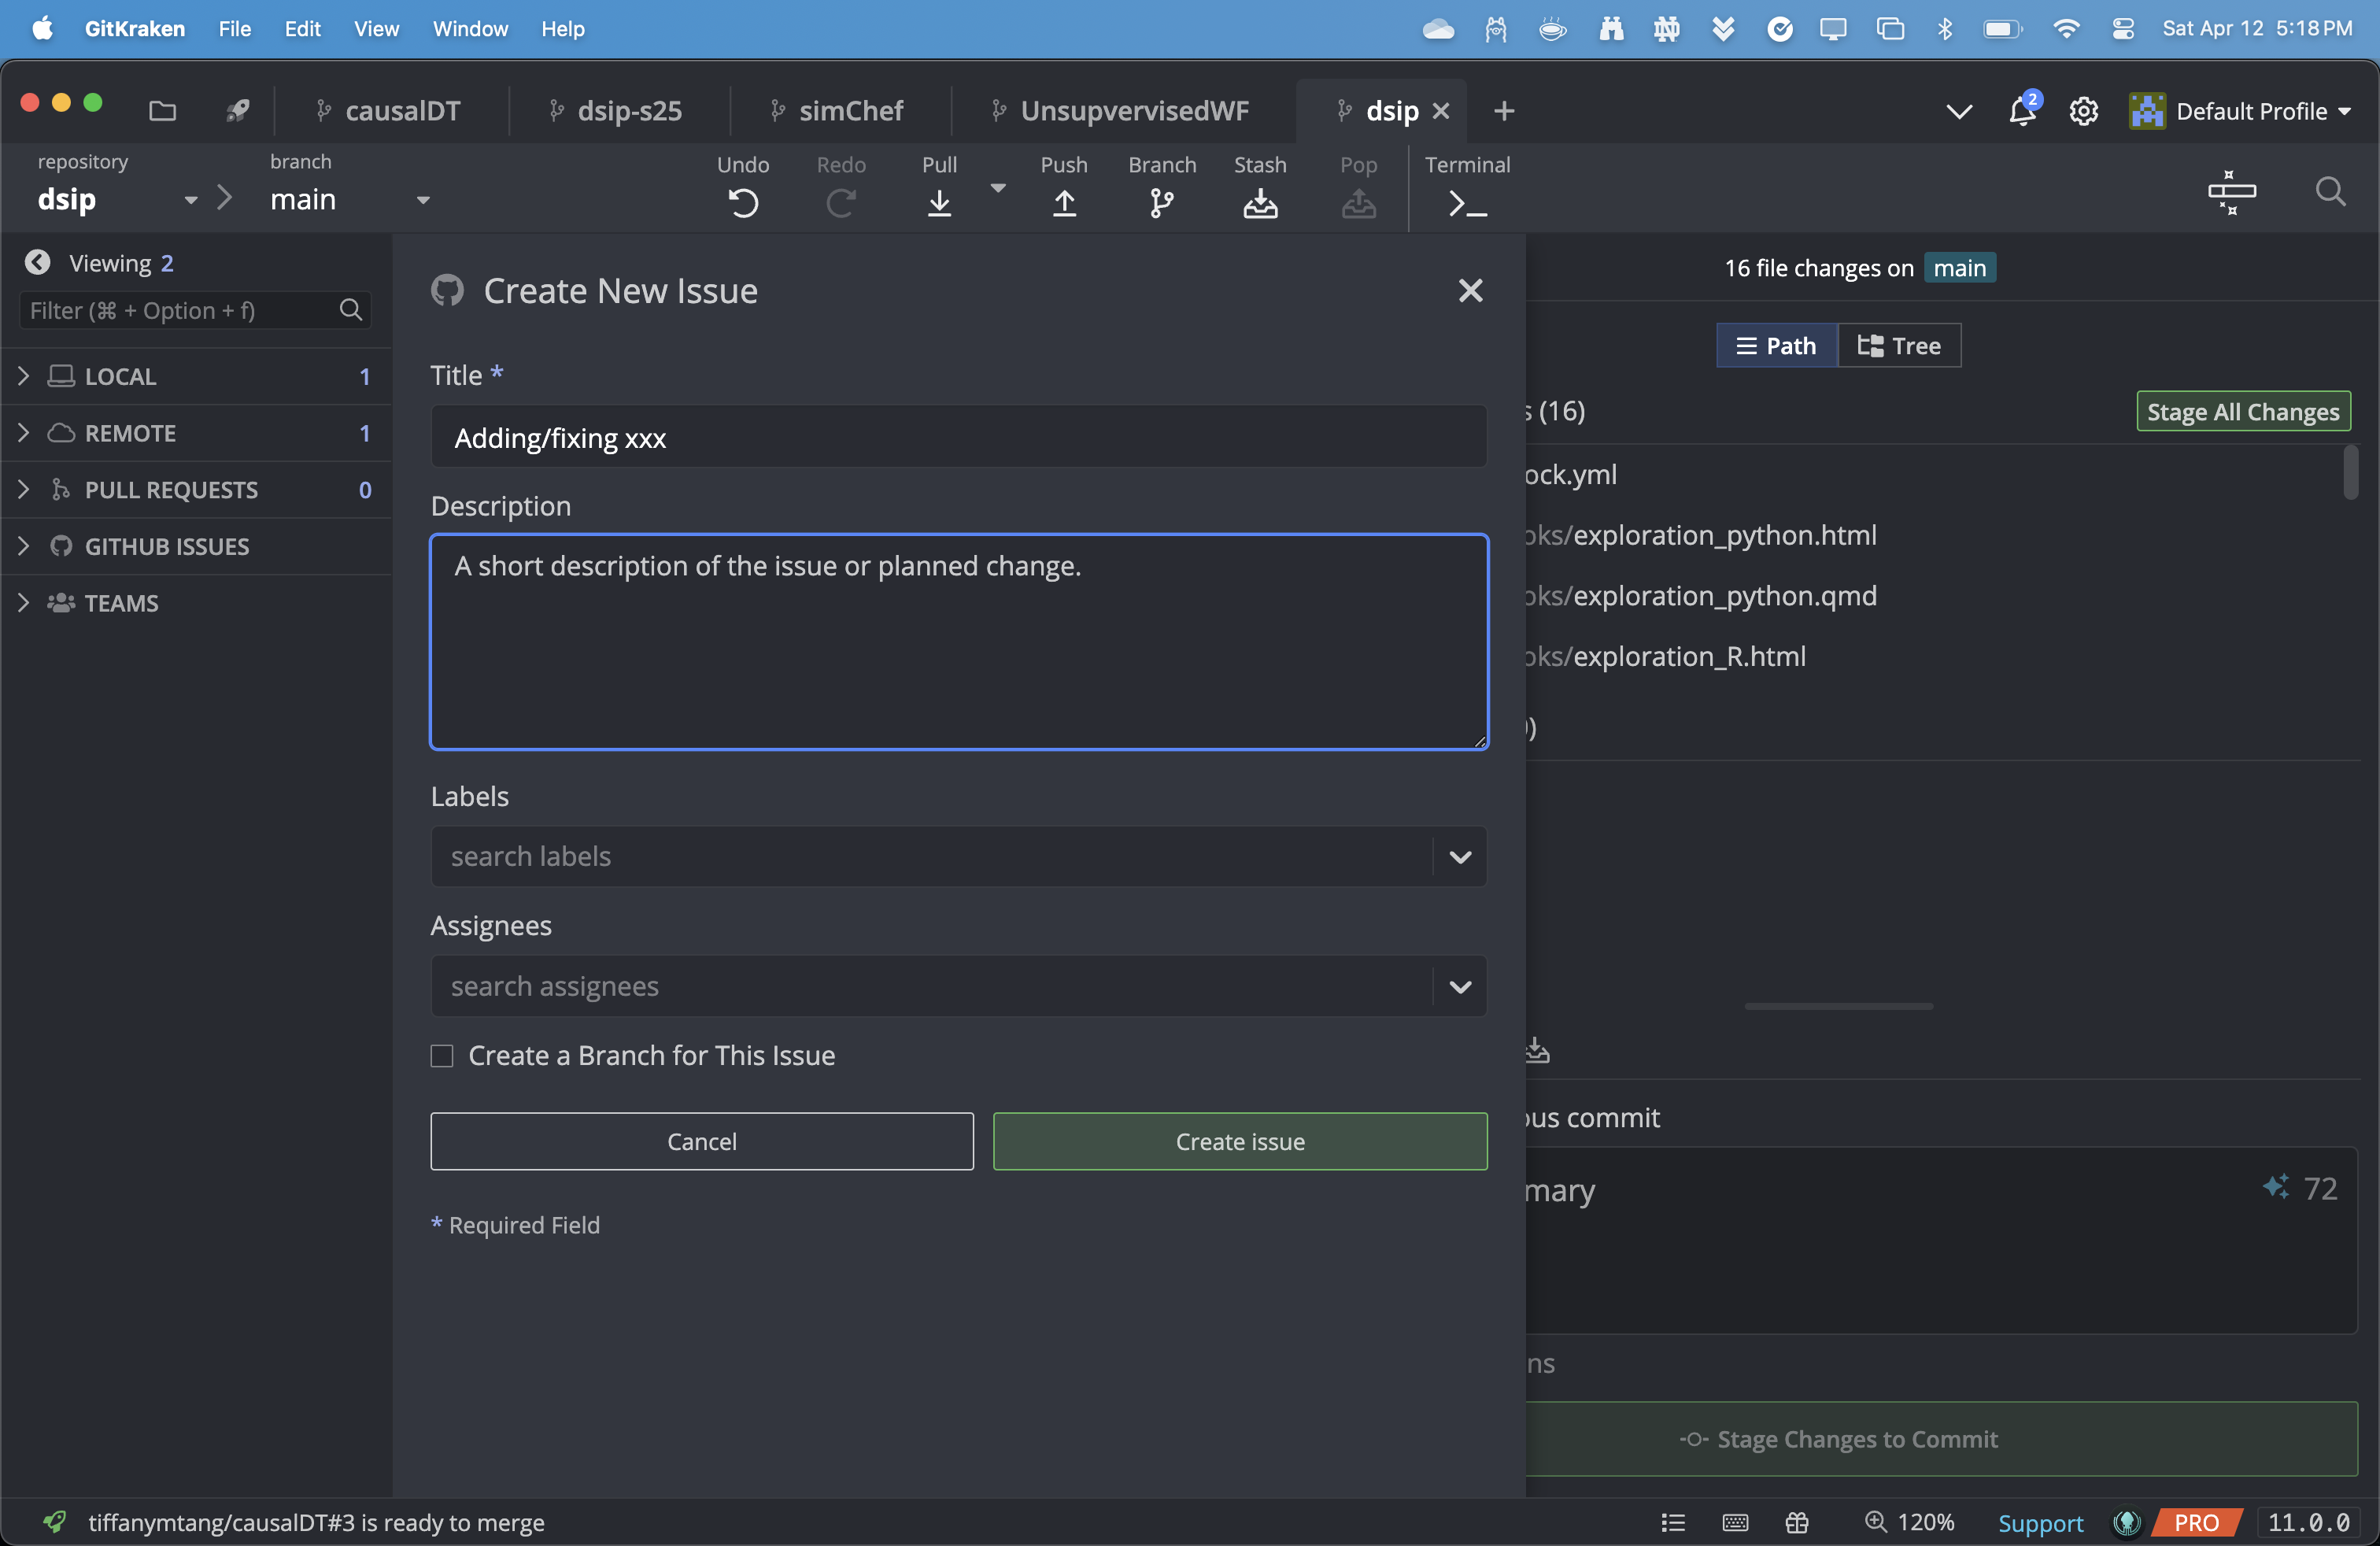
Fill in the title and description of the issue and click on the green “Create issue” button.
You can also assign the issue to yourself (or other collaborators) and/or add labels to the issue (e.g., “bug”, “enhancement”, etc.). This is a good way to keep track of what you are working on and to organize your work.

Step 2: Create a new branch
There are many ways to create a branch. Below, we will cover various ways to create a branch: (1) using GitHub.com, (2) using terminal, (3) using GitHub Desktop, and (4) using GitKraken. Importantly, note that if you create a branch using GitHub.com, this will create a remote branch (i.e., a branch on the remote server), which you will then need to pull locally. While if you create a branch using your local terminal, GitHub Desktop. or GitKraken, this will create a local branch (i.e., a branch on your local computer), which you will then need to push to the remote server.
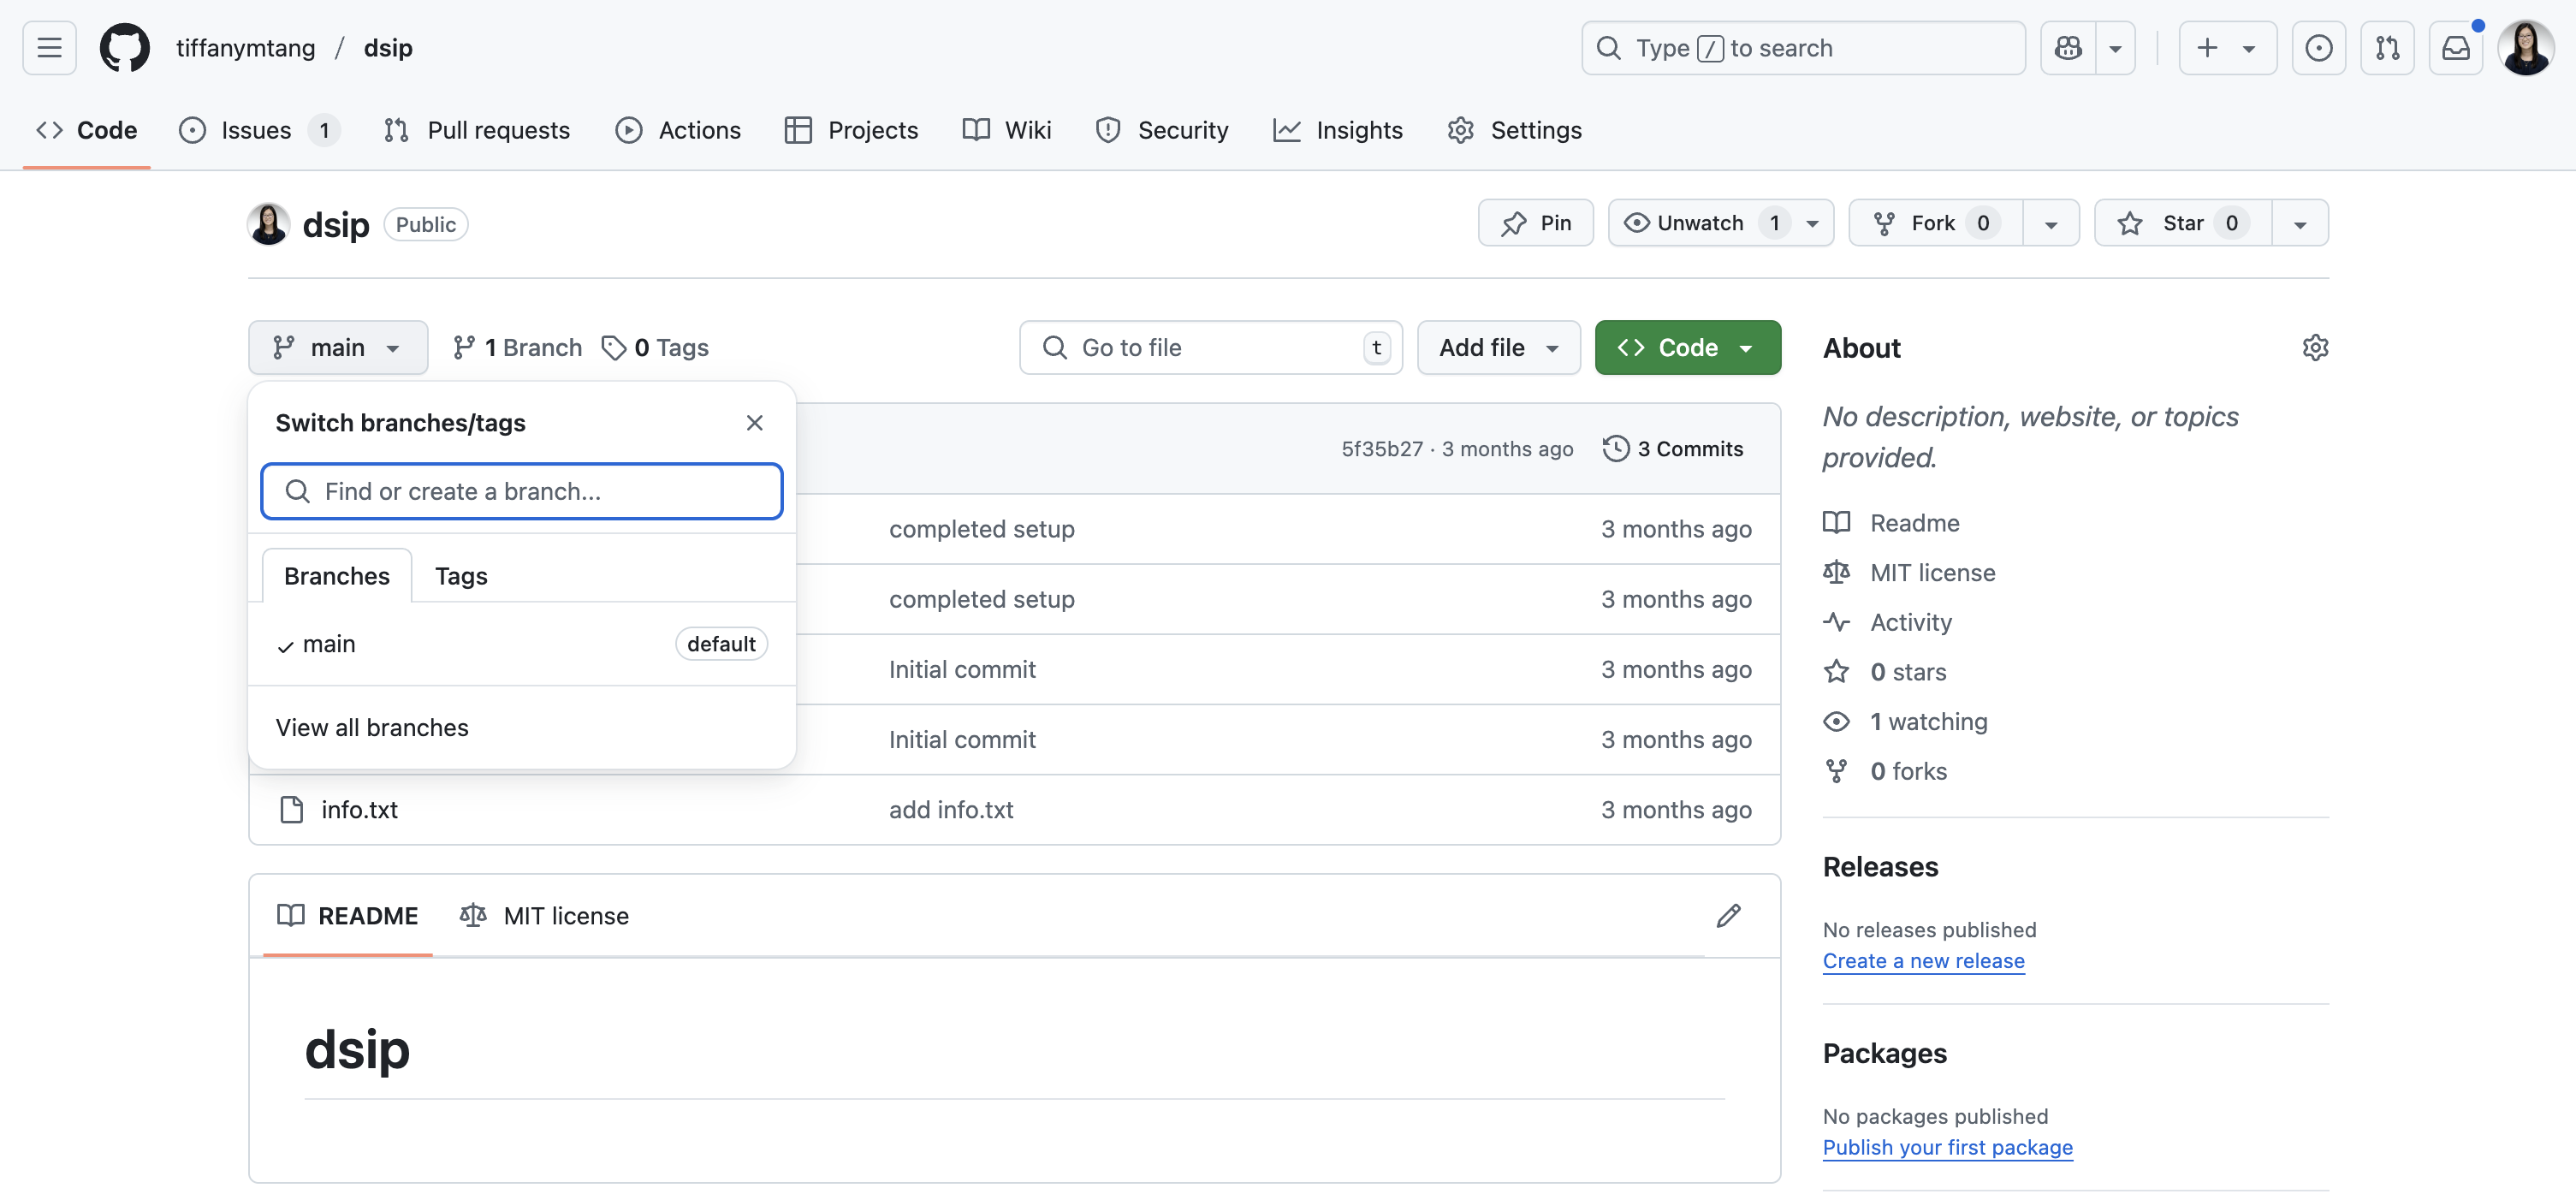
Generally, if you would like to create a (remote) branch (not for a specific issue), you can do so by:
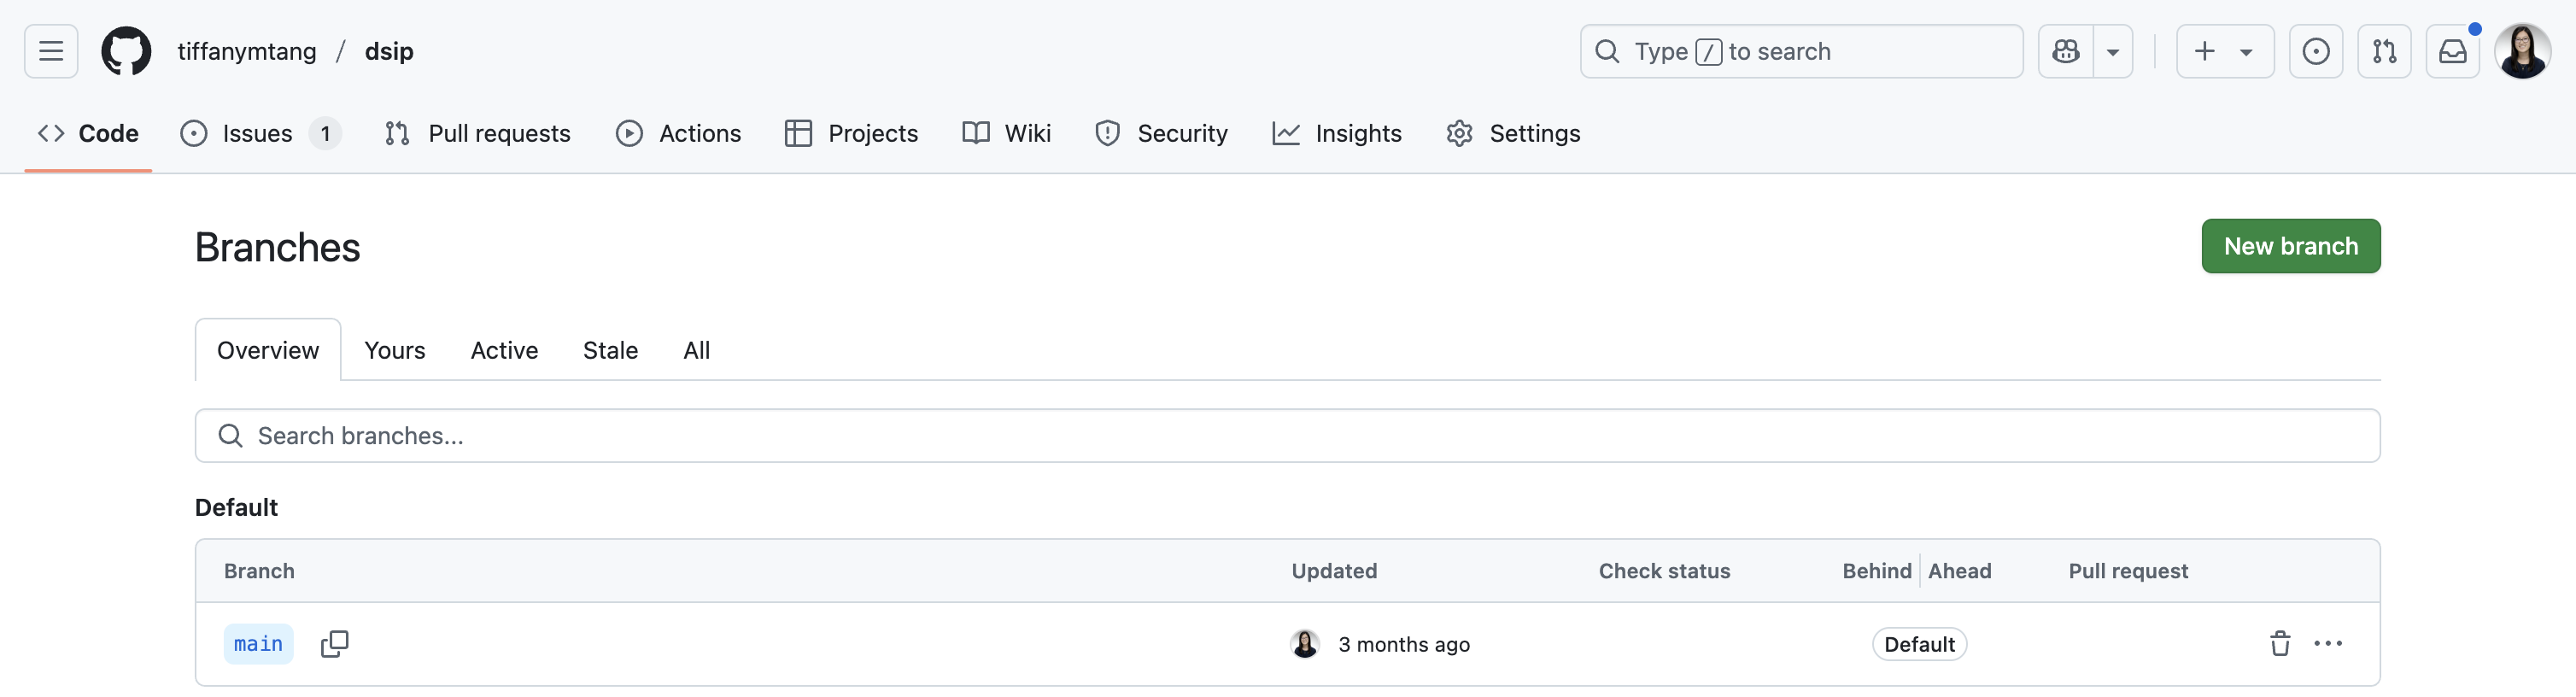
On your repository’s GitHub home page, click on the “main” dropdown button and then on “View all branches”. Then click on the green “New branch” button.


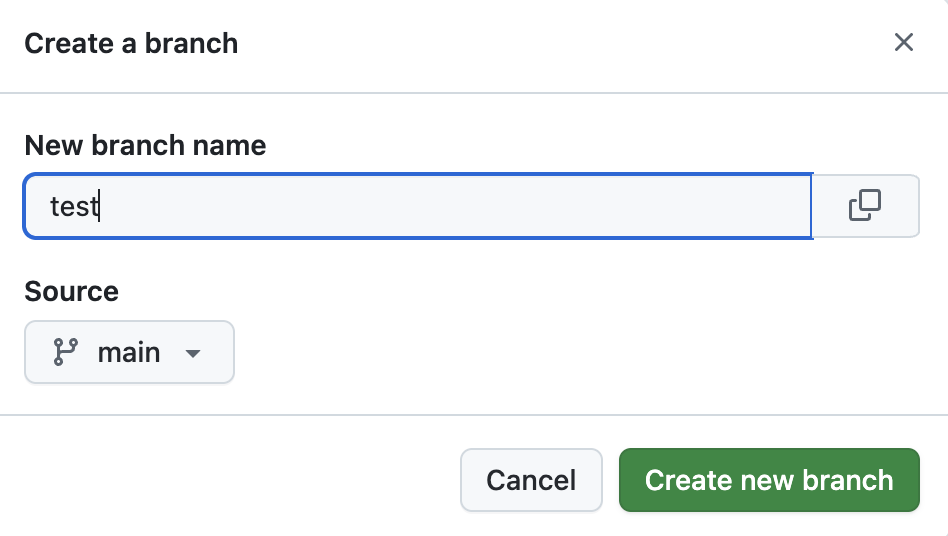
Give the branch a name, and click on the green “Create branch” button. This will create a new branch on the remote repository.
Note: Some conventions for naming branches include beginning the branch name with
feature/<feature_name>for new features,bugfix/<bugfix_name>for fixing bugs, orhotfix/<hotfix_name>for urgent fixes.
If you would like to create a (remote) branch specifically for an issue, you can do so by:
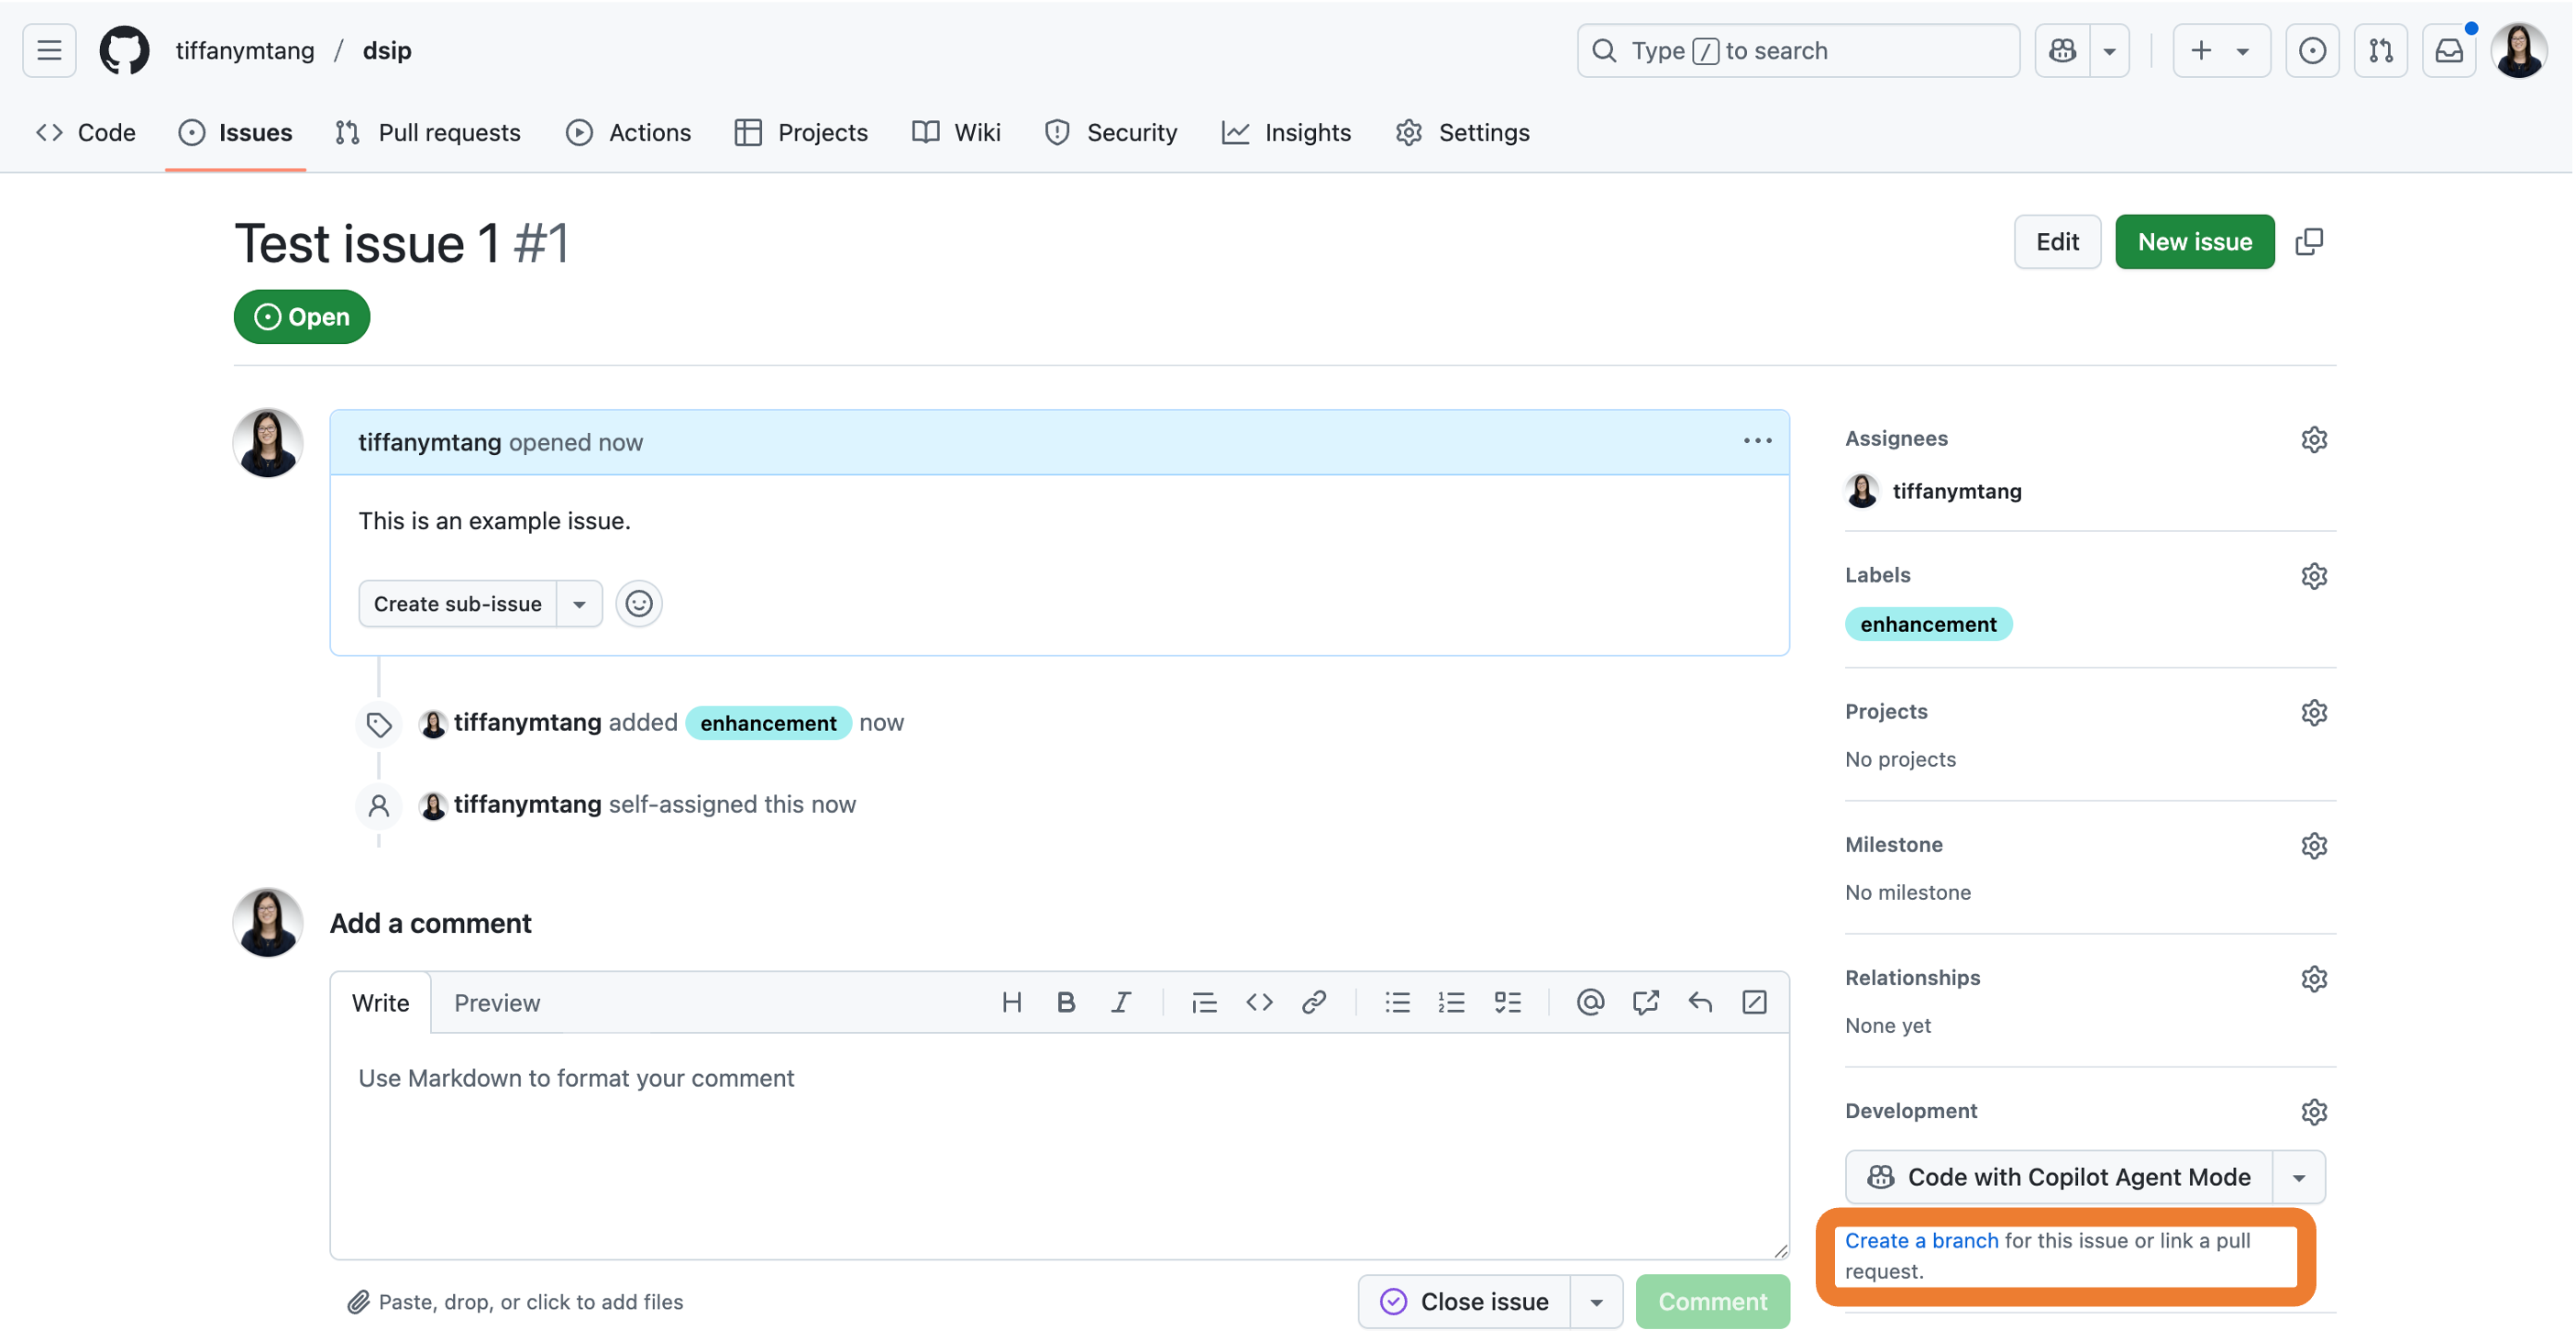
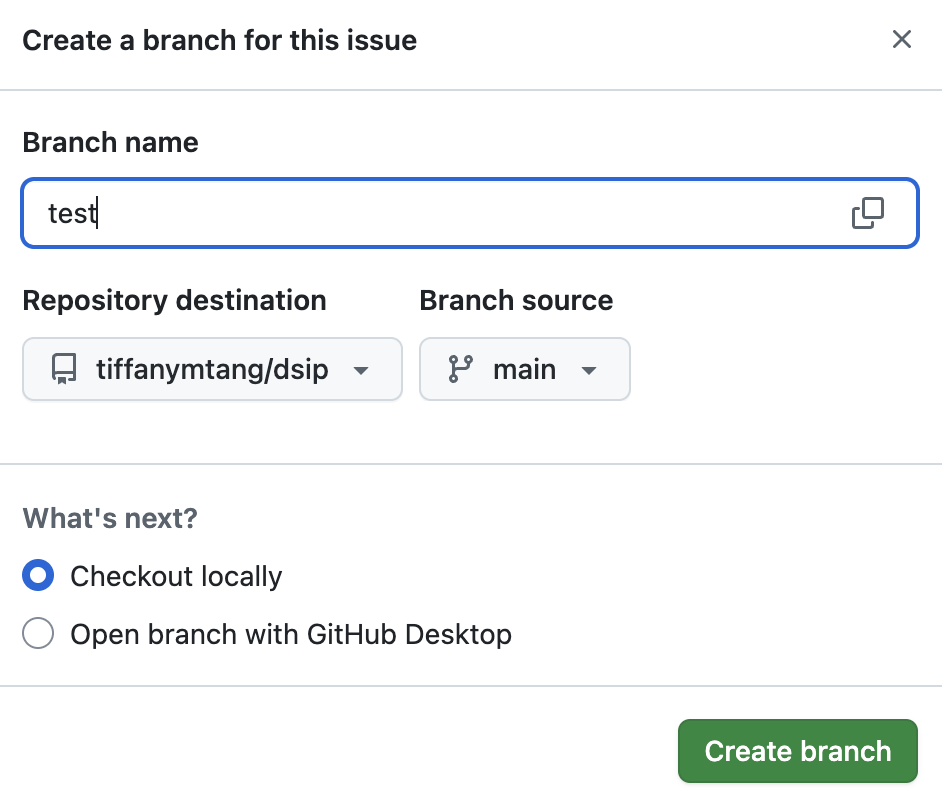
On your issue’s home page, under the “Development” section on the right-side panel, click on the “Create a branch” button.

Give the branch a name, and click on the green “Create branch” button. This will create a new branch on the remote repository and will automatically link it to the issue.
Note: Some conventions for naming branches include beginning the branch name with
feature/<feature_name>for new features,bugfix/<bugfix_name>for fixing bugs, orhotfix/<hotfix_name>for urgent fixes.
After you create the remote branch, you can pull this branch to your local computer and switch to that branch via:
- In your terminal, navigate to your GitHub repository folder (e.g.,
path/to/dsip) and run the following commands:
git fetch origin
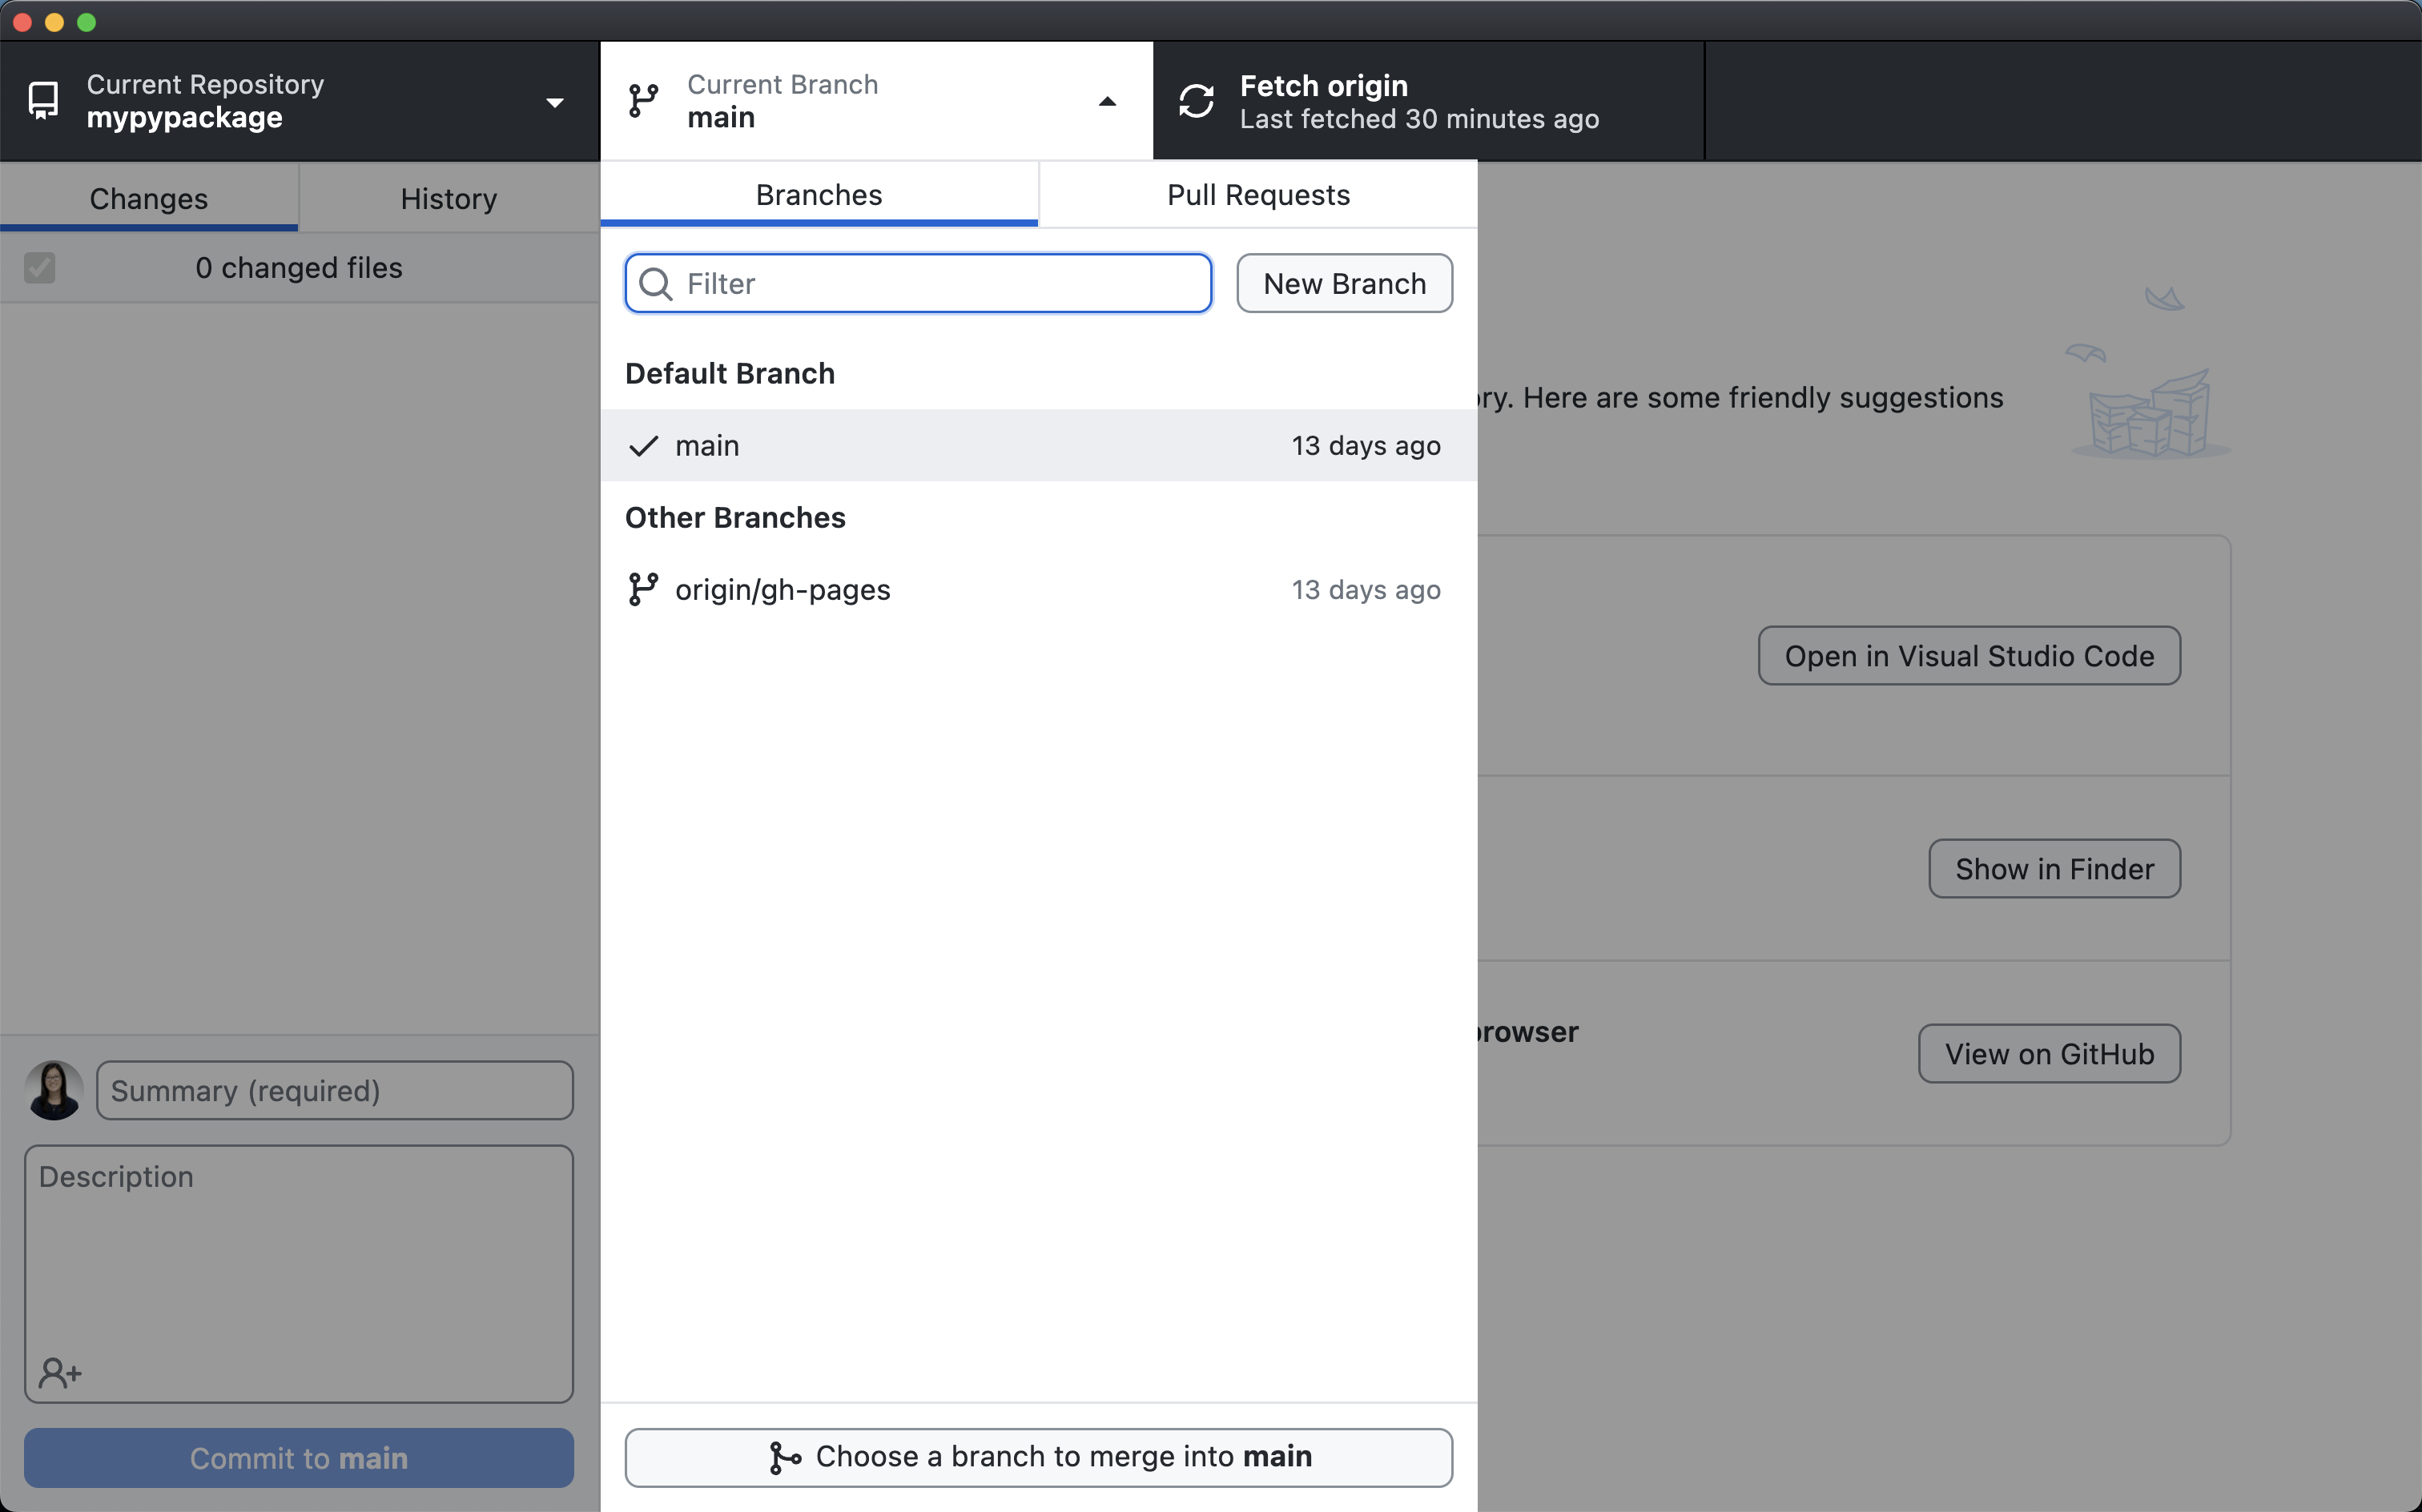
git checkout <new_branch_name>In GitHub Desktop, click on “Fetch origin”, and then click on the “Current Branch” dropdown button. Choose to switch to the branch that you just created.
If you have uncommited changes in your repository, GitHub Desktop will ask whether you’d like to “leave your changes on main” or “bring your changes to the new branch”. Either option will work. It is a matter of whether you want the changes you’ve made to be included in the new branch or left on the main branch to return to later.
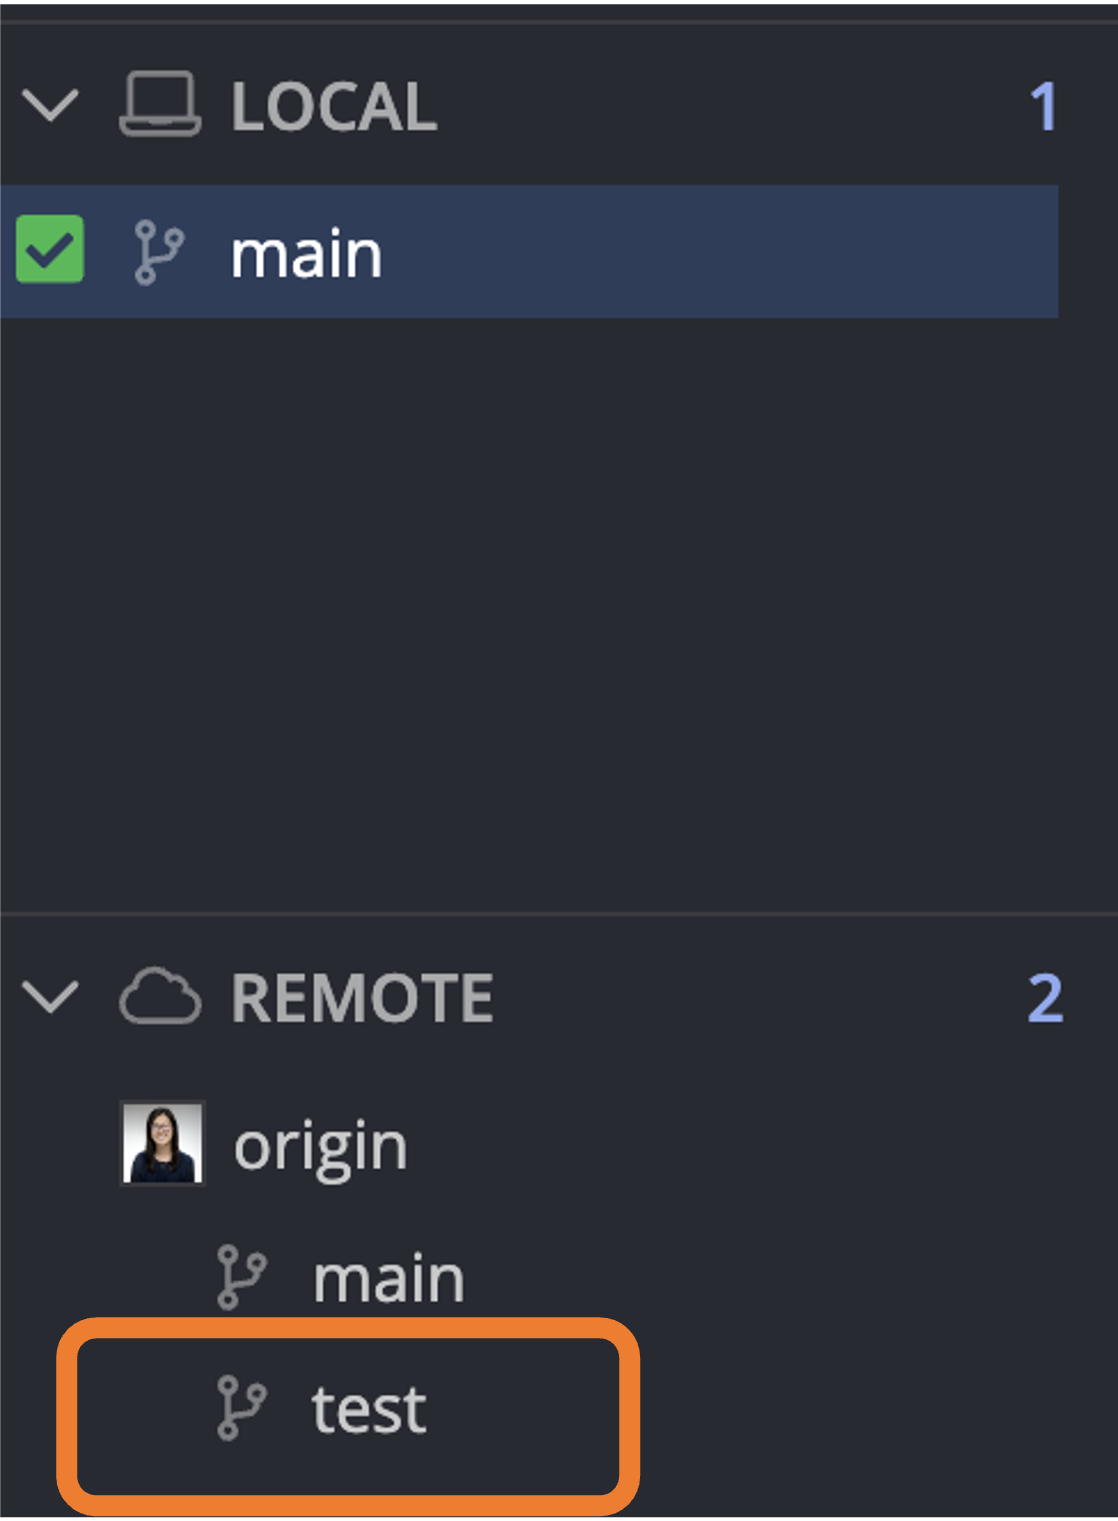
In GitKraken, click on the “Remote” section on the left sidebar and then double click on the branch that you just created. This will automatically pull that branch to your local machine and switch your current branch to this new branch.
You should notice that after you double click on the branch, a new branch (with the same name) will appear under the “Local” section on the left sidebar. This means that you have successfully pulled the branch to your local machine.

In your terminal, navigate to your GitHub repository folder (e.g.,
path/to/dsip) and run the following command to create a new branch and switch to that branch:git checkout -b <new_branch_name>Note that this will only create a new branch on your local computer. To have this branch appear on GitHub.com, you will need to push this branch to the remote repository via:
git push -u origin <new_branch_name>
In GitHub Desktop, click on the “Current Branch” dropdown button and then on “New Branch”.

Give the branch a name, and click on the green “Create Branch” button. This will create a new branch on your local repository. It will also automatically switch your current branch to this new branch.
Note: Some conventions for naming branches include beginning the branch name with
feature/<feature_name>for new features,bugfix/<bugfix_name>for fixing bugs, orhotfix/<hotfix_name>for urgent fixes.To have this branch appear on GitHub.com, you will need to push this branch to the remote repository by clicking on the “Publish branch” button at the top.
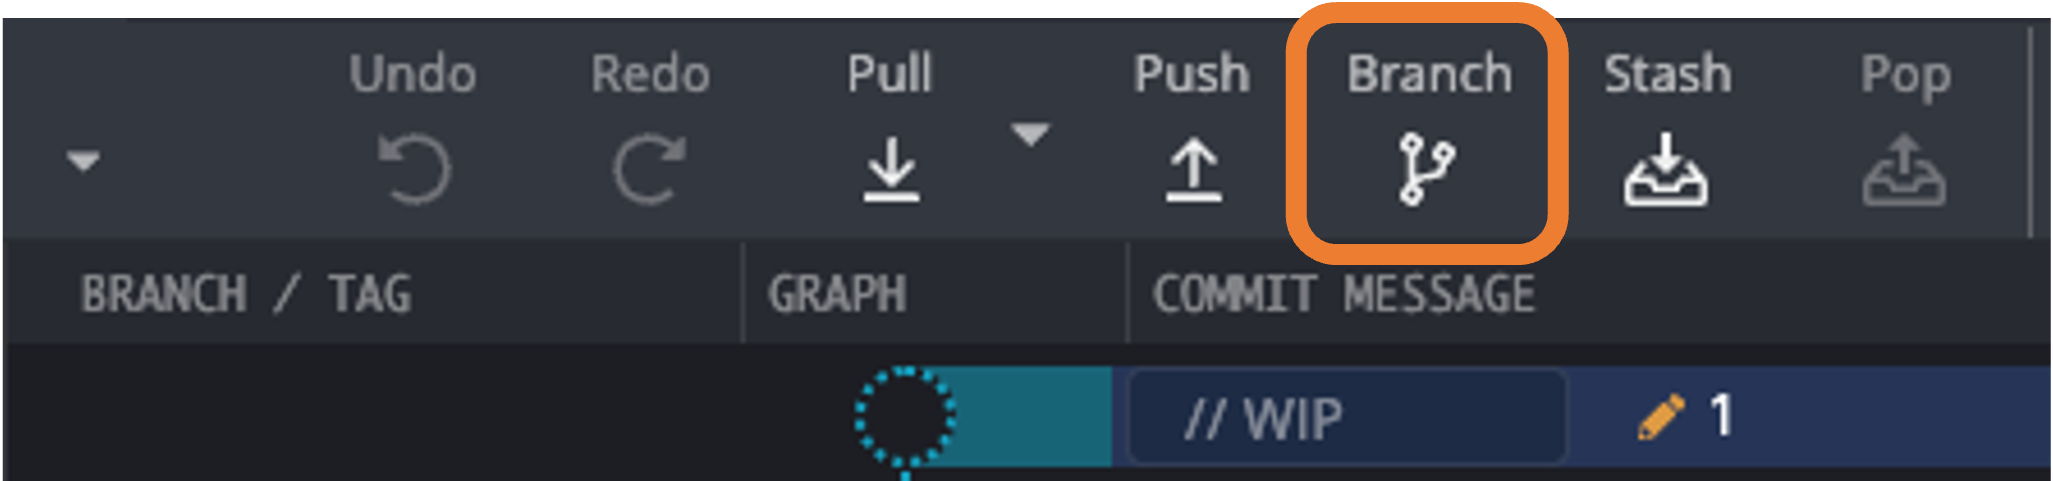
In GitKraken, click on the “Branch” icon at the top.

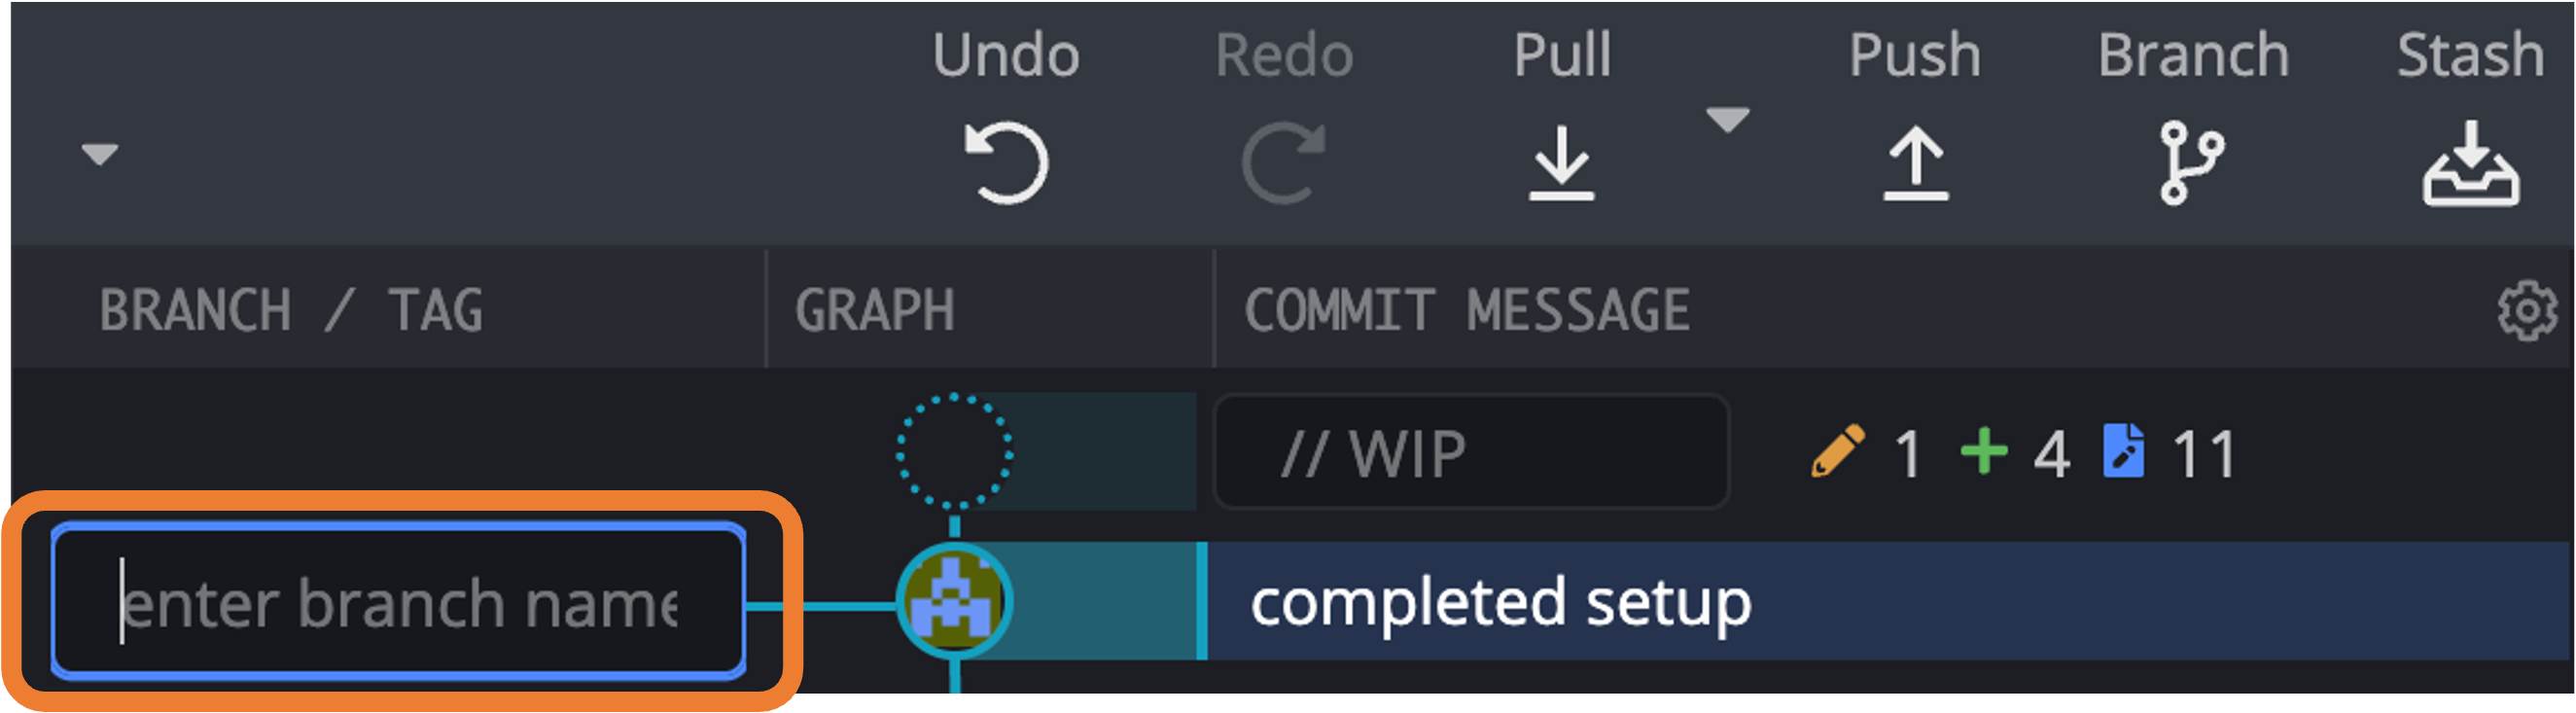
Enter the name of the branch in the text input field and hit “Enter”. This will create a new branch on your local repository. It will also automatically switch your current branch to this new branch.
Note: Some conventions for naming branches include beginning the branch name with
feature/<feature_name>for new features,bugfix/<bugfix_name>for fixing bugs, orhotfix/<hotfix_name>for urgent fixes.
To have this branch appear on GitHub.com, you will need to push this branch to the remote repository by clicking on the “Push” button at the top of the application and then entering the name of the branch in the text input field after “origin/” (as suggested by GitKraken). This will publish a remote version of the branch on GitHub.
Step 3: Make changes locally and push changes
Double check that you are working on your new branch by running the following command in your terminal:
git statusIf you are working on your new branch, you should see something like this:
On branch <new_branch_name>while if you are working on the main branch, you would see something like this:
On branch mainIf you are not on your new branch, you can switch to it by running the following command:
git checkout <new_branch_name>Make changes to your code.
Add, commit, and push your changes to the remote repository using the same commands as before:
git add <file_name> git commit -m "<a short commit message>" git push
Double check that you are working on your new branch by looking at the top left corner of the application where it says “Current Branch”. If you are working on your new branch, it should say the name of your new branch while if you are working on the main branch, it should say “main”. If you are not on your new branch, you can switch to it by clicking on the “Current Branch” dropdown button and selecting your new branch.
Make changes to your code.
Add, commit, and push your changes to the remote repository using the same commands as before:
- Click on the “Changes” tab (on the left) and check the box next to the file(s) that you want to add to the staging area.
- Add a commit message to the text input field next to your GitHub icon. Once you are satisfied with the message, click on the “Commit to <new_branch_name>” button.
- Click on the button at the top that either says “Push origin” or “Publish branch”. If you have already created a remote version of this branch, the button will say “Push origin”. If you have only created a local version of this branch, the button will say “Publish branch”. Publishing the branch will create a remote version of the branch on GitHub.
Double check that you are working on your new branch by looking at the top where it says “branch”. If you are working on your new branch, it should say the name of your new branch while if you are working on the main branch, it should say “main”. If you are not on your new branch, you can switch to it by clicking on the “branch” dropdown button and selecting your new branch.
Make changes to your code.
Add, commit, and push your changes to the remote repository using the same commands as before:
- Click on the “Unstaged Files” section and check the box next to the file(s) that you want to add to the staging area. This will move the file(s) from the “Unstaged Files” section to the “Staged Files” section.
- Add a commit message to the “Commit summary” field. Once you are satisfied with the message, click on the “Commit changes” button.
- Click on the “Push” button at the top of the application.
- If you have only created a local version of this branch (and not yet created the remote version), GitKraken will ask what remote branch you would like to push to. You should enter the name of your new branch in the text input field after “origin/” (as suggested by GitKraken). This will publish a remote version of the branch on GitHub. If you have already created a remote version of this branch, this step is not necessary.
Step 4: Create a pull request
Once you are satisfied with your changes and would like to review your changes and/or merge them into the main branch, you can create a pull request. A pull request is a way to propose changes to the main branch, review the changes, and ask for feedback on these changes before merging them.
Go to your repository’s GitHub.com page.
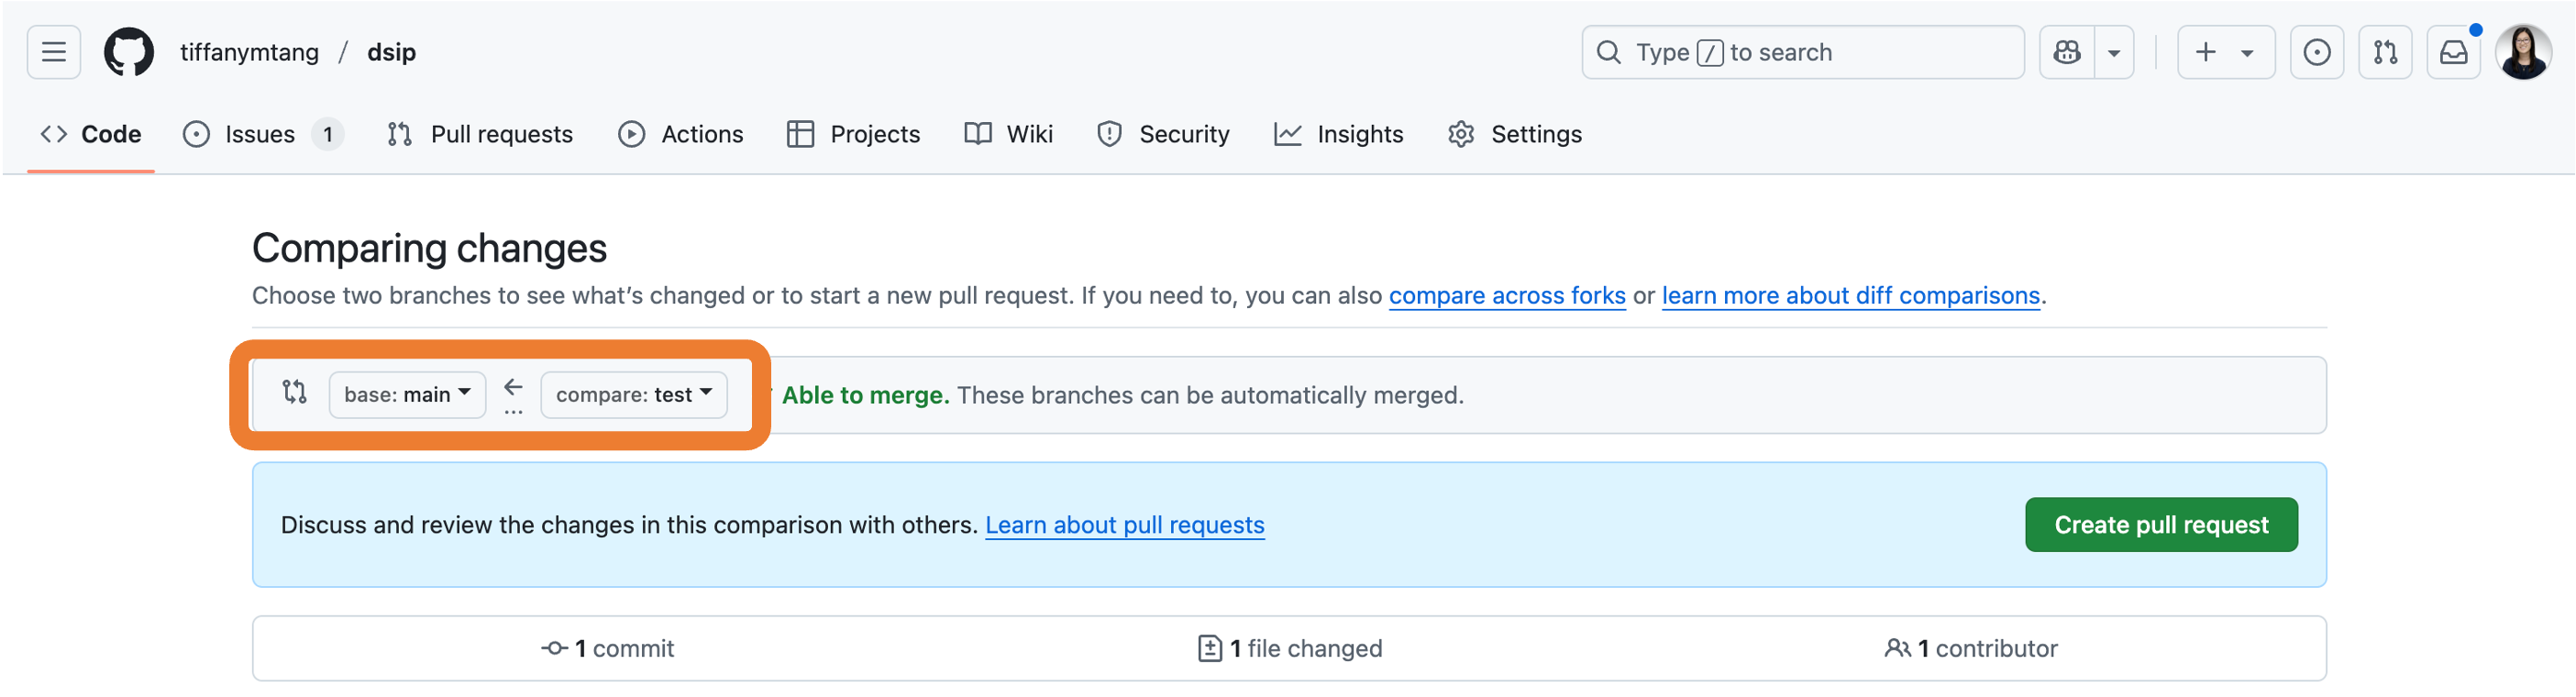
Click on the “Pull requests” tab and then on the green “New pull request” button to create a new pull request.

Since we want to merge the new branch into the main branch, make sure that the base branch is set to “main” and the compare branch is set to your new branch. Then click on the green “Create pull request” button.

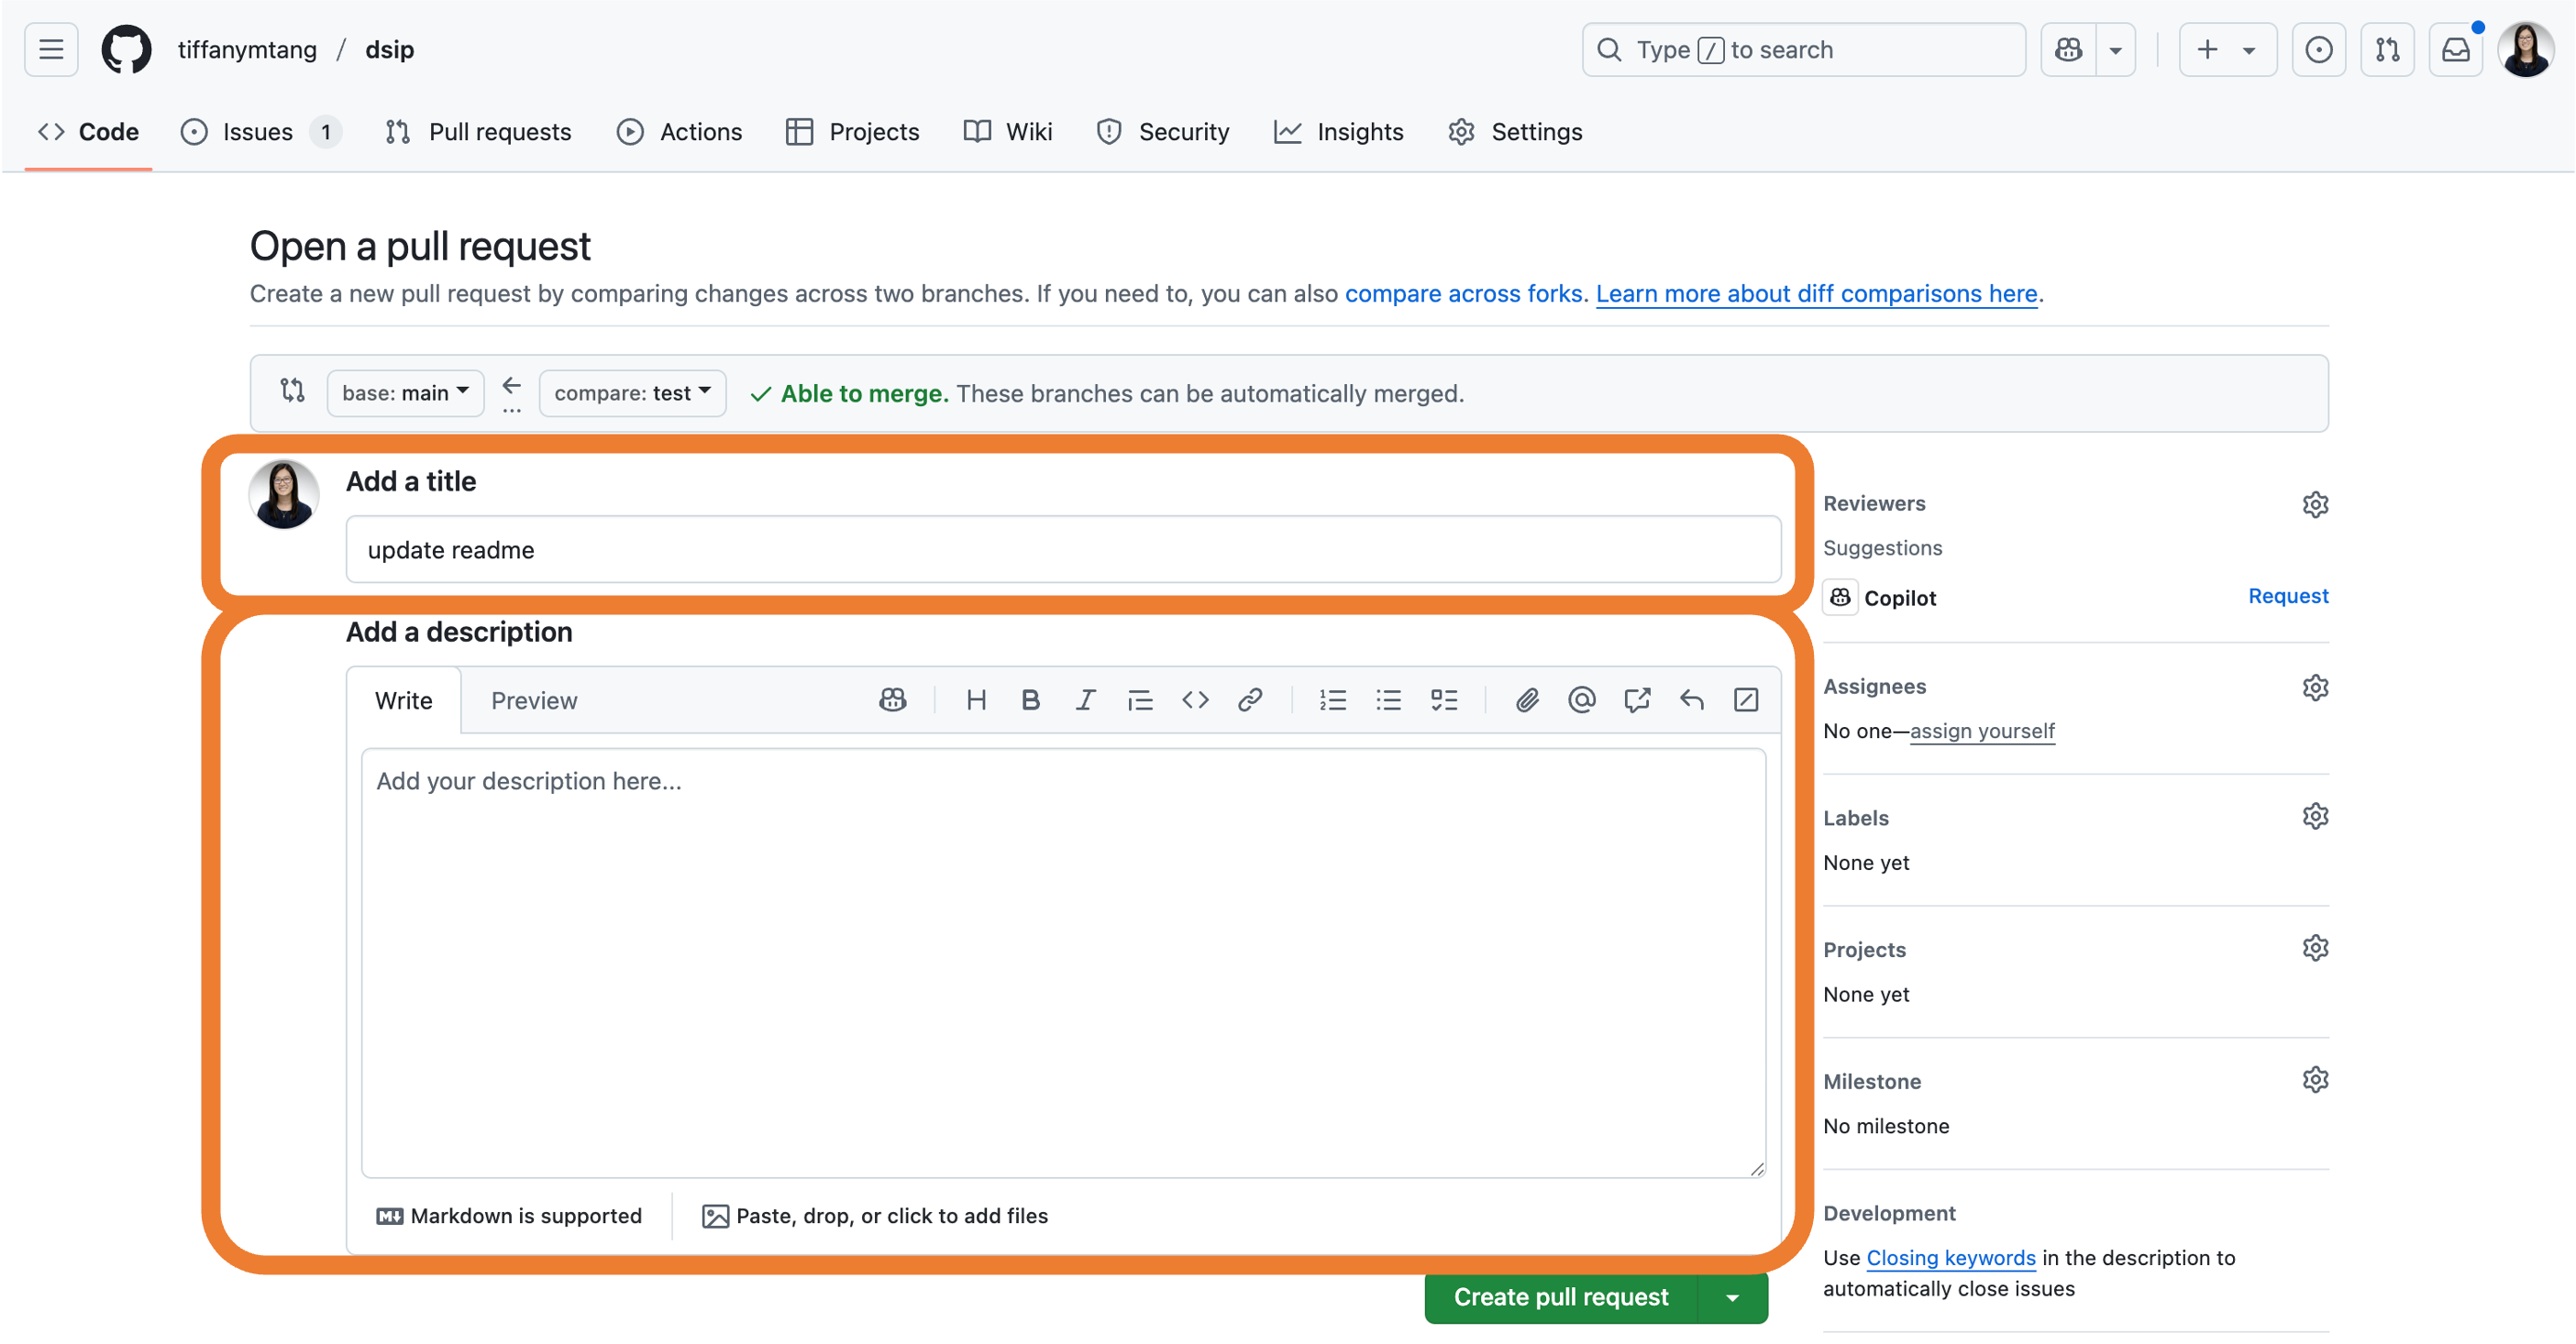
Fill in the title and description of the pull request and click on the green “Create pull request” button.
- If this pull request is related to an issue, you can also link the pull request to the issue by typing “Fixes #
” (or “Closes # ” or “Resolves # ”) in the description. This will automatically close the issue when the pull request is merged. More information about these keywords can be found here. - As when creating an issue, you can also assign the pull request to yourself (or other collaborats) and/or add labels to the pull request (e.g., “bug”, “enhancement”, etc.). This is a good way to keep track of what you are working on and to organize your work.
- Note: you can always edit/revise the title or description after creating the pull request by clicking on the “Edit” button next to the title or the “…” button next to the description.

- If this pull request is related to an issue, you can also link the pull request to the issue by typing “Fixes #

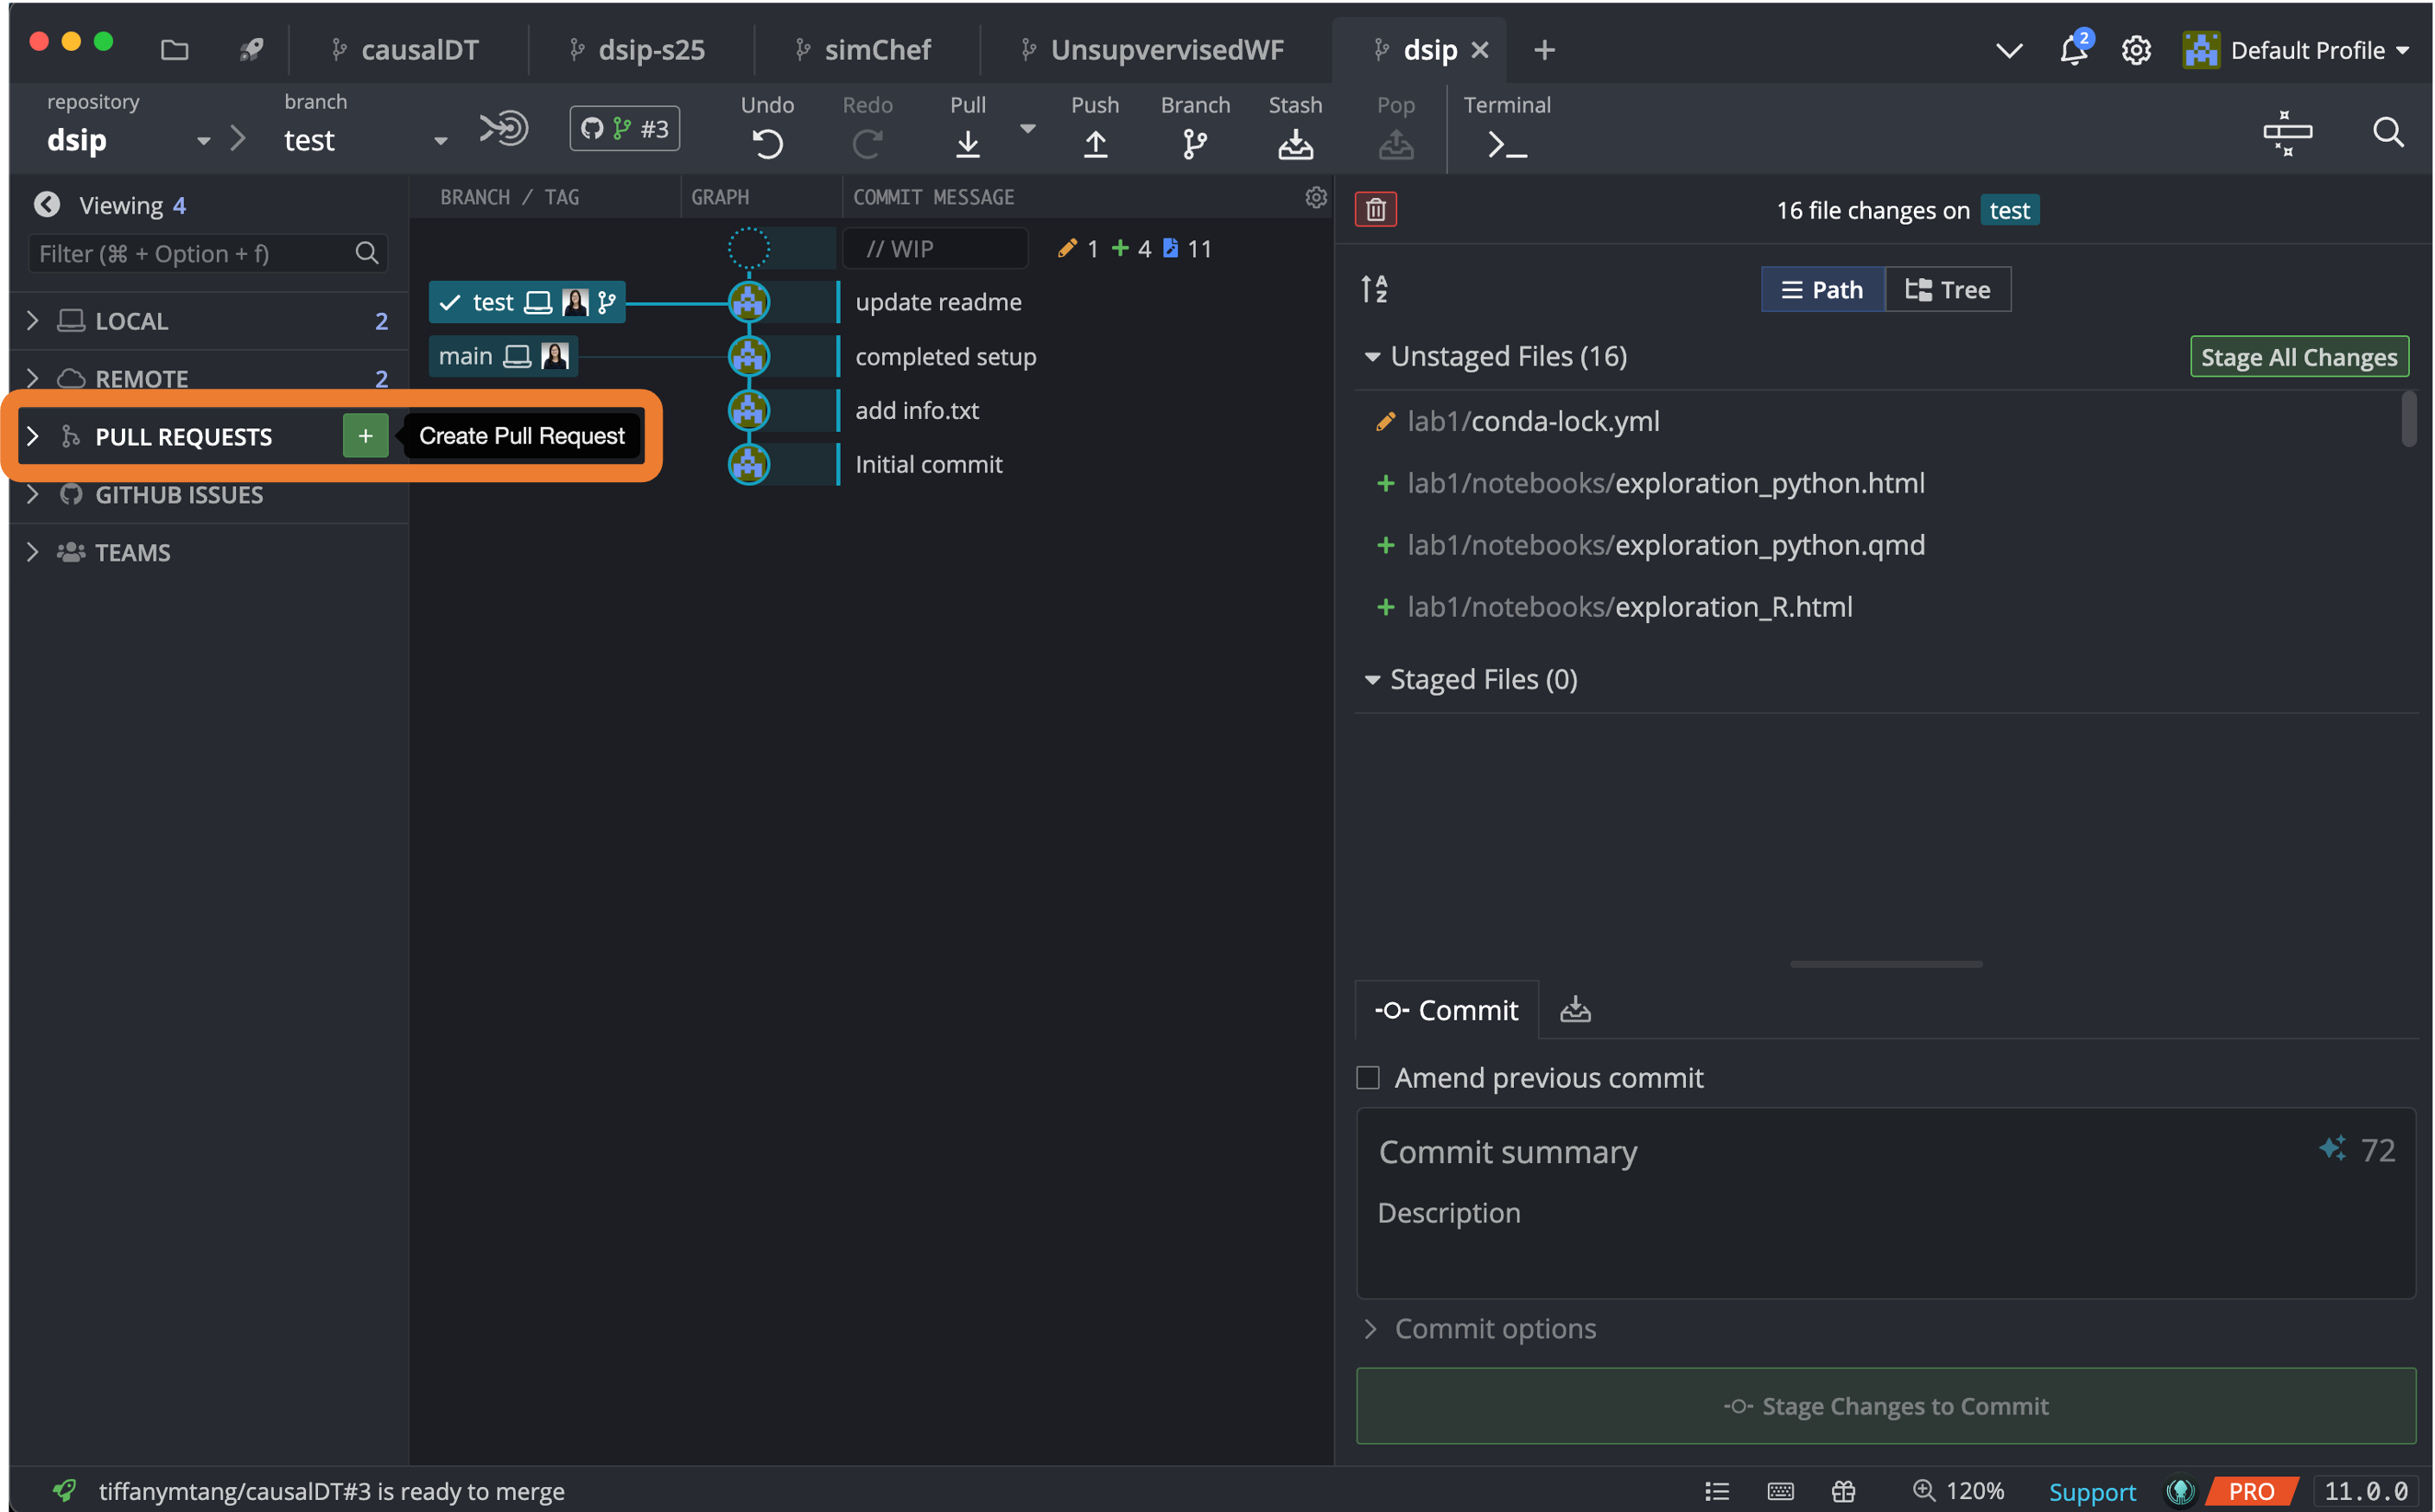
In GitKraken, hover over the “Pull Requests” icon on the left sidebar and then click on the green “+” button.

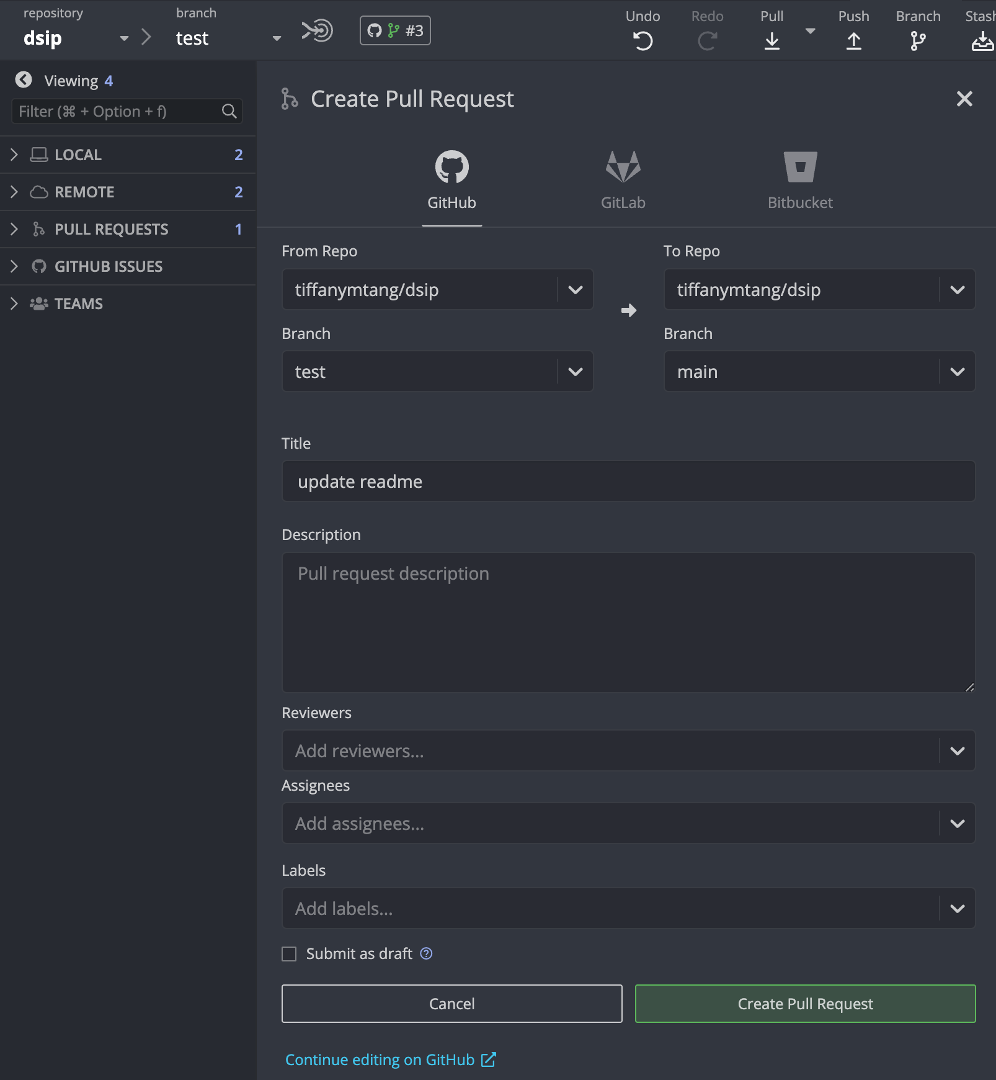
In the pop-up window:
- Under the “From Repo” column, select your new branch from the dropdown menu. Under the “To Repo” column, select the main branch from the dropdown menu. This is because we want to merge the changes from our new branch into the main branch.
- Add an appropriate title and description for this pull request.
- If this pull request is related to an issue, you can also link the pull request to the issue by typing “Fixes #
” (or “Closes # ” or “Resolves # ”) in the description. This will automatically close the issue when the pull request is merged. More information about these keywords can be found here.
- If this pull request is related to an issue, you can also link the pull request to the issue by typing “Fixes #
- You can also add reviewers, assign the pull request to yourself (or other collaborats), and/or add labels to the pull request (e.g., “bug”, “enhancement”, etc.). This is a good way to keep track of what you are working on and to organize your work.

Click on the green “Create Pull Request” button when you are done.
Step 5: Review the pull request
GitHub provides a very nice interface for reviewing the changes made in a pull request.
If you want to see your changes, you can easily view the changes made in the pull request, add comments, and even suggest changes to the code by clicking on the “Files changed” tab at the top of the pull request page on GitHub.com.

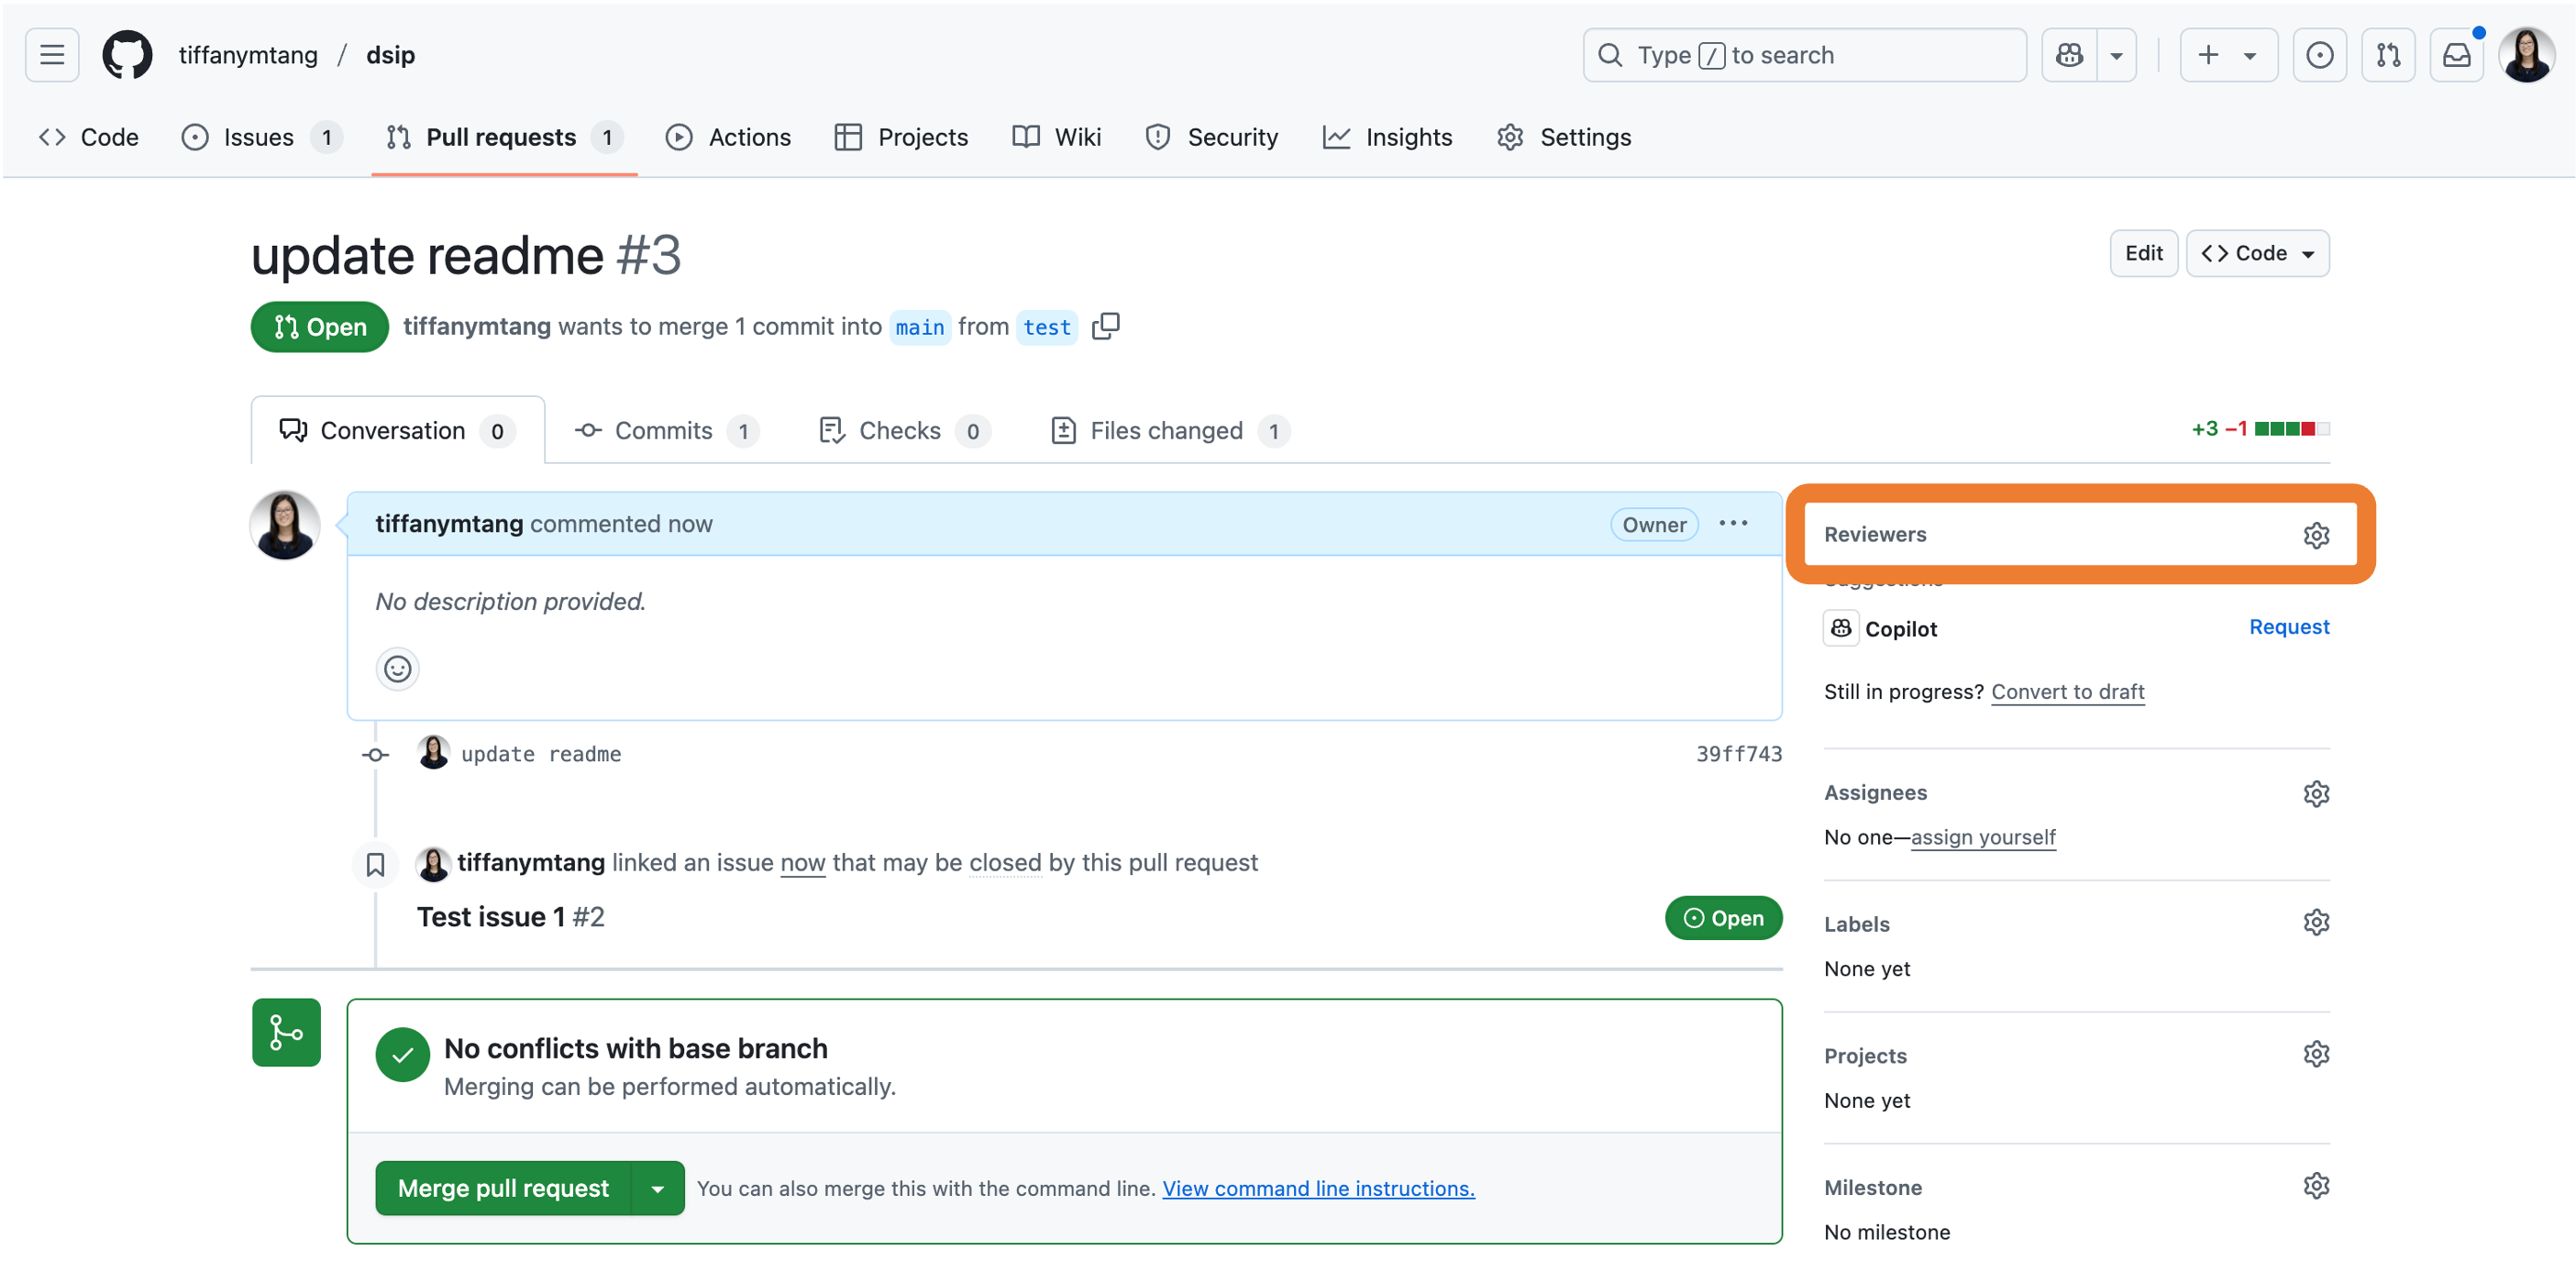
If you would like someone else to review your changes, you can assign reviewers to the pull request by clicking on the “Conversation” tab at the top of the pull request page on GitHub, and then clicking on the gear icon next to “Reviewers” on the right-side panel and select the reviewer(s).


Step 6: Merge the pull request
When you are ready to merge the pull request, click on the green dropdown arrow at the bottom of the conversation thread.
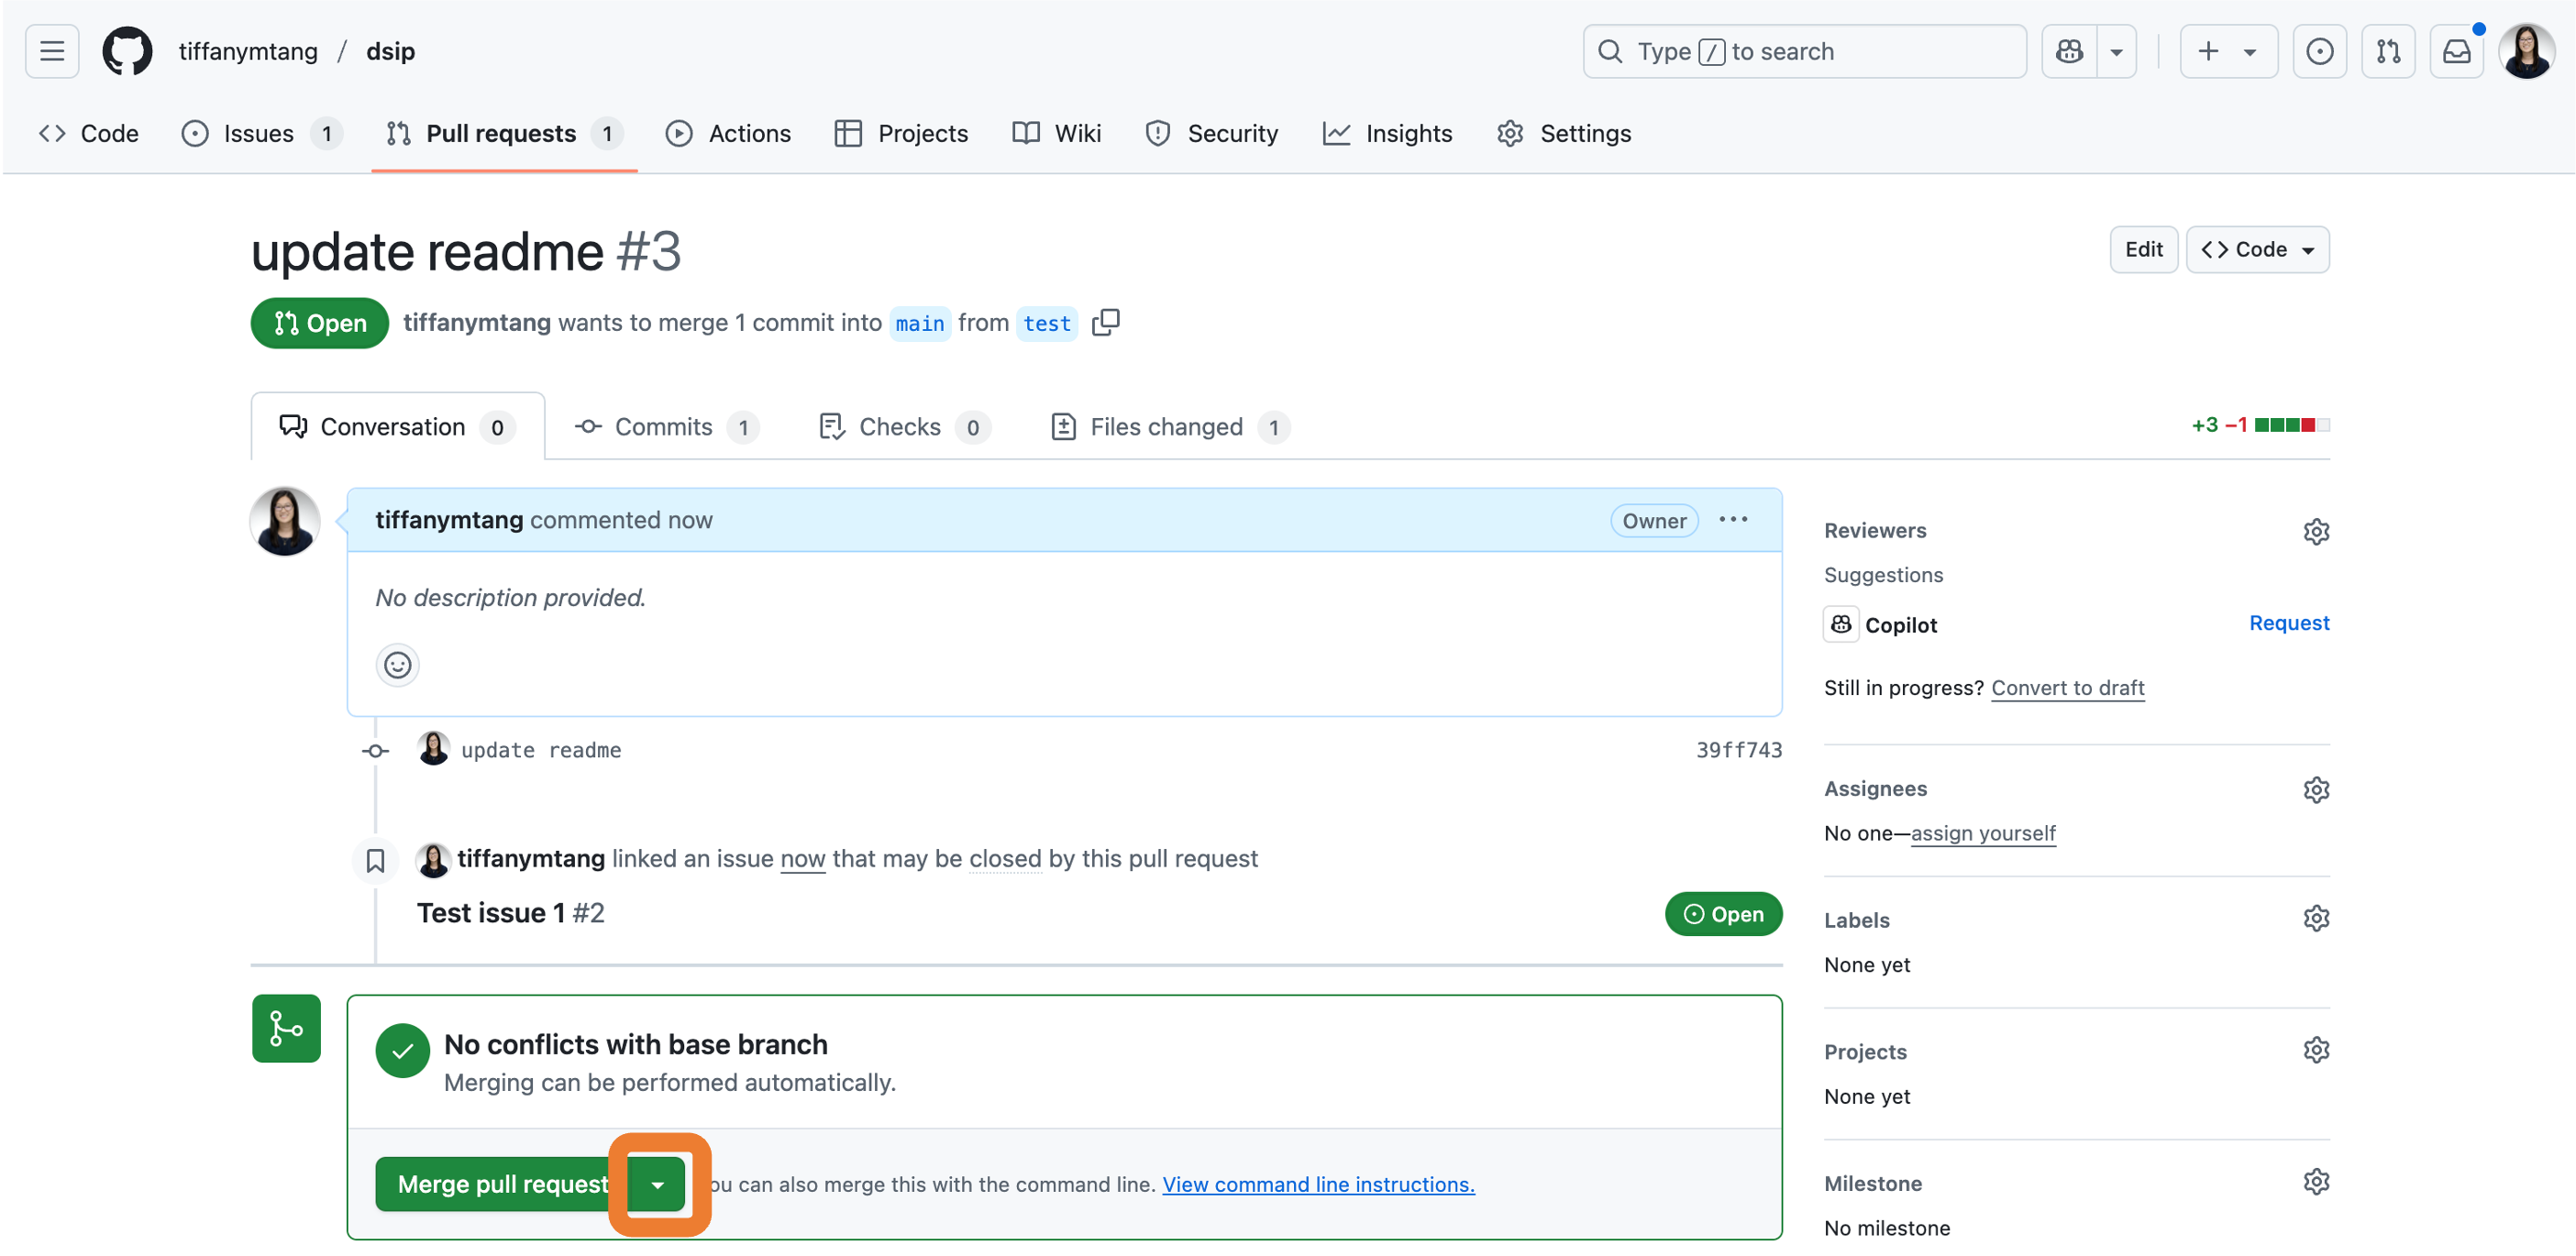
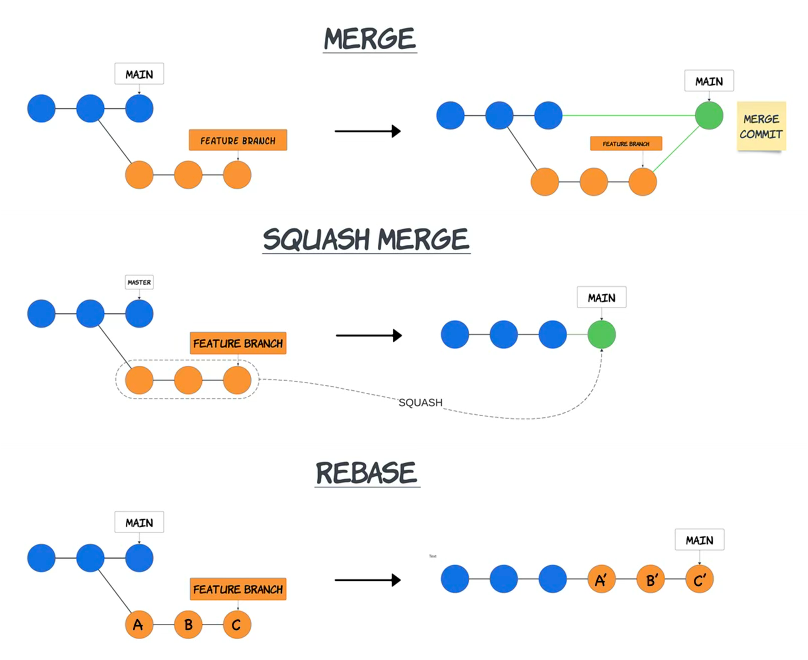
You will have the option to merge your pull request via one of the following:
- “Create a merge commit”: This will keep all commits from the branch and will add each of the separate commits to the base/main branch.
- This is useful if you want to keep a detailed commit history.
- “Squash and merge”: This will combine all of the changes from your new branch into a single commit and then add this commit to the base/main branch.
- This is useful if you want to keep a tidy and simple commit history.
- “Rebase and merge”: This will keep all commits from the branch, but will “rebase” them to make them look like they were created on top of the latest base/main branch.
- This is useful if you want to keep a detailed commit history while also keeping the commit history linear.
Choose the option that best fits your needs, and then click on the green “Confirm merge” button.
If you encounter a merge conflict that prevents the pull request from being merged into the main branch, GitHub will let you know on the pull requests page. To resolve the merge conflict, you will need to manually edit the files that are in conflict and then commit the changes.
To do this, you can follow these steps:
- Click on the “Resolve conflicts” button on the pull request page.
- This will take you to a page that shows the files that are in conflict. You can click on each file to see the changes made in each branch.
- Edit the files to resolve the conflicts. You will need to manually edit the files to keep the changes that you want and remove the changes that you don’t want.
- Once you have resolved the conflicts, click on the “Mark as resolved” button at the bottom of the page.
- This will take you back to the pull request page. You can now click on the green “Commit merge” button to commit the changes and merge the pull request.
More information about merge conflicts can be found here.
Step 7: Delete the branch
Once you have merged the pull request and are done with the branch, you can delete the remote branch by clicking on the “Delete branch” button at the bottom of the pull request page. This will delete the branch on the remote repository, but will not delete the branch on your local computer.

To delete the branch on your local computer, you can do one of the following:
Switch to the main branch (or any branch that isn’t the one you want to delete) by running the following command in your terminal:
git checkout mainDelete your branch by running the following command in your terminal:
git branch -d <branch_name>
- Switch to the main branch (or any branch that isn’t the one you want to delete) by clicking on the “Current Branch” dropdown button and selecting the main branch.
- Click on the “Current Branch” dropdown button again.
- Right-click on the branch that you want to delete and select “Delete…”.
- Switch to the main branch (or any branch that isn’t the one you want to delete) by clicking on the “branch” dropdown button and selecting the main branch.
- Under the “Local” section on the left sidebar, right-click on the branch that you want to delete and select “Delete
”.
Merge Conflicts
If you encounter a merge conflict when pulling changes to your local computer, you will need to resolve the conflicts locally. For most merge conflicts, the following workflow should suffice:
Stash your current changes (if any) by running the following command:
git stashThis will temporarily save your changes and remove them from your working directory. You can retrieve them later by running
git stash pop.Pull the changes from the remote repository by running the following command:
git pullTry to pop your stashed changes by running the following command:
git stash popThis will apply your stashed changes to your working directory.
If there are any conflicts, you will need to resolve them manually (e.g., by opening the files and manually fixing the lines that pose conflicts). Git will mark the lines that are in conflict with special markers (e.g.,
<<<<<<<,=======,>>>>>>>) to indicate the conflicting changes. You will need to edit the file to keep the changes that you want and remove the changes that you don’t want. Git will only consider the conflict resolved once you have removed these conflict markers, so make sure to remove these markers after resolving the conflicts.After resolving the conflicts, you can add (via
git add ...), commit (viagit commit -m "..."), and push (viagit push) the changes to GitHub like usual.
.gitignore
As you begin working on your labs and final project, you will likely generate some files that you do not want to track with git (e.g., data files, temporary files, compiled files, etc.). For example, the .DS_Store file is a hidden “junk” file that is created by macOS and should not be tracked. Python also generates __pycache__ folders when compiling code, and Jupyter notebooks generate .ipynb_checkpoints folders when running notebooks. These files/folders are not necessary to track and will just clutter your repository.
We can instruct git to ignore these files by creating a .gitignore file in our repository. This file contains a list of files and directories that we want git to ignore and never track.
If you followed the R parts of this walkthrough, then a .gitignore file has already been created automatically (by renv). To find this file in your file manager, you will need to show hidden files (i.e., any files that start with .). To reveal hidden files in your file manager, you can press Ctrl+Shift+. (or Cmd+Shift+. on Mac). If a .gitignore has not yet been created, you can create one manually by opening your favorite text editor and saving an empty file with the name .gitignore.
To add the .DS_Store file to the .gitignore file, you can open the .gitignore file in your text editor and add the following line:
*.DS_StoreNote: the
*is a wildcard character that matches any sequence of characters. So*.DS_Storewill match any file that ends with.DS_Store, and thus, adding the above line to your.gitignorewill tell git to ignore all files that end in the extension.DS_Store.
Some other files/folders that you should add to your .gitignore file include:
*/data/*
*__pycache__*
*.ipynb_checkpoints*It is generally best practice to avoid pushing large data files to GitHub repositories; hence, here we are ignoring all files in any data/ folder. Avoid uploading the datasets to GitHub for your labs!
For reference, GitHub has a file size limit of 100 MB per file. Large files close to this limit can dramatically slow down the performance of your repository. If you exceed this limit, bad things usually happen (e.g., losing lots of work, being unable to push new changes, etc).
After these changes, your .gitignore file should look something like this:
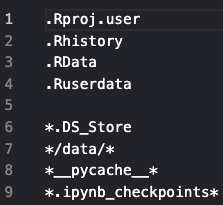
Please save these changes to your .gitignore file. After saving these changes, you can check the status of your repository again to see that many of the files that you previously saw (e.g., .DS_Store, the data files, …) are no longer being tracked by git.
Take one last moment to review all of the files remaining in your git status (or GitHub Desktop/GitKraken status view) are files that you’d like to commit and push to your GitHub repository. If you are satisfied with the files that you see, you can now proceed through the usual GitHub workflow of pulling, adding, committing, and pushing your changes to your GitHub repository.
Troubleshooting
- Git Authentication Error: If you encounter a Git authentication error when trying to push changes to your GitHub repository, this may be an issue with Git Credential Manager (GCM). To fix this, you can try to install Git Credential Manager, which should silently fix the issue. Installation instructions for GCM can be found here.
Git Cheat Sheet
For a quick reference guide to common git/GitHub commands, please refer to this GitHub Cheat Sheet.